- Advantages of a Shared Data Source
- Accessing the Server Shared Data Sources dialog
- Elements of the Server Shared Data Sources dialog
- Elements of the Server Shared Data Source dialog
- Create a Shared Data Source
- Edit a Server Shared Data Source
- Create an Embedded Dataset Based on a Server Shared Data Source
Advantages of a Shared Data Source
- The data connection is reusable so you can use it in multiple reports.
- The information is saved in a separate file in RDSX format that you can access from any report, move to different folders, or rename.
- It provides one place to update the connection for all reports referencing it.
- It supports any data type connection.
There are two types of Shared Data Source in ActiveReports.
Local Shared Data Sources
The local shared data sources are embedded in the application resources or shared through a file system. Local shared data sources can be used in Page or RDL reports. See Working with Local Shared Data Sources for information on how to create a shared data source or modify an existing one.
Server Shared Data Sources
Server shared data sources allow the administrator to create and control access to data sources that are hosted on an instance of ActiveReports Server. You can reference server shared data sources using the DataSourceReference element in Page or RDL reports that are stored and run in ActiveReports Server.
Note: Server Shared Data Sources feature is only available with Professional Edition license.
It is beneficial to use server shared data sources when working with multiple reports referencing the same data. For example, if there is a change in connection properties such as, server name, database name, etc., in case of local shared data sources, you need to open each report and update the connection properties individually. Whereas for reports using the server shared data source, the change is only required in one place.
Server shared data sources allow the administrator to create and control access to data sources that are hosted on an instance of ActiveReports Server. Shared data sources are useful when you have data sources that you use often. Shared data sources make reports and report access easier to manage, and help to keep reports and the data sources more secure. They simplify the process of report designing by allowing them to quickly access shared resources for their reports instead of setting up a new data source each time. You can reference server shared data sources using the DataSourceReference element in Page or RDL reports that are stored and run in ActiveReports Server.
Using shared data sources, you only need to update data source connection properties in one place.
Accessing the Server Shared Data Sources dialog
You can access the Shared Data Source option from the stand-alone designer or the Visual Studio designer. In order to access the server shared data sources, make sure you are connected to ActiveReports Server. See Connecting to ActiveReports Server for further information.
In the Stand-Alone Designer
Access the Server Shared Data Sources dialog from the Server menu of the stand-alone designer.
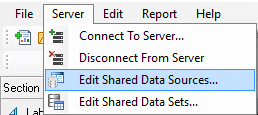
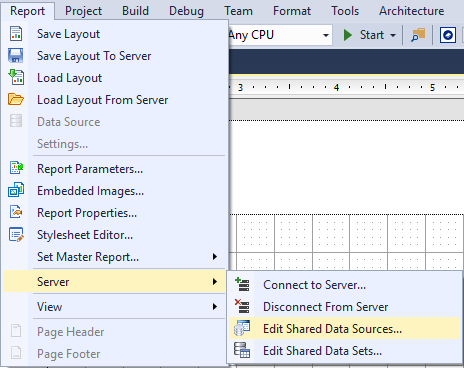
In the Visual Studio Designer
Access the Server Shared Data Sources dialog from the Report menu (Report > Server > Edit Shared Data Sources) of the Visual Studio designer.
Elements of the Server Shared Data Sources dialog
The dialog appears when you click the Shared Data Sources option from the Server menu of the stand-alone designer or Report menu of the Visual Studio designer. Using the options available in this dialog, you can add, edit or refresh a server shared data source.

The Server Shared Data Sources dialog consists of the following elements:
| Elements | Description |
|---|---|
| Add | Opens the Server Shared Data Source dialog, where you can create a new data source using the specified properties for each data type. |
| Edit | Allows you to modify the data source properties of the selected data source. |
| Refresh | Allows you to refresh the list of data sources on ActiveReports Server. |
Elements of the Server Shared Data Source dialog
This dialog appears when you click the Add button on the Server Shared Data Sources dialog. Using the options available in this dialog, you can modify connection properties for each data source type.
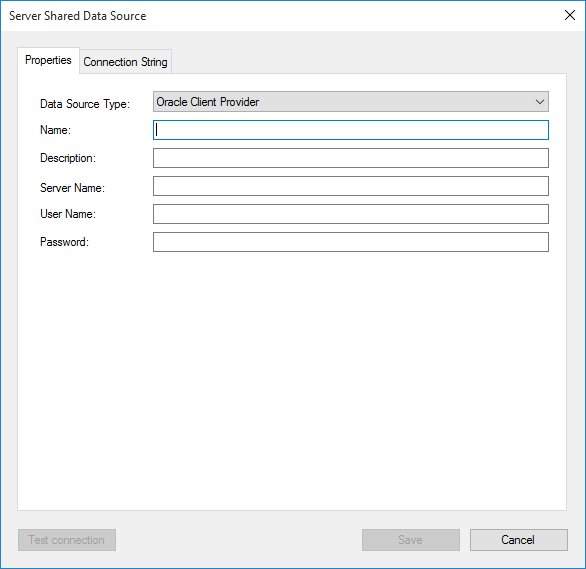
Following are the properties corresponding to each data type.
| Data Source Type | Property Names | Property Description |
|---|---|---|
| Microsoft Sql Client Provider | Name | Enter a name for the data source. This name must be unique within the server. |
| Description |
Allows you to provide a description related to the data source connection. |
|
| Server Name | Enter a SQL server name or URL. | |
| Database Name | Enter the name of the database you want to connect. | |
| Use Windows Authentication | Select this option when you know that any users with a valid Windows account are cleared for access to the data, and you do not want to prompt them for a user name and password. | |
| Use Server Authentication | Select this option to enter a user name and password for server authentication. | |
| User Name | Enter the username to access the database. | |
| Password | Enter the password to log in to the database. | |
| Connection String |
In the Connection String tab, enter a connection string for the data source. The Connection String box displays the connection information based on your server and database connection.
Sample Microsoft Sql Connection String
|
|
| Test connection | Click to verify that the data source connection works using the specified credentials. If the test fails, verify the credentials and server availability. | |
| Oracle Client Provider | Name | Enter a name for the data source. This name must be unique within the server. |
| Description | Allows you to provide a description related to the data source connection. | |
| Server Name | Specify the name of the Oracle server. | |
| User Name | Enter the username to access the database. | |
| Password | Enter the password to log in to the database. | |
| Connection String |
In the Connection String tab, enter a connection string for the data source. The Connection String box displays the connection information based on your server and database connection.
Sample Oracle Connection String |
|
| Test connection | Click to verify that the data source connection works using the specified credentials. If the connection cannot be made, you need to verify your credentials and the server availability. | |
|
Microsoft OleDb Provider JSON Provider CSV Provider |
Name | Enter a name for the data source. This name must be unique within the server. |
| Description | Allows you to provide a description related to the data source connection. | |
|
Connection String |
Enter a connection string for the data source. The Connection String box displays the connection information based on your server and database connection. Sample OleDb Connection String
Sample Odbc Connection String
Sample Xml Connection String
Sample JSON Connection String JSON connection string has two parts - jsondoc and schemadata.
Sample CSV Connection String Path=C:\\Categories.csv;Encoding=utf-7;Locale=en-US;TextQualifier=";
|
|
| Test connection | Click to verify that the data source connection works using the specified credentials. If the connection cannot be made, you need to verify your credentials and the server availability. |
ActiveReports allows ActiveReports Server administrator to work with server shared data sources that are hosted on an instance of ActiveReports Server. The following section explains how the administrator can add or edit server shared data sources using the Server Shared Data Source dialog.
Create a Server Shared Data Source
- Access the Server Shared Data Sources dialog from the stand-alone designer or the Visual Studio designer. See Accessing Server Shared Data Source dialog for more details.
- Connect to ActiveReports Server, if you are not already connected to the server. See Connecting to ActiveReports Server for further information.
- In the Server Shared Data Sources dialog that appears, click Add to create a new data source connection.
- In the Server Shared Data Source dialog that appears, select Data Source Type from the drop-down list. Once you select the Data Source Type, properties corresponding to that data type are listed below.
- Set the properties or enter a connection string to create a data source connection. See Server Shared Data Source dialog for further details.
Note: You can also create a dynamic connection string on the Connection String tab. For example,
="data source=company_sql_server;initial catalog=staff;user id=" + Code.UserContext.GetValue("DbUserId") + ";password=" + Code.UserContext.GetValue("DbUserPassword")
For more information, see UserContext in Multi-Tenant Reports.

- Click the Test Connection button to see if you have successfully connected to the database.
- Click Save to save the data source connection properties and return to Server Shared Data Sources dialog.
Edit a Server Shared Data Source
- Access the Server Shared Data Sources dialog from the stand-alone designer or the Visual Studio designer. See Accessing Server Shared Data Source dialog for details.
- Connect to ActiveReports Server, if you are not already connected to the server. See Connecting to ActiveReports Server for further information.
- In the Server Shared Data Sources dialog that appears, select the data source from the list of data sources, and then click Edit.
- In the Server Shared Data Source dialog that appears, edit the data source connection properties.
- Click Save to save the updated data source connection properties and return to Server Shared Data Sources dialog.
Create an Embedded Dataset Based on a Server Shared Data Source
You can create a Page or an RDL report with a unique dataset based on a server shared data source without having to publish the dataset on the Server each time for every report. Instead, you can embed a dataset based on a Server shared data source in a report you are authoring. You must have the permission Execute and Create Datasets to a data source on ActiveReports Server to perform this operation.
- Connect to ActiveReports Server, if you are not already connected to the server. See Connecting to ActiveReports Server for further information.
- In the Report Explorer, right-click the Data Sources node and select the Add Data Source option or select Data Source from the Add button.
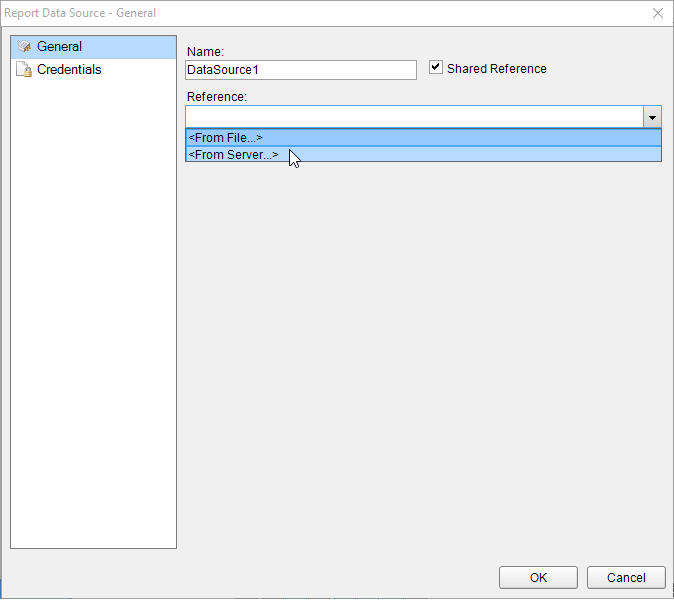
- In the Report Data Source dialog that appears, select the General page and enter the name of the data source. This name appears as a child node to the Data Sources node in the Report Explorer.
- Check the Shared Reference checkbox on.
- Under Reference, from the drop-down list, select From Server...
- In the Server Shared Data Sources dialog that appears, select the data source from the list of data sources, and click OK.
Note: If you do not have the Execute and Create Datasets permission to any data sources on ActiveReports Server, then the Server Shared Data Sources dialog will be empty.
- In the Report Explorer, right-click the server shared data source that you have just added and select the Add Data Set option.
- Add a dataset to the report. See Add a Dataset for details.
See Also