This topic shows how to create an application with a single template layout using the same data as that in Creating an Application Using the Designer (Grid View).
Creating a Template
This example shows how to place a GcMultiRow control on the form of a project and create a template.
If the GcMultiRow control is not registered in the toolbox, please refer to Creating an Application using GcMultiRow.
- Start Visual Studio, and create a new Windows Forms application project.
- In the Properties window, set the Size property of Form1 to (690, 370).
- From the toolbox, select Panel, and drag and drop it onto the form.
- Select the Panel control (for example: Panel1) placed on the form, and perform the following settings in the Properties window.
- Anchor property : Top, Bottom, Left, Right
- Location property : (12, 12)
- Size property : (650, 280)
- From the toolbox, select Button and drag and drop it at the bottom of the form. Place four Button controls in all.
- In the Properties window, set the following values in the Anchor property and Text property of the Button control.
Button control Anchor property Text property Button1 Bottom, Left First Button2 Bottom, Left Next Button3 Bottom, Left Previous Button4 Bottom, Left Last - Select GcMultiRow from the toolbox, and drag and drop it to Panel1.
- Select the GcMultiRow control (for example: GcMultiRow1) that you placed, and then select the Dock in Parent container smart tag.
- Select the GcMultiRow control that you placed, and then select the Add New Template smart tag.
- In the Wizard that gets displayed, click Next.
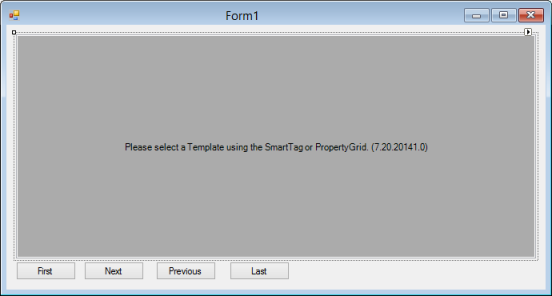
- In Choose a template type, select Empty template.
- Click Finish to exit the Wizard.
- Select the GcMultiRow that you placed, and then select the Edit Template smart tag. Check that the template is displayed.
Using the above steps, you have performed the template settings.
The next step is to create the screen layout.
Placing Cells using the Designer
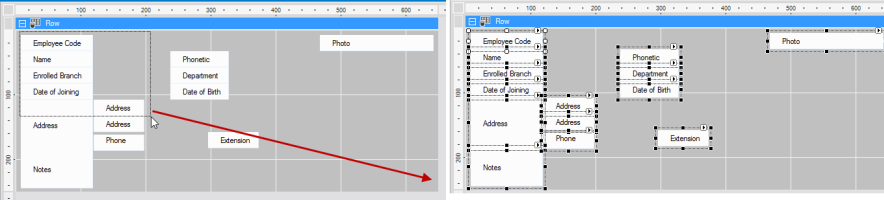
Since the template created in the Wizard is an empty template, you need to place the cells one by one.
- Right click the mouse anywhere in the ColumnHeaderSection1, and select Delete from the context menu.
- Select Row, and set the following settings in the Properties window.
- BackColor property : Silver
- Height property : 250
- Width property : 650
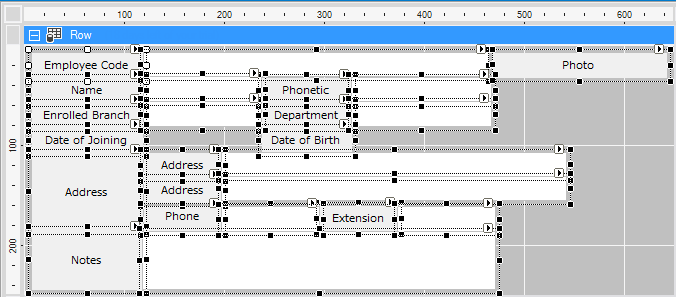
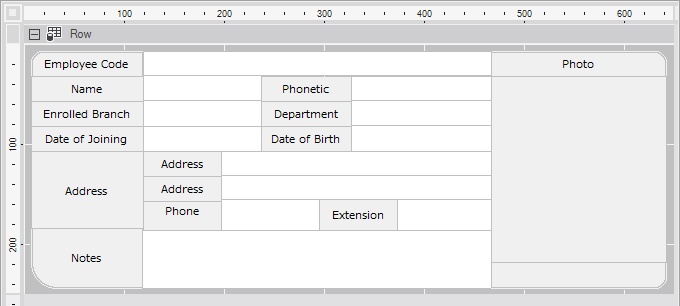
- Add a RowHeaderCell to the template from the toolbox, and set the following values to each of its properties.
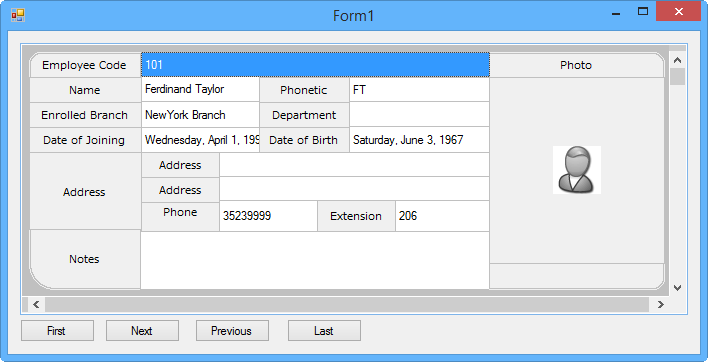
Name property Location property Size property Text property RowHeaderCell1 8, 8 111, 25 Employee Code RowHeaderCell2 8, 33 111, 25 Name RowHeaderCell3 238, 33 90, 25 Phonetic RowHeaderCell4 8, 58 111, 25 Enrolled Branch RowHeaderCell5 238, 58 90, 25 Department RowHeaderCell6 8, 83 111, 25 Date of Joining RowHeaderCell7 238, 83 90, 25 Date of Birth RowHeaderCell8 8, 108 111, 78 Address RowHeaderCell9 120, 108 78, 25 Address RowHeaderCell10 120, 133 78, 25 Address RowHeaderCell11 120, 158 78, 29 Phone RowHeaderCell12 296, 156 78, 30 Extension RowHeaderCell13 8, 185 111, 60 Notes RowHeaderCell14 475, 8 175, 25 Photo -
Select all the cells using drag and drop.
- Set the following settings in the Properties window.
- FlatStyle property: Flat
- ResizeMode property: None
- SelectionMode property: None
- ShowIndicator property: False
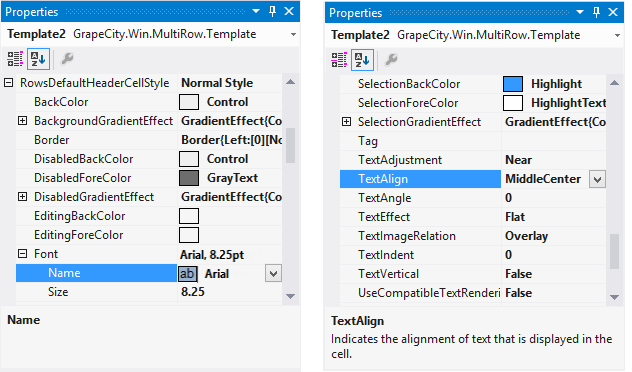
- Select Template1 from the drop-down list in the Properties window, and set the following settings.
- RowsDefaultHeaderCellStyle.Font.Name : Arial
- RowsDefaultHeaderCellStyle.TextAlign : MiddleCenter
- From the toolbox, add TextBoxCells to the template and set the following values in each of its properties.
Name property Location property Size property TextBoxCell1 120, 8 348, 24 TextBoxCell2 120, 32 118, 25 TextBoxCell3 328, 33 140, 25 TextBoxCell4 120, 57 118, 26 TextBoxCell5 328, 57 140, 25 TextBoxCell6 198, 156 98, 31 TextBoxCell7 198, 108 270, 24 TextBoxCell8 198, 132 270, 24 TextBoxCell9 374, 156 94, 31 TextBoxCell10 119, 187 349, 58 - Select all by clicking the TextBoxCell, while holding down the Ctrl key, and set the following settings in the Properties window.
- Style.BackColor property: White
- From the toolbox, add a DateTimePickerCell to the template and set the following values in each of its properties.
Name property Location property Size property DateTimePickerCell1 120, 83 118, 25 DateTimePickerCell2 328, 82 140, 26 - Select all by clicking the DateTimePickerCell, while holding down the Ctrl key, and set the following settings in the Properties window.
- ShowDropDownButton property: NotShown
- Style.BackColor property: White
- From the toolbox, add an ImageCell to the template and set the following values in each of its properties.
Name property ImageLayout property Location property Size property Style.BackColor property ImageCell1 Stretch 468, 33 175, 186 Control - From the toolbox, add a LabelCell to the template and set the following values in each of its properties.
Name property Location property Size property Style.BackColor property LabelCell1 468, 219 175, 26 Control 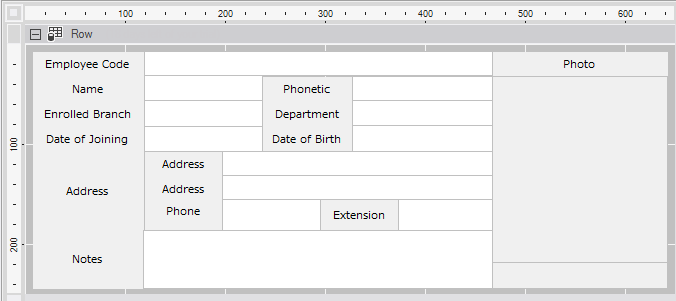
Using the above steps, you have placed cells in the template.
Setting the Cell Border
Use the following steps to set the borders of the cells that you placed on the template.
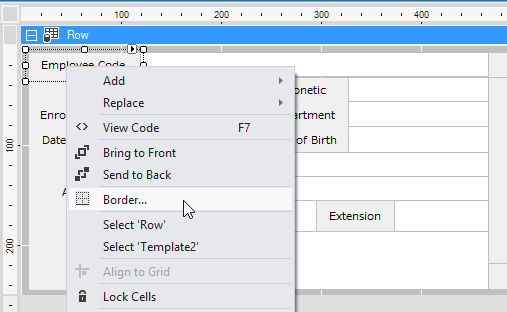
- Right click on RowHeaderCell1, and select Border from the Context Menu.
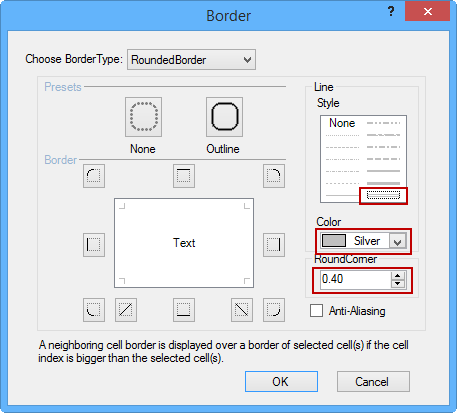
- In Choose Border Type of the Border dialog, set RoundedBorder.
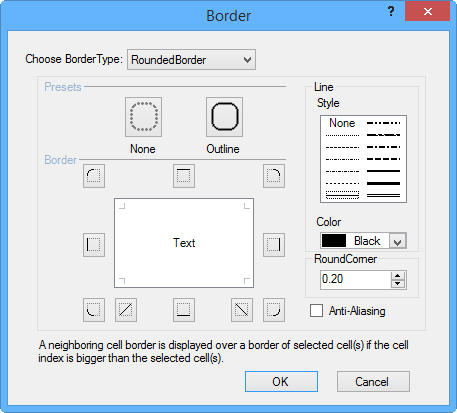
- Set the following values for each item.
- Style: Double
- Color: Silver
- RoundCorner: 0.40
- Using the border buttons, set the left, top, and top-left borders.
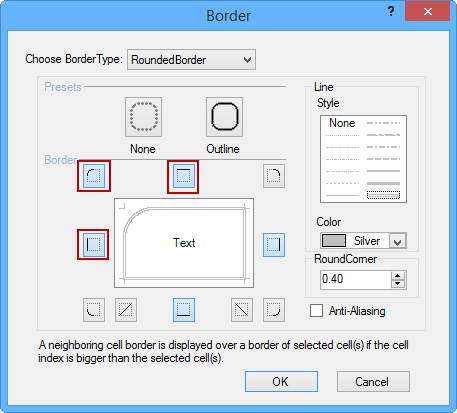
- Change the Style to Thin, and set the right and bottom borders.
- If you close the Borders dialog by clicking the OK button, rounded borders are set on the top left.

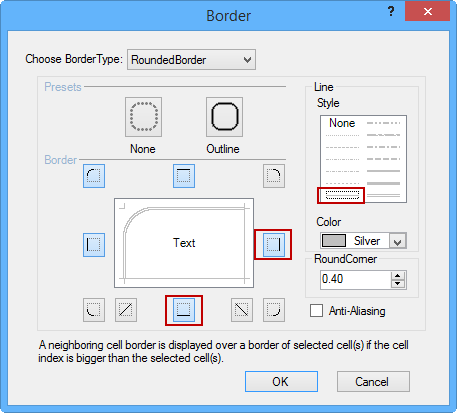
- Use the same steps to set border related settings for other cells.
Using the above steps, you have set the cell borders.
Connecting to the Database
Next, follow the steps below to set the connection settings of the database. For more information on how to add a data source, refer to Creating an Application Using the Designer (Grid View).
- After Employees has been added to the Data Sources window of Visual Studio, set the following values for the DataField property of each cell placed in the rows.
Cell Name DataField Property Values textBoxCell1 Employee Code textBoxCell2 Name textBoxCell3 Phonetic textBoxCell4 Enrolled Branch textBoxCell5 Department dateTimePickerCell1 Date of Joining dateTimePickerCell2 Date of Birth textBoxCell6 Address textBoxCell7 Address textBoxCell8 Phone textBoxCell9 Extension imageCell1 Photo - Click the View - Other Windows - Data Sources menu of Visual Studio.
- Select the Employees table under SampleDataSet, from the tree in the Data Sources window, and drag and drop it into the area of the GcMultiRow control.

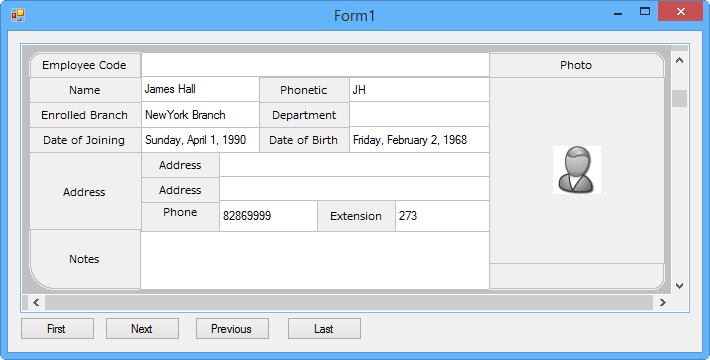
- If you run the project, the values of the data source are loaded into the grid.
Using Code
The code below implements the single template view by changing the size of the GcMultiRow control, when the size or zoom of GcMultiRow control is changed.
[VB]
Private Sub Form1_Load(sender As System.Object, e As System.EventArgs) Handles MyBase.Load EmployessTableAdapter.Fill(SampleDataSet.Employees) GcMultiRow1.MultiSelect = False GcMultiRow1.AllowUserToAddRows = False GcMultiRow1.ScrollBars = ScrollBars.None GcMultiRow1.DataSource = EmployeesBindingSource UpDataGcMultiRowBounds() End Sub Private Sub UpDataGcMultiRowBounds() If Me.gcMultiRow1.Template Is Nothing OrElse Me.gcMultiRow1.Rows.Count &< 1 Then Return End If ' Setting the size of MultiRow Dim mrWidth As Integer = Me.gcMultiRow1.SectionWidth Dim mrHeight As Integer = Me.gcMultiRow1.Rows(0).Height ' Zoom mrWidth = CType(Math.Ceiling(mrWidth * Me.gcMultiRow1.ZoomFactor), Integer) mrHeight = CType(Math.Ceiling(mrHeight * Me.gcMultiRow1.ZoomFactor), Integer) ' Border Size Zoom mrWidth += 4 mrHeight += 4 ' Fit to Panel size If mrWidth > Me.panel1.Width Then mrWidth = Me.panel1.Width End If If mrHeight > Me.panel1.Height Then mrHeight = Me.panel1.Height End If Me.gcMultiRow1.Size = New Size(mrWidth, mrHeight) ' Placement position Dim x As Integer = (Me.panel1.Width - mrWidth) / 2 Dim y As Integer = (Me.panel1.Height - mrHeight) / 2 ' Adjustment of the position If x &< 0 Then x = 0 End If If y &< 0 Then y = 0 End If Me.gcMultiRow1.Location = New Point(x, y) End Sub Private Sub gcMultiRow1_ZoomFactorChanged(ByVal sender As Object, ByVal e As EventArgs) Handles GcMultiRow1.ZoomFactorChanged Me.UpDataGcMultiRowBounds() End Sub Private Sub GcMultiRow1_Resize(sender As System.Object, e As System.EventArgs) Handles GcMultiRow1. Resize Me.UpDataGcMultiRowBounds() End Sub |
[CS]
private void Form1_Load(object sender, EventArgs e)
{
EmployeesTableAdapter.Fill(sampleDataSet.Employees);
gcMultiRow1.Template = new Template1();
gcMultiRow1.MultiSelect = false;
gcMultiRow1.AllowUserToAddRows = false;
gcMultiRow1.ScrollBars = ScrollBars.None;
gcMultiRow1.DataSource = EmployeesBindingSource;
UpDataGcMultiRowBounds();
}
private void UpDataGcMultiRowBounds()
{
if (gcMultiRow1.Template == null || gcMultiRow1.Rows.Count <1)
{
return;
}
// Set the size of MultiRow
int mrWidth = gcMultiRow1.SectionWidth;
int mrHeight = gcMultiRow1.Rows[0].Height;
// Zoom mrWidth = (int)Math.Ceiling(mrWidth * gcMultiRow1.ZoomFactor);
mrHeight = (int)Math.Ceiling(mrHeight * gcMultiRow1.ZoomFactor);
// Border Size
mrWidth += 4; mrHeight += 4;
// Fit to Panel size
if (mrWidth > panel1.Width)
{
mrWidth = panel1.Width;
}
if (mrHeight > panel1.Height)
{
mrHeight = panel1.Height;
}
gcMultiRow1.Size = new Size(mrWidth, mrHeight);
// Placement position
int x = (panel1.Width - mrWidth) / 3;
int y = (panel1.Height - mrHeight) / 2;
//Adjustment of the position
if (x < 0)
{
x = 0;
}
if (y < 0)
{
y = 0;
}
gcMultiRow1.Location = new Point(x, y);
}
private void gcMultiRow1_ZoomFactorChanged(object sender, EventArgs e)
{
UpDataGcMultiRowBounds();
}
private void gcMultiRow1_Resize(object sender, EventArgs e)
{
UpDataGcMultiRowBounds();
}
|
In addition, the following code switches the the display data, by setting the ScrollActions property in the Click event of the Button.
[VB]
Private Sub Button1_Click(sender As System.Object, e As System.EventArgs) Handles Button1.Click ' Move to the first page ScrollActions.VerticalScrollToFirstPage.Execute(GcMultiRow1) End Sub Private Sub Button2_Click(sender As System.Object, e As System.EventArgs) Handles Button2.Click ' Move to the previous page ScrollActions.ScrollUp.Execute(GcMultiRow1) End Sub Private Sub Button3_Click(sender As System.Object, e As System.EventArgs) Handles Button3.Click ' Move to the next page ScrollActions.ScrollDown.Execute(GcMultiRow1) End Sub Private Sub Button4_Click(sender As System.Object, e As System.EventArgs) Handles Button4.Click ' Move to the the last page ScrollActions.VerticalScrollToLastPage.Execute(GcMultiRow1) End Sub |
[CS]
using GrapeCity.Win.MultiRow;
private void Form1_Load(object sender, EventArgs e)
{ b
utton1.Click += new EventHandler(button1_Click);
button2.Click += new EventHandler(button2_Click);
button3.Click += new EventHandler(button3_Click);
button4.Click += new EventHandler(button4_Click);
}
private void button1_Click(object sender, EventArgs e)
{
// Move to the first page
ScrollActions.VerticalScrollToFirstPage.Execute(gcMultiRow1);
}
private void button2_Click(object sender, EventArgs e)
{
// Move to the previous page
ScrollActions.ScrollUp.Execute(gcMultiRow1);
}
private void button3_Click(object sender, EventArgs e)
{
// Move to the next page
ScrollActions.ScrollDown.Execute(gcMultiRow1);
}
private void button4_Click(object sender, EventArgs e)
{
// Move to the the last page
ScrollActions.VerticalScrollToLastPage.Execute(gcMultiRow1);
}
|
If you run the project, the layout is displayed in a single template view.