Administrators can modify permissions to data models, reports, and shared schedules by assigning rights to a role. Once a role has permission to use a model, report, or shared schedule, all users added to that role have the same permission.
Table defining what permissions are granted for each combination of settings for reports and models
| Permission Setting | Model: Read | Model: Create Report | Model: None |
|---|---|---|---|
| Report: None | No operations | No operations | No operations |
| Report: Read | Preview only | Create a copy of report and modify the copy | Preview only |
| Report: Read & Modify | Preview, delete, and modify report | Preview, delete, and modify report | Preview and delete report |
| Report: Full | Preview, delete, and modify report Change access |
Preview, delete, and modify report Change access |
Preview and delete report Change access |
To manage permissions to a model
You can grant read or read and create permission to different roles for each model.
Allow or deny read permission to a model
- From the Administrator Dashboard, select Models.
- On the Models page, select a model from the list, and then click the model properties button to display the properties.
- In the Change Permissions section, next to each role, drop down the box to select whether to grant Read permission, Create Report, or None to hide the model from users in that role.
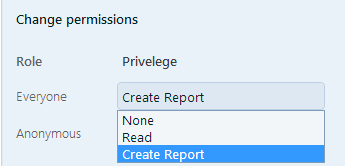
- The selected roles have permission to read or read and create reports on the model.
To manage permissions to a report
You can grant different roles permission to read, modify, or change permissions on each report. The Owner of the report (the user who created or uploaded it) has full permission which cannot be modified.
Allow or deny read, modify, or change permissions
- From the Administrator Dashboard, select Reports.
- On the Reports page, select a report from the list, and then click Permissions button.
- In the Change permissions dialog that appears, next to each role, drop down the box to select whether to allow its users Read, Read & Modify, or Full permissions on the report, or None to hide the report from users in that role.
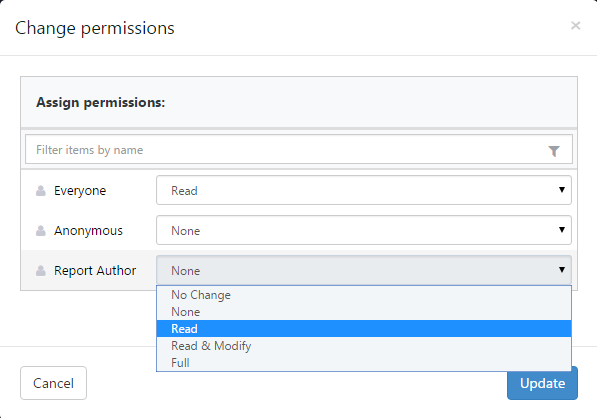
- Read allows users in the role to see the report in the Report Portal Open page and preview the rendered report, but does not allow them to modify it in the Report Portal.
- Read & Modify allows users in the role to modify the report in the Report Portal in addition to Read permissions.
- Full allows users in the role to modify permissions on the report in addition to Read & Modify permissions.
- Click the Update button to save the changes. All users in the selected roles are granted the specified access.
To change ownership of a report
By default, the user who created or uploaded the report has full permission to it. The Owner role always has full permission to the report, so the only way to change that is to change ownership by deleting the report and having a new owner upload it to the server.
Change ownership
- From the Administrator Dashboard, select Reports.
- On the Reports page, next to the report for which you want to change ownership, click Download report button. The RDLX file of the report is copied to your local machine.
- Next to the same report, click Delete. In the message box that appears, click Yes to confirm that you want to delete the report. The report is removed from the server.
- Log in with a new user.
- On the Reports page, click the Upload report button.
- In the Upload an existing report dialog, you can either drop a report file or click inside the dotted box to browse to a report file.
- In the Open dialog that appears, navigate to the report and click Open. The dialog closes and the file name appears in the dotted box.
- Click Upload. The report appears in the list with the new owner listed under the Created By column.
To manage permissions to a data source
- From the Administrator Dashboard, select Data Sources.
- On the Data Sources page, select the data source for which you want to manage permissions, and then click the data source properties button to display the properties.
- In the Change permissions section that appears, next to each role, drop down the box to select whether to allow its users Execute or Execute and Create Datasets permissions on the report.
- Execute allows a user to view reports based on this data source.
-
Execute and Create Datasets allows a user to view reports based on this data source AND create embedded datasets in his/her new or modified reports.
Note: Users must have the Execute and Create Datasets permission to access the Server Shared Data Sources in ActiveReports.
To manage permissions to a shared schedule
You can grant different roles the permission to use shared schedules to schedule reports to run. You can also set options in the Delivery section to allow or prevent users from changing the settings. For more information, see Managing Schedules.
Allow or deny read, modify, or change permissions
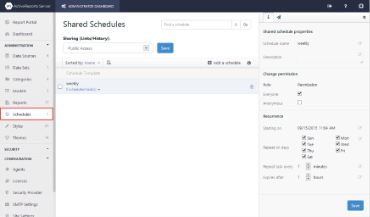
- From the Administrator Dashboard, select Schedules.
- On the Schedules page, select the schedule on which you want to set permissions, and then click the schedule properties button to display the properties.
- In the Change permission section, next to each role, select the checkbox for each role whose users you want to allow to schedule reports. By default, Everyone is allowed to schedule reports, so clear that checkbox to limit permissions to your selected roles.
- Click Save.
To manage permissions to printers
You can grant different roles the permission to use a printer to schedule report printing. For more information, see Managing Schedules and Managing Printers.
Allow or deny read, modify, or change permissions
- From the Administrator Dashboard, select Printers.
- On the Printers page, select the printer on which you want to set permissions, and then click the print permissions button to display the properties.
- In the Change permissions section that appears, next to each role, select the checkbox for each role whose users you want to allow to schedule report printing jobs.
- Click Save.