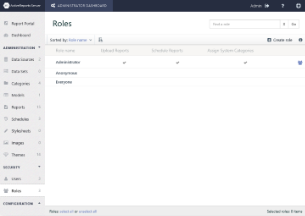
All permissions are granted to a Role. To grant permission to users, add the user to one or more roles. By default, four roles are configured. These roles cannot be deleted, but you can add new roles to the list.
- Administrators contains users with the permission to enter the Administration area.
- Anonymous contains no users, but it allows users to work with the Report Portal without credentials.
- Everyone By default, the Everyone role is assigned to each new user. The Administrator can also enable or disable the Everyone role from the Site Settings page of the Administrator dashboard. Once you disable the Everyone role, a user who created a report while belonging only to that role loses the ability to assign or revoke permissions of that report even if their new role has Full permissions for the report. Also, if this role is disabled, it is not visible to users on the report Information tab (Permissions section) located to the right of a selected report on the Report portal.
- Owner contains the user who originally created or uploaded the report. By default, this is the only role with full permissions on a newly created or uploaded report.
To create a new role
You can add as many roles as you need to the list. Then if you decide to grant permission for a report or model to an entire department, you can make the change once instead of for each individual.
- In the Security section of the Administrator Dashboard, click Roles.The Roles list appears.
-
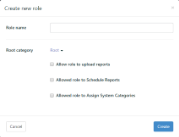
From the Roles page, click Create role button. The Create new role dialog appears.
- In the Role Name box, enter a name for the new role.
- Select the Root category that you want to assign to the role.
- If you want to allow the role to upload reports, select the Allow role to upload reports check box.
- If you want to allow the role to schedule reports, select the Allow role to schedule reports check box.
- If you want to allow the role to assign system categories, select the Allow role to Assign System Categories check box.
- Click Create role. The new role is added to the list, with an extra command that allows you to delete it. To begin using the role, add users to it. To add more permissions, see Managing Permissions.
To add a user to a role
When you create a new role, it has no users.
- In the Security section of the Administrator Dashboard, click Roles.
- In the Roles list that appears, to the right of the role to which you want to add a user, click the Manage users command. The Manage users dialog appears.
- In the Manage users dialog, select check boxes next to users to assign them to the role.
Note: To remove a user from the role, clear the corresponding check box. You cannot add or remove users from the Owner role, which has a user for each report based on the Created By value for that report. - Click the Update button to save the changes.
To grant permission to upload reports
By default, only the Administrator role has permission to upload reports.
- In the Security section of the Administrator Dashboard, click Roles.
- On the Roles page, select a role from the list, and then click the role properties button to display the Role properties.
- In the Role permission section, select the Upload Reports checkbox. All users assigned to the role are able to upload reports.
To grant permission to schedule reports
By default, only the Administrator role has permission to schedule reports.
- In the Security section of the Administrator Dashboard, click Roles.
- On the Roles page, select a role from the list, and then click the role properties button to display the Role properties.
- In the Role permission section, select the Schedule Reports checkbox. All users assigned to the role are able to schedule reports.
To grant permission to assign system categories
By default, only the Administrator role has permission to assign system categories.
- In the Security section of the Administrator Dashboard, click Roles.
- On the Roles page, select a role from the list, and then click the role properties button to display the Role properties.
- In the Role permission section, select the Assign System Categories checkbox. All users assigned to the role are able to assign system categories.
To delete a role
- In the Security section of the Administrator Dashboard, click Roles.
- In the Roles list that appears, to the right of the role that you want to delete, click the Delete role button.
- If the role does not contain any users, it is removed from the list immediately. If the role does contain users, you are asked to confirm.
- Click OK to delete the role.
You can grant other permissions to reports and models by selecting roles to allow for each individual report and each model. See Managing Permissions for more information.

