These are some additional notes about setting properties of cells in particular. There are several ways to set the properties of an individual cell in the Spread Designer. The first step is selecting a cell. For information on selecting a cell, refer to Selecting an Item in the Spread Designer.
If you are setting cell types for a given cell or range of cells, use the cell types right-click menu or the Cell Types option in the Home menu to quickly apply the cell type. In the Cell Types option, there is a separate button or icon for each cell type.
When you set a cell to be a Label cell, the cell becomes locked. If you then clear this cell so that it is no longer a Label cell, the Locked property is still set, so you need to unlock these cells to reset them completely.
With a range of cells selected, you can perform any of these operations available from the context menu.
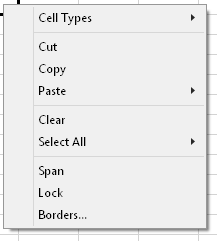
This context menu has the following items:
| Context Menu Choice | Description and Reference |
|---|---|
| Cell Types | You can select the cell type for the cells in this row or column. For more information, refer to Cell Type Dialog. |
| Cut, Copy, Paste | These Clipboard operations handle the contents of the cells and cut, copy, and paste as expected. |
| Clear | Removes the contents of all the cells in the selected row or column but does not affect the header cells. |
| Select All | Allows you to select the entire sheet, all the cells in the data area, or all the cells with data. |
| Span | Automatically sizes the row or column to fit the contents by adjusting either the row height or column width. |
| Lock | You can lock a row and column of cells so that the user cannot edit them. |
| Borders | Runs the Border Editor to allow you to edit the borders of the cells. For more information, refer to Border Editor. |
For information on putting a formula in a cell, refer to Entering a Formula in Spread Designer.
For information on how to select a cell, refer to Selecting an Individual Cell. For information on how to select a range of cells, refer to Selecting a Contiguous Range of Cells.
For more tasks in Spread Designer, return to Designing in the Data Area.