In this tutorial, you will see how C1Query enables end users to pose queries spanning multiple database tables, and learn how to use the Schema Designer to specify a schema describing the database, its tables and inter-table relationships. Complete the following steps:
-
Repeat steps 1–3 of Tutorial 1, or just copy the Tutorial 1 project to another directory (if you copied the project, return the C1Query1 control FilterMode property setting to its default: False and clear theDataSourceproperty).
Set the C1QueryFrame1 control FullFieldNames property to True.
-
Add one more Command button to the form. Change the caption of the first button to “Apply Query”, the caption of the second button – to “Show SQL”. Add the following code to the buttons’ Click event:
Example Title Copy CodePrivate Sub Command1_Click() OK = C1Query1.BuildSQL If OK Then Adodc1.CommandType = adCmdText Adodc1.RecordSource = C1Query1.SQL Adodc1.Refresh Set DataGrid1.DataSource = Adodc1 End If End Sub Private Sub Command2_Click() C1Query1.BuildSQL MsgBox C1Query1.SQL End Sub -
Press the right mouse button over the C1Query1 control and select Schema Designer from the context menu. ComponentOne Query Schema Designer opens.
-
In the Schema Designer, select Import database structure from the Schema menu. That will open the Import Wizard dialog box.
-
In the Import Wizard dialog box, specify the connection string to connect to the NWIND.MDB database. Use the standard DataLink Properties dialog box that can be opened by pressing the ellipsis button to the right of the connection string edit box, or just enter the following string:
Example Title Copy CodeProvider=Microsoft.Jet.OLEDB.4.0;Data Source=C:\Program Files\Microsoft Visual Studio\VB98\Nwind.mdb;Persist Security Info=False
-
Press the Next button. On the Import Wizard’s second step, press the >> button moving all table names from Available tables to Create views. Press Finish. This will create a schema based on the database structure information.
-
Now take some time to explore the schema. You can see that a schema is created, three palette windows on the sides: Folders, Views and Relationships, originally empty, are now filled with information. You can double click on objects in these palettes, opening editors (designers) for each object.
-
For each database table, there is a view in the imported schema. By default, a C1Query view is essentially the same as a database table, but, in general, you can create multi-table views and add other enhancements – see Tutorial 4 - C1Query Schema Features.
For each database table, there is also a folder in the imported schema. Folders form a layer between the end user and database structure. They isolate the user from cryptic field names and other complexities of database structure. By default, after import, folders represent views (which, in their turn, represent database tables), folder names and field names are simply table names and database field names. However, you can rename them afterwards, and rearrange the folders to present a consistent business view of the data to the user. See Tutorial 4 for examples.
You also see relationships joining database tables together. These relationships were generated during import, from foreign key constraints present in the database. You can modify the relationships later, if necessary.
-
Run the program and experiment with various queries that you can now formulate.See Tutorial 1 - Using C1Query in DataSource Mode for instructions how to interact with a C1QueryFrame control creating a query.
You are now able to formulate queries spanning multiple tables. For example:
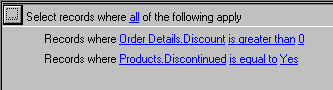
C1QueryFrame shows field names qualified with table name because we set its FullFieldNames property to True.
-
Applying your query by pressing the Show SQL button to see SQL statements generated by C1Query.
In this tutorial, you saw the C1Query engine at work. In the following tutorials you will learn how to customize its behavior and user interface.