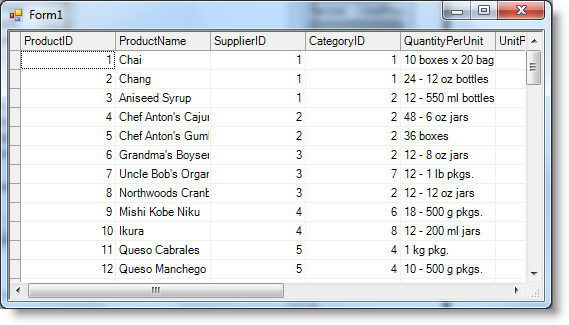
The following steps will walk you through binding a data source to the grid application you created in the Step 1 of 3: Creating the FlexGrid for WinForms Application topic.
- Open the C1FlexGrid Tasks menu. For more information on accessing the C1FlexGrid Tasks menu, see C1FlexGrid Tasks Menu.
- In the C1FlexGrid Tasks menu, click the Choose Data Source drop-down arrow and select the Add Project Data Source link from the drop-down box.
- The Data Source Configuration Wizard appears. Leave the default setting, Database, selected on the Choose a Data Source Type page, and click Next.
- On the Choose a Database Model page, leave Dataset selected and click Next.
- Click the New Connection button to create a new connection or choose one from the drop-down list. When you click New Connection, the Add Connection dialog box appears.
- Leave Microsoft Access Database File as the Data source.
- Click the Browse button under Database file name. In the Select Microsoft Access Database File dialog box, browse to the C1NWind.mdb database in the Documents\ComponentOne Samples\Common directory. Select the C1NWind.mdb file and click Open.
- In the Add Connection dialog box, click the Test Connection button to make sure that you have successfully connected to the database or server and click OK.
- Click OK again to close the Add Connection dialog box.
- Click the Next button to continue. A dialog box will appear asking if you would like to add the data file to your project and modify the connection string. Since it is not necessary to copy the database to your project, click No.
- Save the connection string in the application configuration file by checking the Yes, save the connection as box and entering a name. Click the Next button to continue.
- On the Choose Your Database Objects page, expand the Tables node, and select the Products table. Enter ProductsDS in the DataSet name box and click Finish to exit the wizard.
- A DataSet and connection string are added to your project. Additionally, Visual Studio automatically creates the following code to fill the DataSet:
To write code in Visual Basic
Visual Basic Copy CodeMe.ProductsTableAdapter.Fill(Me.ProductsDS.Products)
To write code in C#
C# Copy Codethis.productsTableAdapter.Fill(this.productsDS.Products);
Run the program and observe the following:
Notice that the data from the Products table is reflected in the grid.

Congratulations! You have successfully bound the grid application to a data source. In the next topic, you will learn how to customize format strings, Visual Styles, and built-in styles.
See Also