Visual Studio and its underlying data engine, ADO.NET, support only one mode: disconnected access to data. An ADO.NET data set is always pre-fetched in its entirety from the server to the client. Pre-fetching large data sets over the wire creates two serious problems:
- Even distributed Web applications often include large data sets, such as a list of available products and other data originated in database tables with thousands of records or more. It is very inefficient and in many cases impossible to transfer such data from the server to the client in its entirety. This forces developers to produce makeshift solutions, such as asking the user to enter a few initial letters of the product name before showing the list of products, severely reducing the quality of end-user experience, application performance and scalability.
- The absence of large data set support makes it impossible to develop classic client-server and desktop database applications in Visual Studio (without DataObjects for .NET). This is a serious drawback since many developers need to develop such applications. These applications traditionally require access to large data sets. A popular belief that you only need large data sets if you have not designed your application correctly is a misconception due to the lack of tools supporting the right data access modes. Another popular misconception is that the disconnected model, also loosely referred to as Web application, 3-tier application, and so on, necessarily means pre-fetching all the data from the server to the client at once and that any other approach is the old live connection per user approach that is not scalable.
DataObjects for .NET fills this gap, offering a solution to the problem of large data sets. It proves the misconceptions mentioned above wrong. It gives you the tool to achieve the best of both worlds: to have data access that is both disconnected, or no live connection is maintained on the server for particular users, and is therefore scalable, and at the same time, unlimited in data size.
To use a large data set in DataObjects for .NET is as easy as setting the DataAccessMode property to Virtual Mode.
Perhaps you are skeptical and think that it might work in a demo but never in the real world with huge tables, and so on. Well, how about a table of 2.7 million rows? This is what is shown in this tutorial, and you will see this data appearing in a TrueDBGrid with no delay, and it can be scrolled without noticeable delays.
Although it is not demonstrated in this tutorial, you can use virtual data access mode in distributed Web-based applications as well, simply by setting the DataAccessMode property to Virtual. See Tutorial 3: Creating Distributed 3-Tier Applications for more information.
We will begin by creating a new Windows Application project. In this tutorial we will create two forms.
To create Form1:
- Place the following components on the first form as shown in the figure.
Number of Components Name Namespace 1 C1SchemaDef C1SchemaDef1 C1.Data.C1SchemaDef 1 C1DataSet C1DataSet1 C1.Data.C1DataSet 2 C1DataTableSource C1DataTableSource1
C1DataTableSource2C1.Data.C1DataTableSource 2 C1TrueDBGrid C1TrueDBGrid1
C1TrueDBGrid2C1.Win.C1TrueDBGrid.C1TrueDBGrid 2 Label Label1
Label2System.Windows.Forms.Label 1 command Button Button1 System.Windows.Forms.Button

- Set the Text property of each label to Fetching data.
- Set the Text property of Button1 to Huge Table.
- Select the C1SchemaDef1 control, use the smart tags to expand the C1SchemaDef Tasks menu and select Schema Designer.
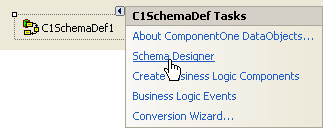
The Schema Designer opens, and the Import Wizard appears, but you can click Cancel to close the wizard. - Select File | Open in the Schema Designer menu and open the schema file that was saved in Tutorial 1: Creating a Data Schema. The schema appears in the designer
- To enable virtual mode, we must set the DataAccessMode property for the table view objects that we need to be accessed "virtually". "Virtual", as opposed to "static", means data is fetched in increments, on demand, as opposed to fetching everything at once:
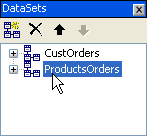
- In the View menu, make sure that DataSets is checked.
- Double-click the ProductsOrders dataset in the DataSets window to open it.
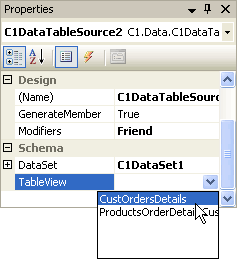
- In the DataSet Editor, click the title bar of the ProductsOrderDetailsCust table view and set the DataAccessMode property to VirtualAutomatic in the Properties panel.

- Click the title bar of the CustOrdersDetails table view and set the DataAccessMode property to VirtualAutomatic.
DataAccessMode = VirtualAutomatic means that the fetch is performed in increments, or segments, asynchronously in background mode while the application becomes available to the user and interactive immediately after the first segment is fetched. The user has interactive access not just to the data already fetched in background, but to the whole table, including its physical end, so the user sees data in its entirety, as if all data were transferred to the client, although the background fetch may not yet be complete. To enable this transparency, DataObjects for .NET performs the fetch on demand, when the user requests data not yet fetched from the server, in addition to the background fetch.
DataAccessMode = VirtualAutomatic is appropriate for large tables that are big enough to make it undesirable to fetch all data at startup time (doing so would incur a long delay before the application becomes interactive), but not too big, so they can still fit in client memory. Later in this tutorial we will also use DataAccessMode = Virtual, which is intended for very large tables, so large that they do not fit in memory. - Close the Schema Designer and click Yes to save the schema.
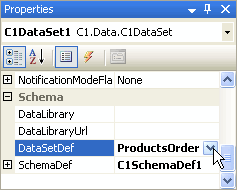
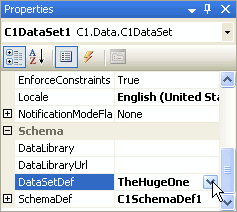
- Set the C1DataSet1's SchemaDef property to C1SchemaDef1 and the DataSetDef property to ProductsOrders in the property pane.
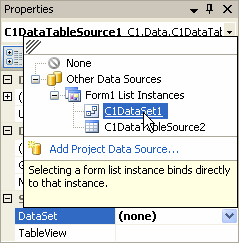
- Set the DataSet property for C1DataTableSource1 and C1DataTableSource2 to C1DataSet1.
- Set the TableView property of C1DataTableSource1 to ProductsOrderDetailsCust and set the TableView property of C1DataTableSource2 to CustOrdersDetails.
- Bind the C1TrueDBGrid components to the C1DataTableSource components:
- Set C1TrueDBGrid1's DataSource to C1DataTableSource1.
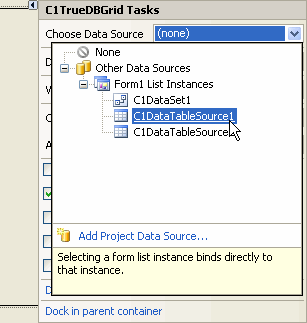
- Set C1TrueDBGrid2's DataSource to C1DataTableSource2.
Note that we bind the grids to C1DataTableSource components rather than directly to a C1DataSet component. This is essential for virtual mode; it works only if you use C1DataTableSource as your data source. - Set C1TrueDBGrid1's DataSource to C1DataTableSource1.
- Add the following code to create a C1DataTableSource1_AsyncFetchComplete event handler:
To write code in Visual Basic
Visual Basic Copy CodePrivate Sub C1DataTableSource1_AsyncFetchComplete(ByVal sender As Object, ByVal e As System.EventArgs) Handles C1DataTableSource1.AsyncFetchComplete Label1.Text = "Fetch complete. Record count: " + C1DataTableSource1.DataTable.Rows.Count.ToString() End SubTo write code in C#
C# Copy Codeprivate void c1DataTableSource1_AsyncFetchComplete(object sender, System.EventArgs e) { label1.Text = "Fetch complete. Record count: " + c1DataTableSource1.DataTable.Rows.Count.ToString(); } - Add the following code to create a C1DataTableSource2_AsyncFetchComplete event handler:
To write code in Visual Basic
Visual Basic Copy CodePrivate Sub C1DataTableSource2_AsyncFetchComplete(ByVal sender As Object, ByVal e As System.EventArgs) Handles C1DataTableSource2.AsyncFetchComplete Label2.Text = "Fetch complete. Record count: " + C1DataTableSource2.DataTable.Rows.Count.ToString() End SubTo write code in C#
C# Copy Codeprivate void c1DataTableSource2_AsyncFetchComplete(object sender, System.EventArgs e) { label2.Text = "Fetch complete. Record count: " + c1DataTableSource2.DataTable.Rows.Count.ToString(); }
This completes the Form1 set up, where we used DataAccessMode = VirtualAutomatic.
Now let's add a second form to the project where we show a very large table with 2.7 million rows. For such huge data amounts we must use DataAccessMode = Virtual.
In this part of the tutorial we need a SQL Server connection. Up until now a Microsoft Access sample database was enough. MS Access, being a desktop database, does not provide sufficient query optimization, so it cannot be effectively used in DataObjects for .NET virtual mode. We will use the SQL Server sample Northwind database included in the standard SQL Server installation.
Obviously, we do not want to physically fill 2.7 million rows in your SQL Server database, so we will simulate a huge table by creating a composite table with self-joins, repeating the same tables, Order Details and Products, several times to create the desired effect:
Order Details →(∞-1) Products →(1-∞) Order Details →(∞-1) Products →(1-∞) Order Details
To create Form2:
- Select Project | Add Windows Form. The Add New Item dialog box appears.
- Choose Windows Form from the Templates pane.
- Name the form Form2 and click Add.
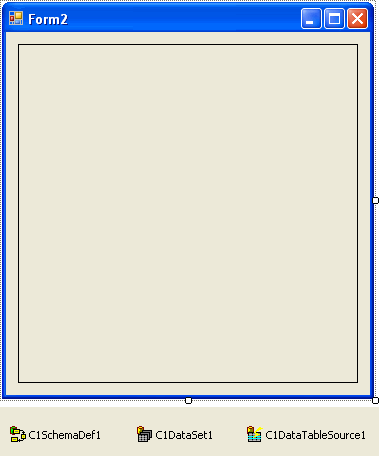
- Place the following components on the form as shown in the figure.
Number of Components Name Namespace 1 C1SchemaDef c1SchemaDef1 C1.Data.C1SchemaDef 1 C1DataSet c1DataSet1 C1.Data.C1DataSet 1 C1DataTableSource C1DataTableSource1 C1.Data.C1DataTableSource 1 C1TrueDBGrid c1TrueDBGrid1 C1.Win.C1TrueDBGrid.C1TrueDBGrid
- As in other tutorials, we start with the schema created in Tutorial 1: Creating a Data Schema. Select the C1SchemaDef1 control, click the smart tag to open the C1SchemaDef Tasks menu, and select Schema Designer.
The Schema Designer opens, and the Import Wizard appears, but you can click Cancel to close the wizard. - Select File | Open in the Schema Designer menu and open the schema file that was saved in Tutorial 1: Creating a Data Schema. The schema will appear in the designer.
- Right-click the Tables window and select Add | Composite table from the context menu.
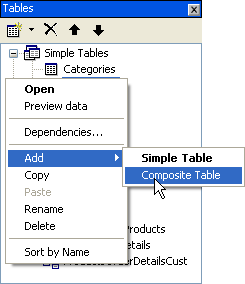
- In the newly added node, change the default name CompositeTable to HugeTable.
- Select the Diagram tab in the Composite Table Editor and drag-and-drop the following tables from the Tables window to the Composite Table Editor, arranging them as in the image below:
- Order Details – drag and drop this table three times.
- Products – drag and drop this table two times.
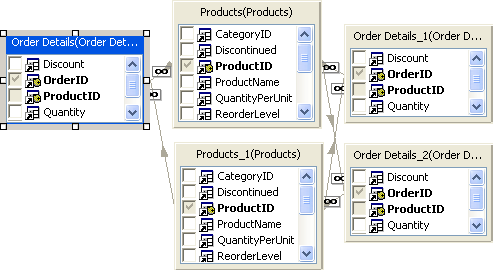
- In the resulting diagram, delete the following redundant relations by selecting the relation and pressing the Delete key (or right-click the relation and select Remove from the context menu):
- Products – Order Details_2
- Products_1 – Order Details
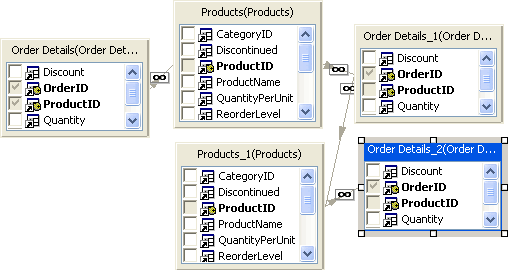
- Invert the first (Products – Order Details) and third (Products_1 – Order Details_1) relations by selecting the relation and choosing Invert from the context menu, so that the resulting diagram becomes:
Order Details →(∞-1) Products →(1-∞) Order Details →(∞-1) Products →(1-∞) Order Details
- Define composite table fields by checking the check boxes for the following fields:
Table Field Order Details OrderID
ProductIDProducts ProductName Order Details_1 OrderID Products_1 ProductName Order Details_2 OrderID - If necessary, select View | DataSets and then right-click the DataSets window and select Add in the context menu
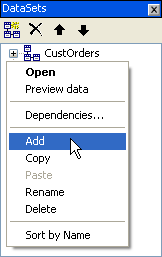
- For the newly created data set node, change the default name DataSet to TheHugeOne.
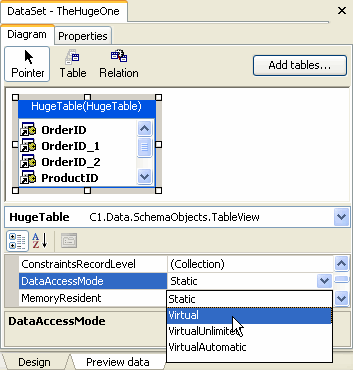
- Drag the HugeTable node from the Tables window and drop it in the DataSet Editor. This creates a data set consisting of a single table, HugeTable.
- Set the DataAccessMode property of the HugeTable table view to Virtual.
- Now we must change the database connection from MS Access to SQL Server in order to use the SQL Server sample Northwind database included in the standard SQL Server installation.
- If necessary, select View | Connections and then double-click the existing Connection node in the Connections window. The Connection Editor opens.
- Click the ellipsis button to the right of the Connection string to open the standard OLE DB Data Link Properties dialog box.
- Click the Provider tab and select Microsoft OLE DB Provider for SQL Server.
- Click the Connection tab and select your SQL Server server name; enter your login information, if necessary; and select the Northwind database.
- Click OK to close the Data Link Properties dialog box.
- Close the Schema Designer and click Yes to save the schema.
- Set the C1DataSet1's SchemaDef property to c1SchemaDef1 and the DataSetDef property to TheHugeOne in the Properties window.
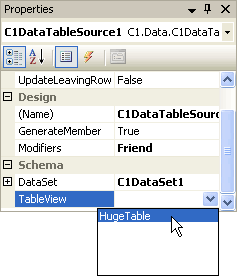
- Set the C1DataTableSource's DataSet property to C1DataSet1 and the TableView property to HugeTable.
- Set the C1TrueDBGrid1's DataSource to C1DataTableSource1 to bind the grid to the C1DataTableSource.
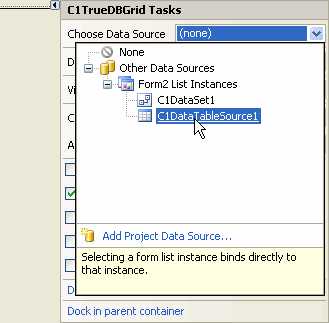
Note that we bind the grid to the C1DataTableSource components rather than directly to the C1DataSet component. This is essential for virtual mode; it works only if you use C1DataTableSource as your data source. - To activate Form2, switch to Form1 and double-click Button1 to switch to code view and add the Button1_Click event. Add the following code to the Button1_Click event in Form1:
To write code in Visual Basic
Visual Basic Copy CodeDim form2 As Form2 form2 = New Form2() form2.ShowDialog(Me)
To write code in C#
C# Copy CodeForm2 form2 = new Form2(); form2.ShowDialog(this);
Run the program and observe the following:
- The first form demonstrates DataAccessMode =VirtualAutomatic, where DataObjects for .NET continues to fetch data in the background while the user can interact with the grid as though the data were fetched completely to the client. The labels below the grids show the status of the background fetch: they show "Fetching data…" until the fetch is complete. While the label still shows "Fetching data…", try going to the last row by dragging the scrollbar thumb to the bottom. After a brief delay you will see the last row (CustomerID="WOLZA", OrderID=11044). This is the actual last row of the table, and DataObjects for .NET positions to the end of the table (as well as to any other desired position) correctly, although the background fetch is still in progress and has not yet reached the last row. Unlike asynchronous fetch features in other tools, DataObjects for .NET implements it transparently to the user; the user does not need to be aware that background fetch is incomplete.
- When DataObjects for .NET finishes fetching all rows in the background, it automatically switches to the regular in-memory mode, so the scrollbar is now exactly positioned according to the current row number. While the fetch is in progress, the scrollbar position is approximate, because the total row count and absolute row numbers are not yet known.
- Next press the "Huge table" button and enjoy the view of a 2.7 million rows table!
- Try scrolling forward fast by continuously pressing the PageDown key in quick succession. You will notice that after a few keystrokes it pauses for a brief moment. This occurs when DataObjects for .NET refreshes its cache, fetching a new portion of data from the server. Now try scrolling forward a bit slower, taking a short pause after each time you press PageDown. You will notice that if you do it this way, the delays disappear; the grid reacts immediately to every keystroke. This is a result of one of the optimization techniques employed by DataObjects for .NET: if necessary, it fetches additional segments of data during periods of inactivity. Since users rarely scroll through data without at least taking a look, in most cases, this technique creates the impression of continuous smooth scrolling without pauses and delays.
- Try going to the last row by dragging the scrollbar thumb to the bottom. After a brief delay you will see the last row (OrderID=11077, ProductID= 77,…). DataObjects for .NET only paused for a brief moment, which is necessary to fetch the segment of rows in the end of the table; it did not fetch the whole enormous number of rows as other tools do when last record is requested.