Although Visual Studio makes great strides towards facilitating development of distributed applications, it falls short of completely automating it. You still need to add many items to your application to make it a distributed, Web application. You need to create Web services, write server-side code to retrieve and update data on the server, and so on. DataObjects for .NET fills this gap, making it incredibly easy to create distributed applications.
No additional steps are required to use a DataObjects for .NET data library in a distributed, Web environment. You develop your data and business logic code, as shown in Tutorial 2: Defining Business Logic, in exactly the same way, regardless of whether you use it in a classic two-tier client-server environment (as we did in Tutorial 2: Defining Business Logic), or in a Web distributed environment. It becomes simply a matter of deployment. In this tutorial we will do exactly this, use the Northwind data library as it was built in Tutorial 2: Defining Business Logic, in a distributed environment.
In a distributed scenario, you have your data library assembly deployed on the server and on the client. Deploying it on the client, you can use the .NET assembly download facilities, so you will not need a special client installation procedure; the data library and other parts of your application will be automatically downloaded from the server and, if necessary, automatically upgraded. DataObjects for .NET manages the data library code, so that necessary parts of your business logic code execute on the server and other parts execute on the client. All this is done transparently to the developer, so your business logic code must be concerned with its proper task, business logic, and does not need to organize client-server interaction or even be aware of it.
In short, DataObjects for .NET makes developing distributed, Web applications very simple. You just create an application as you always do, regardless of whether it is distributed, and DataObjects for .NET makes it distributed for you and manages all server-client interaction according to the actual deployment environment.
Server-side DataObjects for .NET data libraries work according to the Web services architecture; the server is stateless, and they do not maintain live database connections per user. So the distributed application support in DataObjects for .NET is as effective and scalable as with manually written server-side code. The only difference is that, of course, DataObjects for .NET does it for you.
An additional advantage of the DataObjects for .NET distributed model is that you can use any of the multiple deployment scenarios and options supported by .NET Remoting. You can deploy your data library on the server as a Web service, an IIS application, or you can create your own server hosting the data library assembly.
In this tutorial, we have chosen the option of hosting the data library in a special host application (server), instead of hosting it in IIS (Microsoft Internet Information Server), to make the tutorial independent of IIS. Using DataObjects for .NET over the Web as a Web service is even easier than the process demonstrated in this tutorial. All you need to do is publish your data library as an IIS application, creating a virtual directory hosting your data library assembly.
- Create a new Windows Application project and name it ThreeTierServer.
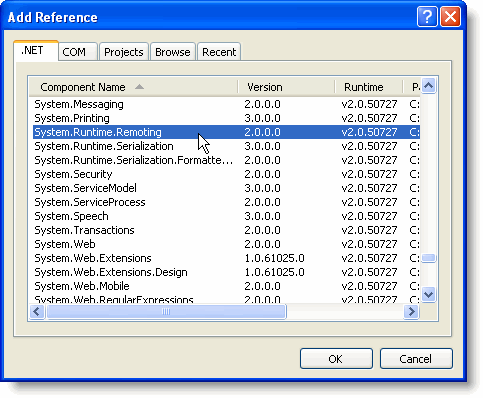
- Select Project | Add Reference and select System.Runtime.Remoting in the Add Reference window to add a reference to the System.Runtime.Remoting.dll, the .NET Framework assembly responsible for .NET remoting, to the project.
- Select Project | Add Reference and browse to locate the compiled Northwind.dll assembly, built in Tutorial 2: Defining Business Logic. This adds a reference to the assembly to the project.
- Add the following statement at the top of the form in Code view to import the System.Runtime.Remothing.Channels namespace:
To write code in Visual Basic
Visual Basic Copy CodeImports System.Runtime.Remoting.Channels
To write code in C#
C# Copy Codeusing System.Runtime.Remoting.Channels;
- Add the following code to the Form_Load event:
To write code in Visual Basic
Visual Basic Copy CodeDim serverProv As BinaryServerFormatterSinkProvider serverProv = New BinaryServerFormatterSinkProvider serverProv.TypeFilterLevel = System.Runtime.Serialization.Formatters.TypeFilterLevel.Full Dim clientProv As BinaryClientFormatterSinkProvider = New BinaryClientFormatterSinkProvider Dim props As IDictionary = New Hashtable props("port") = 8000 Dim chan As System.Runtime.Remoting.Channels.Tcp.TcpChannel = New System.Runtime.Remoting._ Channels.Tcp.TcpChannel(props, clientProv, serverProv) ChannelServices.RegisterChannel(chan, False) System.Runtime.Remoting.RemotingConfiguration.RegisterWellKnownServiceType(Type.GetType_ ("Northwind.RemoteService, Northwind"), "ThreeTierServer.soap", _ System.Runtime.Remoting.WellKnownObjectMode.Singleton)To write code in C#
C# Copy CodeBinaryServerFormatterSinkProvider serverProv; serverProv = new BinaryServerFormatterSinkProvider(); serverProv.TypeFilterLevel = System.Runtime.Serialization.Formatters.TypeFilterLevel.Full; BinaryClientFormatterSinkProvider clientProv = new BinaryClientFormatterSinkProvider(); IDictionary props = new Hashtable(); props["port"] = 8000; System.Runtime.Remoting.Channels.Tcp.TcpChannel chan = new System.Runtime.Remoting.Channels._ Tcp.TcpChannel(props, clientProv, serverProv); ChannelServices.RegisterChannel(chan, false); System.Runtime.Remoting.RemotingConfiguration.RegisterWellKnownServiceType(Type.GetType("_ Northwind.RemoteService, Northwind"), "ThreeTierServer.soap", System._ Runtime.Remoting.WellKnownObjectMode.Singleton);
Here ThreeTierServer.soap is the name we have chosen to identify this data library in its clients, the URI (Unified Resource Identifier). You can choose any unique identifier you like, provided you use the same ID in the client in the DataLibraryUrl property that specifies the connection.
This code registers DataObjects for .NET remoting service with .NET remoting framework. In this tutorial, we use TCP/IP channel, not the more popular HTTP channel that you would normally use in a Web application, because we want the tutorial to work on machines with no Web server running.
Instead of this code, you can use a configuration file for remoting registration. If you are deploying your data library in IIS, a configuration file is the only option. A configuration file, web.configfor IIS deployment, may look like the following example:
<configuration>
   <system.runtime.remoting>
       <application> <service>
           <wellknown mode="Singleton"
                type="Northwind.RemoteService, Northwind" objectUri="ThreeTierServer.soap" />
           </service>
       </application>
  </system.runtime.remoting>
</configuration>
Now that our Northwind data library is deployed on a server, we can use it in a client application. This client application can reside on the same machine, or it can be thousands of miles away, it is just a matter of setting a single property in the client application specifying the connection URL. A client application for distributed use is created in exactly the same way as a regular client application; in fact, it is a regular client application, such as the one in Tutorial 2: Defining Business Logic. The only difference is that we set the connection property, DataLibraryUrl. - Copy the client project from Tutorial 2: Defining Business Logic. This will serve as our client application.
- Open the form and select the C1DataSet1 component.
- Set C1DataSet1.DataLibraryUrl = tcp://localhost:8000/ThreeTierServer.soap. This connects it to the server.
Run the Server Application, Then Run the Client Application and Observe the Following:
Run the ThreeTierServer application first and make sure it is running while the client application is running.
The client application behaves exactly as the application we built in Tutorial 2: Defining Business Logic. This is DataObjects for .NET's transparent distributed application development at work; with no code changes we have deployed our application in a distributed environment. All database access code is executed on the server, and business logic is executed on the client without a single line of code added for that purpose to the client application. The server can be anywhere on the Internet, it is just a matter of changing the URL from localhost to an Internet address, for example, to c1DataSet1.DataLibraryUrl = http://www.mycompany.com/ThreeTierServer.soap.