You can set properties on a row of cells and those properties apply to the row. You can work with either rows or columns selected to speed the work in customizing cells in the data area. With the row (or rows) or column (or columns) selected, use the context menu by right-clicking on the selected area to perform some actions on the cells in that row or column quickly. For example you can select a cell type for the cells, you can insert or delete a row or column, and you can set the row height or column width.
With a row selected (and this is similar to that for a column selected), you can perform any of these operations available from the context menu. Here is the context menu available for selected rows.
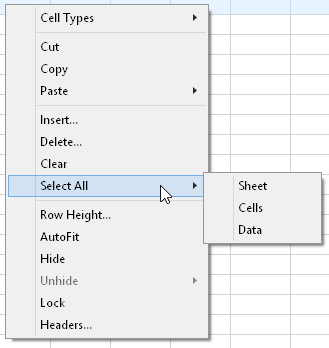
This context menu has the following items:
| Context Menu Choice | Description and Reference |
|---|---|
| Cell Types | You can select the cell type for the cells in this row. For more information, refer to Cell Type Dialog. |
| Cut, Copy, Paste | In this release the copy, cut, and paste options are not available. Any Clipboard operation would have to be done in code. |
| Insert | This allows you to insert a row or rows above the selected row. See the Row or Column Insert or Delete Dialogs. |
| Delete | Allows you to delete a row or rows, but not without first asking you to confirm. See the Row or Column Insert or Delete Dialogs. |
| Clear | Removes the contents of all the cells in the selected row but does not affect the header cells. |
| Select All | Allows you to select the entire sheet, all the cells in the data area, or all the cells with data. |
| Row Height | Set the height of the entire row. See the Row Height or Column Width Dialog. |
| AutoFit | Automatically sizes the row to fit the contents by adjusting the row height. |
| Hide / Unhide | With Hide, make the row invisible to the user, though still accessible by code. To make it visible again, use Unhide. When you hide a row, the data is kept in the data model, but the row is not displayed in the sheet. |
| Lock | You can lock a row of cells so that the user cannot edit them. Remember this applies the lock to the row, not the individual cells. |
| Headers | Runs the Header Editor to allow you to edit the header of this row. For more information, refer to Header Editor. |
For information on working with a column of cells, refer to Setting Column Properties in Spread Designer.
For information on other selectable items, return to Setting Properties in Spread Designer.
For information on how to select a column, refer to Selecting a Row of Cells.
For more tasks in Spread Designer, return to Designing in the Data Area.