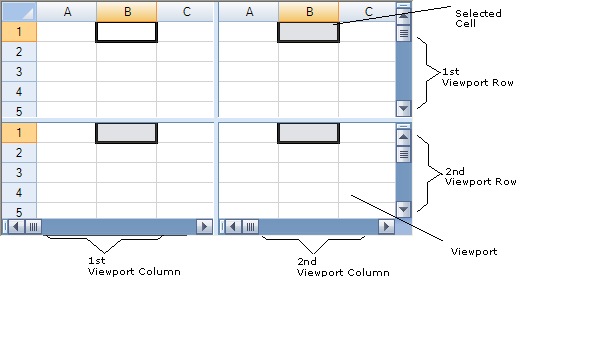
You can divide up the display into separately scrollable viewports. You can set up the following configurations:
- A set of horizontal viewports (called a viewport row since it is a row of viewports)
- A set of vertical viewports (called a viewport column since it is a column of viewports)
- A set of both (as shown in the following figure)
The viewports allow you to display different parts of a very large spreadsheet in a very limited viewing area. You can add, remove, and customize viewports programmatically, and you can allow your end user to create and use viewports.
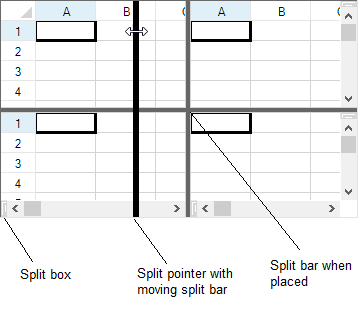
For an end user to create a viewport, the end user can click on the split box and drag it to the desired location. To allow the end user to divide the display, set the policy for displaying the split boxes. The end user can create multiple viewports in either orientation. You can allow split bars in only one orientation by setting the policy to display only the split box in that orientation. For more information on split boxes, refer to Customizing Split Boxes. The figure below shows how to create a viewport.
The split bars show the border of each viewport. Each viewport row or viewport column has its own scroll bars.
The scroll bar must be visible for the split boxes to be accessible. For more information about scroll bars, refer to Customizing the Scroll Bars of the Component.
To remove a split bar, the end user can either double-click on the split bar or click and drag it all the way to the edge of the sheet.
There are several properties and methods that relate to the use of viewports; many of these provide customizations programmatically as summarized in this table.
| Customization | Method or Property in FpSpread (or SpreadView) class |
|---|---|
|
Add and remove viewports |
|
|
Set the height and width of viewports |
|
|
Determine the viewport for a given location in the display |
|
|
Determine the row or column of cells in a particular viewport row or viewport column |
|
|
Determine which is the active viewport |
|
|
Determine the index of a particular viewport row or viewport column |
|
|
Determine the number of viewports in either orientation |
|
|
Position the viewport in the display |
The preferred height and preferred width are suggested sizes. The Spread component attempts to layout the viewports as close as possible to the suggested sizes. However, if the sum of the suggested sizes is larger (or smaller) than the size of the component then the actual sizes of one or more of the viewports must be larger (or smaller) than the suggested size.
The preferred height and preferred width can set to -1 or a positive number. A -1 indicates a variable size. A positive number indicates a fixed size in pixels. When the component lays out the viewports, available space is first allocated for the fixed-size viewports. Any remaining space is evenly divided among the variable-sized viewports.
The ColumnViewportWidthChanged and the RowViewportHeightChanged events are raised any time the split boxes are moved by the end user. These events are not raised when you add a viewport programmatically; they are raised only when the user changes the width or height of a viewport.
For frozen rows and columns, the frozen row or column is a separate viewport. The leading frozen row or column is a separate viewport while the trailing frozen row or column is also a separate viewport. Indexes for the frozen viewports are:
| Index | Frozen Viewport |
|---|---|
| -1 | Leading frozen |
| 0 | First scrollable |
| 1 | Second scrollable |
| n-1 | Last scrollable |
| n | Trailing frozen |
For more information about frozen rows and columns, refer to Setting Fixed (Frozen) Rows or Columns.
Using Code
To create or customize a viewport in code, use the following add and set methods in the FpSpread class. Refer to the preceding table for descriptions of these. Refer to the Assembly Reference for more details on each.
- AddViewport
- RemoveViewport
- GetViewportPreferredWidth and SetViewportPreferredWidth
- GetViewportPreferredHeight and SetViewportPreferredHeight
- SetActiveViewport
For more information, refer to methods in the FpSpread class.
Example
This example adds a viewport and sets its various properties.
| C# |
Copy Code
|
|---|---|
fpSpread1.AddViewport(1, 2); fpSpread1.SetViewportLeftColumn(1, 3); fpSpread1.SetViewportTopRow(0, 6); fpSpread1.SetViewportPreferredHeight(0, 100); fpSpread1.SetViewportPreferredWidth(0, 100); |
|
| VB |
Copy Code
|
|---|---|
fpSpread1.AddViewport(1, 2) fpSpread1.SetViewportLeftColumn(1, 3) fpSpread1.SetViewportTopRow(0, 6) fpSpread1.SetViewportPreferredHeight(0, 100) fpSpread1.SetViewportPreferredWidth(0, 100) |
|
Using the Spread Designer
- Select the Spread component (or select Spread from the pull-down menu).
- In the main window, select the split boxes from the edge of the scroll bars and drag them each to the position to create the viewports as needed.
- From the Settings menu, choose Preferences and select Save Split Bars on Apply to allow Spread Designer to save these viewports when you apply the changes. Some developers create split bars for viewing certain aspects of their spreadsheet, but do not want them saved.
- From the File menu, choose Apply and Exit to apply your changes to the component and exit Spread Designer.