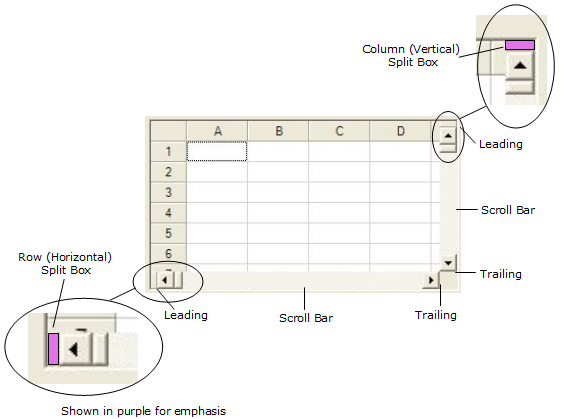
You can determine the display and placement of the split boxes. By default, the split boxes are shown and appear at the leading edge of each of the scroll bars, as shown in the figure below. You can change these by setting a property or by using Spread Designer.
When the end user clicks and drags the split box, the view is split into separate viewports. For more information on viewports, refer to Customizing Viewports.
| Customization | Property and Enumeration |
|---|---|
| Placement of split box relative to the scroll bar |
ColumnSplitBoxAlignment property in FpSpread class RowSplitBoxAlignment property in FpSpread class SplitBoxAlignment enumeration |
| Whether or when to display the split box |
ColumnSplitBoxPolicy property in FpSpread class RowSplitBoxPolicy property in FpSpread class SplitBoxPolicy enumeration |
Using the Properties Window
- At design time, in the Properties window, select the Spread component.
- Select (in the Splitters category) the ColumnSplitBoxAlignment, RowSplitBoxAlignment, ColumnSplitBoxPolicy, or RowSplitBoxPolicy property.
- Click the drop-down arrow to display the choices and select the value. Repeat this for each property.
Using Code
Set the ColumnSplitBoxAlignment, RowSplitBoxAlignment, ColumnSplitBoxPolicy, and RowSplitBoxPolicy properties for the row or column of viewports for the FpSpread component.
Example
In this example, the split box for the columns is at the leading edge of the scroll bar and is displayed as needed; for the rows, the split box is at the trailing edge of the scroll bar and is always displayed.
| C# |
Copy Code
|
|---|---|
fpSpread1.ColumnSplitBoxAlignment = FarPoint.Win.Spread.SplitBoxAlignment.Leading; fpSpread1.RowSplitBoxAlignment = FarPoint.Win.Spread.SplitBoxAlignment.Trailing; fpSpread1.ColumnSplitBoxPolicy = FarPoint.Win.Spread.SplitBoxPolicy.AsNeeded; fpSpread1.RowSplitBoxPolicy = FarPoint.Win.Spread.SplitBoxPolicy.Always; |
|
| VB |
Copy Code
|
|---|---|
fpSpread1.ColumnSplitBoxAlignment = FarPoint.Win.Spread.SplitBoxAlignment.Leading fpSpread1.RowSplitBoxAlignment = FarPoint.Win.Spread.SplitBoxAlignment.Trailing fpSpread1.ColumnSplitBoxPolicy = FarPoint.Win.Spread.SplitBoxPolicy.AsNeeded fpSpread1.RowSplitBoxPolicy = FarPoint.Win.Spread.SplitBoxPolicy.Always |
|
Using the Spread Designer
- From the Settings menu, select SplitBox.
- In the Split Box tab, set the values for the ColumnSplitBoxAlignment, RowSplitBoxAlignment, ColumnSplitBoxPolicy, or RowSplitBoxPolicy property.
- Click OK.
- From the File menu choose Apply and Exit to apply your changes to the component and exit Spread Designer.
or
- Select the Spread component (or select Spread from the pull-down menu).
- In the property list for the component (in the Splitters category), select the ColumnSplitBoxAlignment, RowSplitBoxAlignment, ColumnSplitBoxPolicy, or RowSplitBoxPolicy property.
- Click the drop-down arrow to display the choices and select the value. Repeat this for each property.
- From the File menu choose Apply and Exit to apply your changes to the component and exit Spread Designer.