The main feature of C1TextBox that distinguishes it from the standard TextBox control is that it works with typed data. When the user enters something in a C1TextBox control (or its descendant, C1DateEdit or C1NumericEdit), the input string undergoes several transition phases before it becomes a typed value of the Value property. The input string goes through the following transition phases:
-
Edit mask parsing
The first phase is edit mask parsing (if an edit mask is active, see the Masked Input tutorial), extracting the stored content string out of the masked string displayed in the control.
-
PreValidation
The next phase is PreValidation of the input string. This validation is always performed over a string value, regardless of the DataType, since at this time the input string is not yet converted to a typed value (not yet parsed).
-
Parsing
The next phase after pre-validation is parsing, that is, conversion to the required data type specified in the DataType property.
- PostValidation
The last phase before modifying the Value property is PostValidation that is performed over the typed value obtained by parsing. If the value satisfies the PostValidation conditions, it is assigned to the Value property.
Of course, all these phases are optional, except parsing (and that is optional too, if DataType is set to String), they only occur if you specify validation conditions in corresponding properties.
This tutorial demonstrates pre-validation and post-validation, that is, how you can perform validation logic before and after parsing the input string.
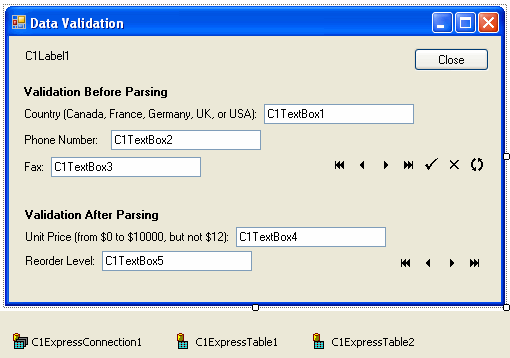
- Create a new Windows Application project. Place the following components on the form as shown in the figure:
- C1ExpressConnection (C1.Data.Express.C1ExpressConnection)
- C1ExpressTable1-2 (C1.Data.Express.C1ExpressTable)
- C1Label1-8 (C1.Win.C1Input.C1Label)
- C1TextBox1-5
- C1DbNavigator1-2 (C1.Win.C1Input.C1DbNavigator)
- Button1 (System.Windows.Forms.Button)
- From the Properties window, set the following properties for the C1Label and Button controls:
Control Property Value C1Label2 TextDetached True Text Validation Before Parsing C1Label3 TextDetached True Text Country (Canada, France, Germany, UK, or USA): C1Label4 TextDetached True Text Phone Number: C1Label5 TextDetached True Text Fax: C1Labe6 TextDetached True Text Validation After Parsing C1Label7 TextDetached True Text Unit Price (from $0 to $10000, but not $12): C1Label8 TextDetached True Text Reorder Level: Button1 Name btnClose Text Close - Select the C1ExpressConnection1 component, go to the Properties window, open the ConnectionString property combo box. Add the following to the ConnectionString property: Provider=Microsoft.Jet.OLEDB.4.0;Data Source="Documents\ComponentOne Samples\Common\C1NWind.mdb".
- Set the properties of C1ExpressTable1-2 as follows:
Control Property Value C1ExpressTable1 ConnectionComponent C1ExpressConnection1 DbTableName Customers C1ExpressTable2 ConnectionComponent C1ExpressConnection1 DbTableName Products - To bind controls to the data source, set the following properties:
Control Property Value C1DbNavigator1
DataSource
C1ExpressTable1
C1DbNavigator2
DataSource
C1ExpressTable2
C1Label1
DataSource
C1ExpressTable1
DataField
CompanyName
C1TextBox1
DataSource
C1ExpressTable1
DataField
Country
C1TextBox2
DataSource
C1ExpressTable1
DataField
Phone
C1TextBox3
DataSource
C1ExpressTable1
DataField
Fax
C1TextBox4
DataSource
C1ExpressTable2
DataField
UnitPrice
C1TextBox5
DataSource
C1ExpressTable2
DataField
UnitsInStock
- Set up the navigator controls. For both C1DbNavigator1 and C1DbNavigator2 set the PositionVisible property to False. In C1DbNavigator1 show two additional buttons using the VisibleButtons property: Cancel and Apply.
- The top part of the form contains controls demonstrating pre-validation, the bottom part demonstrates post-validation. The first editable control, C1TextBox1 allows you to enter a country name from a list of allowed countries.
For the C1TextBox1 control:
- Expand the PreValidation property of that control and set its PatternString sub-property to Canada, France, Germany, UK, USA.
- The separator string dividing the list to separate items is specified in the ItemSeparator property. Although we could use the default "|", set ItemSeparator to ", " (comma and space) for better readability.
The fact that PatternString represents an exact list of values to match the input string against is indicated by the value of the PreValidation.Validation property set to ExactList. This is default, so we do not have to change it.
- The next control, C1TextBox2 validates user input using wildcard patterns. The input string is a telephone number. Different countries have different conventional phone numbers formats. We allow input strings in any of the three formats, for US, France and Germany. In this case, the PatternString contains three items, each item a wildcard pattern. An input string satisfies the condition if it matches one of the patterns. Expand the PreValidation property and set its sub-properties to the following:
Control Property Value C1TextBox2 PreValidation.Validation Wildcards PreValidation.PatternString (*) ###-####|##.##.##.##|####-###### - Wildcard pattern validation demonstrated in the previous step is often not accurate enough. For instance, you cannot enter three digits instead of four in the third pattern. This kind of validation is better performed with regular expressions. .NET regular expressions are a very powerful means of string validation. The C1TextBox3 control contains a fax number and string validation is specified with the following property settings:
Control Property Value C1TextBox3 PreValidation.Validation RegexPattern PreValidation.PatternString (\(\d+\) )?(\d+-\d+|(\d\d.){3}\d\d) The C1TextBox4 control validates the typed Value for the UnitPrice field (post-validation). The validation condition is that the price must be between 0 and 10,000 (0 and 10,000 included), and the price of $12.00 is not allowed. To specify such constraints:
- Expand the PostValidation property and press the ellipsis button of the Intervals sub-property to open the ValueInterval Collection Editor dialog box.
- In this dialog box, you can specify one or more intervals. The input value must belong to one of them. Add an interval and set its MinValue to 0 and MaxValue to 10000.
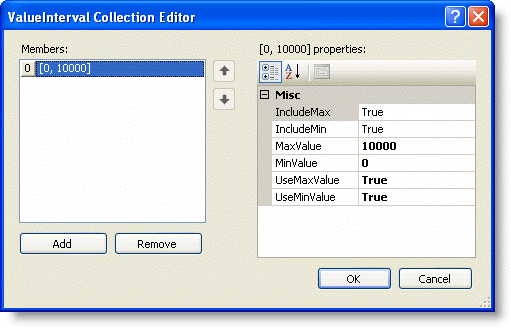
- Press OK to close the dialog box.
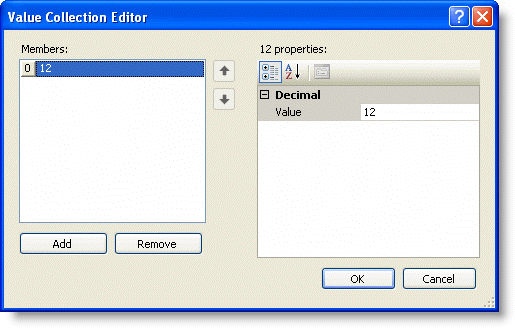
- Now specify the excluded value, 12.00. Press the ellipsis button of the ValuesExcluded property, add 12 in the Value Collection Editor that opens and press OK to close the editor.
- The C1TextBox4 control also demonstrates another important feature unrelated to validation. Normally, we want to display a currency value in a Currency format (with dollar sign), but edit it as a simple number (no dollar sign). This is easy to do in C1Input. Just recall from the Using C1TextBox for Date-Time Input tutorial that you can specify different formats for display and edit mode. Set the FormatType to Currency.
- In C1TextBox5 control validation is performed programmatically, in the PostValidating event code. Set the Validation property to PostValidatingEvent and create the following event handler for the PostValidating event:
To write code in Visual Basic
Visual Basic Copy CodePrivate Sub C1TextBox5_PostValidating(ByVal sender As Object, ByVal e As C1.Win.C1Input.PostValidationEventArgs) Handles C1TextBox5.PostValidating If (CType(e.Value, Int16) < 0) Then e.ErrorInfo.ErrorMessage = "Value cannot be less than zero." ElseIf (CType(e.Value, Int16) > 5000) Then e.ErrorInfo.ErrorMessage = "Value cannot be greater than 5000." Else Return End If e.Succeeded = False End SubTo write code in C#
C# Copy Codeprivate void C1TextBox5_PostValidating(object sender, C1.Win.C1Input.PostValidationEventArgs e) { if ((Int16)e.Value < 0) e.ErrorInfo.ErrorMessage = "Value cannot be less than zero."; else if ((Int16)e.Value > 5000) e.ErrorInfo.ErrorMessage = "Value cannot be greater than 5000."; else return; e.Succeeded = false; }
This code verifies that the value lies between 0 and 5000. In case of an error, it sets the e.ErrorMessage property that makes the specified message text appear in the error message after the event. Setting e.Suceeded to False indicates that the code has detected a validation error.
Run the program and observe the following:
When any one of the validation conditions are not satisfied, an attempt to leave the control with incorrect value shows an error message box with caption "C1Input Validation Error" and a brief error description. In the C1TextBox5 control, the error message is one of the two specified in the code.