When editing date-time data with the property DateTimeInput set to True, the C1TextBox and C1DateEdit controls work in a special mode. In this mode, instead of editing date-time values as regular strings, they are divided into separate fields for month, day, hour, and so on. It looks similar to the standard DateTimePicker control. However, C1TextBox and C1DateEdit support more formats than the standard DateTimePicker control and have many additional features, such as time zone adjustment, culture-dependent date formatting, and so on.
- Create a new Windows Application project. Place the following components on the form as shown in the figure:
- C1ExpressTable1 (C1.Data.Express.C1ExpressTable)
- C1Label1-9 (C1.Win.C1Input.C1Label)
- C1TextBox1-5 (C1.Win.C1Input.C1TextBox)
- C1DbNavigator1 (C1.Win.C1Input.C1DbNavigator)
- Button1 (System.Windows.Forms.Button)
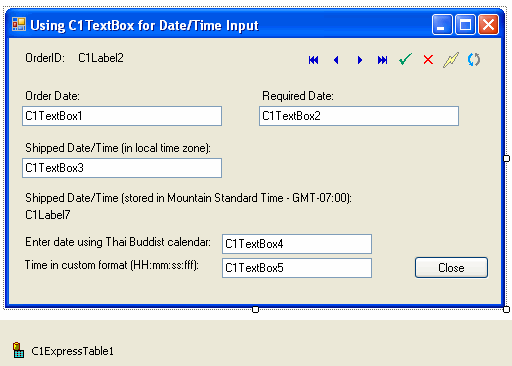
- From the Properties window, set the following properties for the C1Label and Button controls:
Control Property Value C1Label1 TextDetached True Text OrderID: C1Label3 TextDetached True Text Order Date: C1Label4 TextDetached True Text Required Date: C1Label5 TextDetached True Text Shipped Date/Time (in local time zone): C1Labe6 TextDetached True Text Shipped Date/Time (stored in Mountain Standard Time - GMT-07:00): C1Label8 TextDetached True Text Enter date using Thai Buddist calendar: C1Label9 TextDetached True Text Time in custom format (HH:mm:ss:fff): Button1 Name btnClose Text Close - Add the following to the ConnectionString property of the C1ExpressTable1 control: Provider=Microsoft.Jet.OLEDB.4.0;Data Source="Documents\ComponentOne Samples\Common\C1NWind.mdb".
- For the C1ExpressTable1 component, open the DbTableName property combo box and select Orders from the database table list.
Also, you need to set the AutoIncrement property of the OrderID field of C1ExpressTable1, otherwise you will not be able to update data in the database.
- Select C1ExpressTable1, click the ellipsis button in the Properties window for the Fields property to open the Fields dialog box, select the OrderID field and set its AutoIncrement property to ClientAndServer. This is necessary because OrderID is an autoincrement field in the database, so it must be treated accordingly by C1DataExpress.
- Bind controls to the data source by setting the following properties:
Control Property Value C1DbNavigator1 DataSource C1ExpressTable1 C1Label2 DataSource C1ExpressTable1 DataField OrderID C1TextBox1 DataSource C1ExpressTable1 DataField OrderDate C1TextBox2 DataSource C1ExpressTable1 DataField RequiredDate C1TextBox3 DataSource C1ExpressTable1 DataField ShippedDate C1Label7 DataSource C1ExpressTable1 DataField ShippedDate Set up the navigator control C1DbNavigator1:
- Set its PositionVisible property to False and ColorButtons property to True.
- Expanding the VisibleButtons property, set the following flags to True: First, Previous, Next, Last, Apply, Cancel, Update, and Refresh.
- Create the following event handlers (see the Data Navigation and Actions Using C1DbNavigator tutorial for details):
To write code in Visual Basic
Visual Basic Copy CodePrivate Sub C1DbNavigator1_RefreshData(ByVal sender As Object, ByVal e As System.EventArgs) Handles C1DbNavigator1.RefreshData C1ExpressTable1.ExpressConnection.Fill() End Sub Private Sub C1DbNavigator1_UpdateData(ByVal sender As Object, ByVal e As System.EventArgs) Handles C1DbNavigator1.UpdateData C1ExpressTable1.ExpressConnection.Update() End SubTo write code in C#
C# Copy Codeprivate void C1DbNavigator1_RefreshData(object sender, System.EventArgs e) { C1ExpressTable1.ExpressConnection.Fill(); } private void C1DbNavigator1_UpdateData(object sender, System.EventArgs e) { C1ExpressTable1.ExpressConnection.Update(); } - In C1TextBox1, we will represent the OrderDate in a full format, with full day of week, day, full month name, and year. To specify that, set the FormatType property to LongDate.
Since we leave the DateTimeInput property with its default value True, we will get date-time editing with separate fields for day of week, month, day, and year at run time. In the C1TextBox2 control, set the FormatType to ShortDate.
LongDate and ShortDate are examples of standard .NET formats. Their actual representation depends on the regional settings controlled by the Culture property.
- The C1TextBox3 control demonstrates how you can represent a date in different formats depending on whether it is in edit or display mode (whether it has the input focus). We will make it LongDateShortTime when the control does not have input focus, and in edit mode, when it has input focus, we will use custom format with time zone. To begin with the custom format, set the following properties:
Control Property Value C1TextBox3 FormatType CustomFormat CustomFormat MM/dd/yyyy h:mm tt zzz This format is the control’s default format (where tt is the AM/PM designator and zzz is the time zone representation). We can override it, and other format-related properties, for display and/or edit mode using properties DisplayFormat and EditFormat. Expand the DisplayFormat property, then expand its sub-property (Inherit) and select False for the FormatType flag. That will break the inheritance from control for the FormatType property and allow us to change it. Set this property, and also set the FormatType property for C1Label7 at this time to the following:
Control Property Value C1TextBox3 DisplayFormat.FormatType LongDateShortTime C1Label7 FormatType LongDateShortTime - Specify how NULL values (DBNull) are displayed in C1TextBox3 and in C1Label7. Set the following properties:
Control Property Value C1TextBox3 NullText (not shipped yet) EmptyAsNull True C1Label7 NullText (null) By default, clearing the control (select all and pressing Delete) reverts it to the value it had before editing once the control loses focus. We changed this behavior setting the EmptyAsNull property to True, now clearing the control sets its value to DBNull.
- The C1TextBox3 control also demonstrates the time zone adjustment feature. It is useful in situations where information is entered into the database by operators located in different time zones. Then it is convenient to show and edit dates for each operator in his or her local time, but store the entered dates in the database adjusted to a single, unified time zone. Suppose the database server is located in Mountain Time zone (7 hours to the West from GMT, Greenwich Mean Time).
For the C1TextBox3 control:
- To enable time zone adjustment, set the control’s CurrentTimeZone property to False. This will make the GMTOffset property modifiable.
- Set the GMTOffset property to –07:00 (Mountain Standard Time). Now C1TextBox3 converts all values to the local time before displaying them, and vice-versa, converts values entered by the user to the Mountain Time zone.
- The next control, C1TextBox4 demonstrates how date input can be localized for any culture supported in .NET. Set the Culture property to Thai (Thailand) and FormatType to LongDate. Then date format, including month names and year number, will be defined by the Thai Buddhist calendar.
- The last control, C1TextBox5 allows you to enter precise time with milliseconds. Set the FormatType property to CustomFormat and the CustomFormat property to HH:mm:ss.fff. Set the DataType property to DateTime.
Since this control is not data bound, to start editing from a non-empty value, set the Value property to some date-time value.
Run the program and observe the following:
- By setting the DateTimeInput property to True, you can edit date-time fields, such as year, month, day separately. You can type on the keyboard (months are entered numerically even if month name is shown) or use arrow keys or mouse wheel to advance a field. The AM/PM designator can be changed typing the first letter.
- When the C1TextBox3 control takes focus, the date format in it changes. You can specify the time zone in which the date is entered. By default, it is your local time zone. When you enter a date in C1TextBox3 and move focus away from the control, the C1Label8 control below shows the actual value stored in the database (and in the control’s Value property). It is adjusted to the Mountain Time zone.