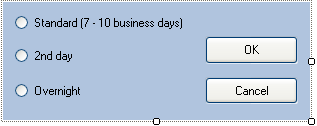
The drop-down form below includes option buttons and button controls for the user to make a selection from the C1DropDownControl.
The drop-down form appearance properties have been edited so that the form appears as below:
Select the form class name (for this example, WindowsApplication1.DropDownForm1) in the DropDownFormClassName property of your C1DropDownControl. Notice that when you run the project and select the drop-down arrow, the drop-down form now appears.
Enable the button controls on the drop-down form:
- Set the AcceptButton and CancelButton properties of your DropDownForm1 to button1 and button2, respectively.
- Select the OK button and set its DialogResult property to OK. Similarly, select the Cancel button and set its DialogResult property to Cancel.
- To make the drop-down form change the control text when it is closed after the user clicks an item, add the following event handler for the PostChanges event:
To write code in Visual Basic
Visual Basic Copy CodePrivate Sub DropDownForm1_PostChanges(sender As Object, e As System.EventArgs) If (MyBase.DialogResult = DialogResult.OK) Then Dim control1 As Control For Each control1 In MyBase.Controls If (TypeOf control1 is RadioButton AndAlso CType(control1, RadioButton).Checked) Then MyBase.OwnerControl.Value = CType(control1, RadioButton).Text End If Next End If End SubTo write code in C#
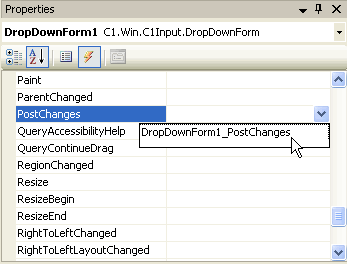
C# Copy Codeprivate void DropDownForm1_PostChanges(object sender, System.EventArgs e) { if (DialogResult == DialogResult.OK) { foreach (Control control1 in Controls) { if (control1 as RadioButton != null && ((RadioButton)control1).Checked) { OwnerControl.Value = ((RadioButton)control1).Text; } } } } - At design time, select DropDownForm1 to view its properties in the Properties window, and then select the Events button
 from the Properties toolbar.
 - Set the DropDownForm1.PostChanges event to DropDownForm1_PostChanges.
- To make the OK button (button1) receive focus when the form opens, set the DropDownForm1.FocusControl property to button1.
- To have a check in the Standard option button, in design time select radiobutton1 and set its Checked property to True.
This topic illustrates the following:
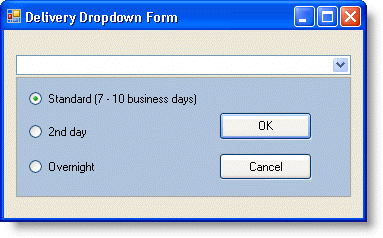
Your form should appear similar to the form below:
See Also