This walkthrough illustrates how to set up a basic End-User Report Designer on a Windows Forms application in the Professional Edition of ActiveReports.
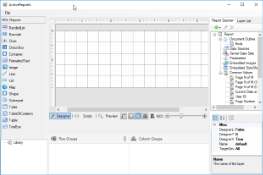
At the end of this walkthrough, the End-User Report Designer appears like the following image.
Adding the Designer control to the Form
You will add the Designer that could only edit and preview a report file.
- Create a new Windows Forms Application project.
- In the Name field, rename the file to CustomEUD and click OK.
- Select a Form and go to the Properties Window to change the Name property to frmMain and the Text property to ActiveReports.
- Resize the Form so that you can accommodate the controls listed further. See Adding ActiveReports Controls for more information.
- From the Visual Studio toolbox, drag the Designer control onto the Form and rename it to designer.
- From the Visual Studio toolbox, drag the Toolbox control onto the Form and rename it to toolbox.
- To attach the toolbox control to the designer control, in the Solution Explorer, right-click Form1.cs and select View Code.
- Add the following code (marked in bold) after the InitializeComponent method.
C# code. Paste AFTER the InitializeComponent method Copy Codepublic frmMain() { InitializeComponent(); designer.Toolbox = toolbox; } - At the top of the code view, add a using directive.
C# code. Paste at the top of the Form1 code view Copy Codeusing GrapeCity.ActiveReports.Design;
Loading and/or saving the report file
- From the Visual Studio Menus & Toolbars toolbox group, drag the MenuStrip control onto the Form.
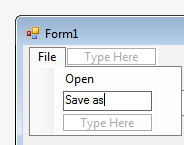
- Create the following structure for the MenuStrip control: File > Open, File > Save as.
- On the Form, double-click the Open menu item and paste the following code (marked in bold) into the openToolStripMenuItem_Click handler.
C# code. Paste INSIDE the openToolStripMenuItem_Click handler Copy Codeprivate void openToolStripMenuItem_Click(object sender, EventArgs e) { OpenFileDialog openFileDialog = new OpenFileDialog(); var dialogResult = openFileDialog.ShowDialog(); if (dialogResult == System.Windows.Forms.DialogResult.OK) { designer.LoadReport(new System.IO.FileInfo(openFileDialog.FileName)); } } - On the Form, double-click the Save as menu item and paste the following code (marked in bold) into the saveAsToolStripMenuItem_Click handler.
C# code. Paste INSIDE the saveAsToolStripMenuItem_Click handler Copy Codeprivate void saveAsToolStripMenuItem_Click(object sender, EventArgs e) { SaveFileDialog saveFileDialog = new SaveFileDialog(); saveFileDialog.Filter = GetSaveFilter(); var dialogResult = saveFileDialog.ShowDialog(); if (dialogResult == System.Windows.Forms.DialogResult.OK) { designer.SaveReport(new System.IO.FileInfo(saveFileDialog.FileName)); } } - After the saveAsToolStripMenuItem_Click handler code, add the code for the GetSaveFilter method as follows.
C# code. Paste AFTER the saveAsToolStripMenuItem_Click handler Copy Codeprivate string GetSaveFilter() { switch (designer.ReportType) { case DesignerReportType.Section: return "Section Report Files (*.rpx)|*.rpx"; case DesignerReportType.Page: return "Page Report Files (*.rdlx)|*.rdlx"; case DesignerReportType.Rdl: return "RDL Report Files (*.rdlx)|*.rdlx"; default: return "RDL Report Files (*.rdlx)|*.rdlx"; } }
Creating a new report based on a chosen type
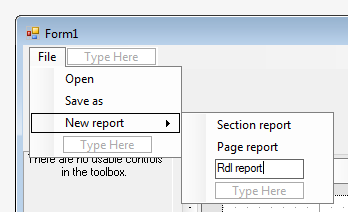
- Create the following structure for the MenuStrip control: File > New report > Section report; File > New report > Page report; File > New report > Rdl report.
- Double-click the Section report MenuStrip item and add the following code (marked in bold) into the sectionToolStripMenuItem_Click handler.
C# code. Paste INSIDE the sectionToolStripMenuItem_Click handler Copy Codeprivate void sectionToolStripMenuItem_Click(object sender, EventArgs e) { designer.NewReport(DesignerReportType.Section); } - Double-click the Page report MenuStrip item and add the following code (marked in bold) into the pageReportToolStripMenuItem_Click handler.
C# code. Paste INSIDE the pageReportToolStripMenuItem_Click handler Copy Codeprivate void pageReportToolStripMenuItem_Click(object sender, EventArgs e) { designer.NewReport(DesignerReportType.Page); } - Double-click the Rdl report MenuStrip item and add the following code (marked in bold) into the rdlReportToolStripMenuItem_Click handler.
C# code. Paste INSIDE the rdlReportToolStripMenuItem_Click handler Copy Codeprivate void rdlReportToolStripMenuItem_Click(object sender, EventArgs e) { designer.NewReport(DesignerReportType.Rdl); }
Adding the Export option
- From the Project menu, select Add Reference.
- In the Reference Manager dialog that appears, select the following reference and click OK to add them to your project.
GrapeCity.ActiveReports.Export.Pdf.v12 - At the top of the code view, add using statements.
C# code. Paste at the top of the Form1 code view Copy Codeusing GrapeCity.ActiveReports.Export.Pdf.Page; using GrapeCity.ActiveReports.Rendering.IO; using GrapeCity.ActiveReports; using System.IO;
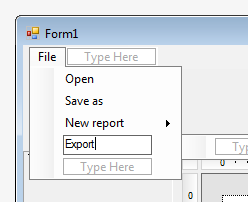
- In the MenuStrip control, add the Export menu item to the File menu.
- In the Properties Window, set the Enabled property to False. This enables the Export menu item to be displayed in the Preview mode only.
- To enable the Export menu item to be displayed for page and rdl reports only, add the following code (marked in bold) after the InitializeComponent method.
C# code. Paste AFTER the InitializeComponent method Copy Codepublic frmMain()
{
InitializeComponent();
designer.Toolbox = toolbox;
designer.ActiveTabChanged += designer_ActiveTabChanged;
}void designer_ActiveTabChanged(object sender, EventArgs e)
{
exportToolStripMenuItem.Enabled = designer.ActiveTab == DesignerTab.Preview && designer.ReportType != DesignerReportType.Section;
}
- On the Form, double-click the Export item and add the following code (marked in bold) to the exportToolStripMenuItem_Click handler.
C# code. Paste INSIDE the exportToolStripMenuItem_Click handler Copy Codeprivate void exportToolStripMenuItem_Click(object sender, EventArgs e) { SaveFileDialog saveFileDialog = new SaveFileDialog(); saveFileDialog.Filter = "Pdf (*.pdf)|*.pdf"; var dialogResult = saveFileDialog.ShowDialog(); if (dialogResult == System.Windows.Forms.DialogResult.OK) { var pdfRe = new PdfRenderingExtension(); var msp = new MemoryStreamProvider(); (designer.Report as PageReport).Document.Render(pdfRe, msp); using (var stream = msp.GetPrimaryStream().OpenStream()) using (var fileStream = new FileStream(saveFileDialog.FileName, FileMode.Create, FileAccess.Write)) { stream.CopyTo(fileStream); } MessageBox.Show("Export is done"); } }
For more information on export filters, rendering extensions and their settings, refer to the Exporting section of the ActiveReports User Guide.
Adding other controls to the Form
- From the Visual Studio toolbox, drag the following controls onto the Form.
Control Name Property Value ReportExplorer arReportExplorer ReportDesigner = designer
This binds the ActiveReports Designer to the ReportExplorer control.
Resize and move as necessary.LayerList arLayerList ReportDesigner = designer
This binds the ActiveReports Designer to the LayerList control.
Resize and move as necessary.PropertyGrid arPropertyGrid Resize and move as necessary. GroupEditor arGroupEditor ReportDesigner = designer
This binds the ActiveReports Designer to the GroupEditor control.
Resize and move as necessary.ReportsLibrary arReportsLibrary ReportDesigner = designer
This binds the ActiveReports Designer to the ReportsLibrary control.
Resize and move as necessary. - On the Form, select the Designer control.
- In the Properties Window, set the PropertyGrid property of the Designer control to arPropertyGrid. This binds the ActiveReports Designer to the Property Grid control.
Viewing the End User Report Designer
Press F5 to run the project. The End User Report Designer opens with an RDL Report.
For information on how you can customize the End User Report Designer and more, refer to the End User Designer product sample.