When you have a Page or RDL report open in the ActiveReports Designer, you can see nodes like the following in the Report Explorer.
- Document Outline
- Each report page (or the body for RDL reports)
- Each control, for example:
- BandedList
- Tablix
- Table
- Each control, for example:
- Each report page (or the body for RDL reports)
- Data Sources
- DataSource (right-click to add a data source; you can have more than one)
- DataSet (right-click the DataSource to add a data set)
- Fields (drag onto the report or onto a data region)
- Another DataSet (you can have more than one)
- DataSet (right-click the DataSource to add a data set)
- DataSource (right-click to add a data source; you can have more than one)
- Server Data Sets (right-click to open a dialog and add a server shared data set)
- Parameters (right-click to open a dialog and add a parameter)
- Embedded Images (right-click to browse for an image to add)
- Embedded StyleSheets (right-click to open and add a style sheet)
- Common Values (drag onto the report to display the value in a textbox)
In the Report Explorer, you can
- remove controls
- add, edit or remove parameters
- add a data source
- drag fields onto the report
- share a data source
- add data sets
- add, edit, or remove embedded images
- drag common values like page numbers, current date, or report name onto the report as a textbox
- select the report or any element in the report to display in the Properties window, where you can modify its properties
To add a DataSource
- In the Report Explorer, right-click the Data Sources node and select Add Data Source. The Report Data Source dialog appears, open to the General page.
- On the General page, drop down the Type list and select Microsoft OleDb Provider.
- Under Connection, on the Connection Properties tab, drop down the OLE DB Provider list and select Microsoft.Jet.OLEDB.4.0.
- In the Server or file name box, enter the path and file name to your Access database, for example,
C:\Users\YourUserName\Documents\GrapeCity Samples\ActiveReports 11\Data\NWIND.MDB. - Click the Accept button. The new data source is added to the Data Sources node. To use fields from the data source, add a data set.
To share a DataSource
- In the Report Explorer, expand the DataSources node, right-click the node for the data source that you want to share, and select Share Data Source. The Save Shared Data Source File dialog appears.
- Navigate to the folder where you want to save the file, enter a name for the file, and click Save.
- The type of data source as well as the connection string are saved to a file of type RDSX that you can use in other reports.
To add a DataSet
- In the Report Explorer, expand the DataSources node, right-click the node for the data source that you want to use, and select Add DataSet. The DataSet dialog appears.
- In the list to the left, select Query to show the Query page.
- In the Query box to the right, enter a SQL query to pull the data you want for your report.
Example Query Copy CodeSELECT * FROM Customers
- Click the Accept button to create the data set. The data fields appear in the data set node.
To bind a DataSet field to a TextBox control
- In the Report Explorer, expand the DataSources node, then the node for the data source, then the DataSet that you want to use.
- From the DataSet node, click the DataSet field that you want to bind to a TextBox control, drag it onto the report surface or onto a data region and drop it.
- A TextBox control is created and bound to the field with the proper expression in the Value property. For example, if you drag the City field onto the report, the Value property of the TextBox contains the expression =Fields!City.Value.
To add a Server Data Set
In ActiveReports, you can create and access data sets that are hosted on ActiveReports Server. Server shared data sets retrieve data from server shared data sources to provide data to multiple reports. ActiveReports allows you to use only one type of data set for your report, either local or shared.
A server shared data set that you add to your report is an instance of data set hosted on ActiveReports Server. If you make any changes to the data sets that are added to your report, the changes are not reflected on the server.
You can override the following server shared data set settings in ActiveReports.
- Create additional calculated fields
- Create additional filters
- Override data set options
- Override parameter options and values
Use the following steps to add a Server Data Set to your report.
- Connect your Stand-Alone Designer to ActiveReports Server if you are not already connected to the server. See Connecting to ActiveReports Server for further information.
- In the Report Explorer, right-click the Server Data Sets node, and then select Add Data Set or select Shared Data Set from the Add button. The Add Server Data Set dialog appears.
- In the Add Server Data Set dialog that appears, select a data set from the list.
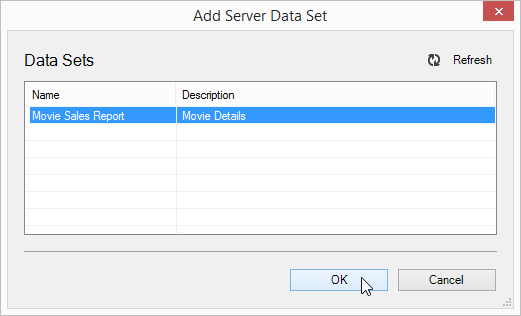
- Click OK to add the data set. The Server Data Sets node is populated with fields returned by the query.
Once you add a server shared data set to your report, ActiveReports automatically marks the report as a remote report. Remote reports are executed on ActiveReports Server.Note: Users should at least have Read permission to access the Server Shared Data Set. For more information, see Managing Data Sets.
To add parameters
- In the Report Explorer, right-click the Parameters node and select Add Parameter. The Report Parameters dialog appears.
- On the General tab of the dialog, enter text for prompting users for a value.
- On the Available Values tab, you can select values from a DataSet to populate a list from which users can select a value.
- On the Default Values tab, you can provide default values to use if the user does not select a value.
- Click Accept to save the parameter. The new parameter appears in the Report Explorer under the Parameters node.
- From the Report Explorer, drag the parameter to report design area to create a TextBox that is bound to the parameter. When you run the report, the value that the user supplies in the prompt dialog displays in the bound TextBox on the report.