This walkthrough illustrates how to set up a basic End-User Report Designer on a Windows Forms application in the Professional Edition of ActiveReports.
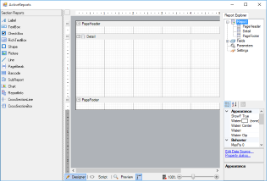
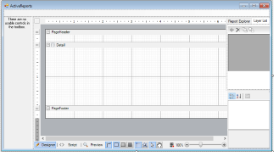
At the end of this walkthrough, the End-User Report Designer appears like the following image.
Adding controls to the Form
- In a Windows Forms application, select a Form and go to the Properties Window to change the Name property to formDesigner and Text property to ActiveReports.
- Resize the Form so that you can accommodate the controls listed in the next step.
- From the Visual Studio toolbox, drag the following controls onto the Form in the order listed below. The order is important because some of the controls are placed inside other container controls. Also, set the properties as indicated in the list below.
Controls Placed on a Form
Control Parent Name Dock Property Value ToolStripContainer formDesigner toolStripContainer Fill LeftToolStripPanel - Enabled = False
RightToolStripPanel - Enabled = FalseSplitContainer toolStripContainer splitContainer Fill FixedPanel = Panel1 Designer splitContainer.Panel2 arDesigner None Anchor = Top, Bottom, Left, Right
Resize and move as necessary.TabControl splitContainer.Panel2 tabControl None Anchor = Top, Bottom, Left, Right
Resize and move as necessary.ReportExplorer tabControl.tabPage1 arReportExplorer None ReportDesigner = arDesigner
This binds the ActiveReports Designer to the ReportExplorer control.Anchor = Top, Bottom, Left, Right
Resize and move as necessary. You can control the visibility of Report Explorer nodes using VisibleNodes property.LayerList tabControl.tabPage2 arLayerList None ReportDesigner = arDesigner
This binds the ActiveReports Designer to the LayerList control.
Resize and move as necessary.PropertyGrid splitContainer.Panel2 arPropertyGrid None Anchor = Top, Bottom, Right
Resize and move as necessary.Toolbox splitContainer.Panel1 arToolbox Fill -
- Select arDesigner and in the Properties window go to the PropertyGrid property and select arPropertyGrid. This attaches the Property Grid to the Designer to display properties of the selected item.
- Select tabControl and in the Properties window, click the ellipses button in the TabPages property.
- In the TabPage Collection Editor dialog that appears, select tabPage1 and change the Text property to Report Explorer.
- Select tabPage2 and change its Text property to Layer List.
The Form now looks like the image below:
Creating a Data toolbox group
Add the following code to create a data group in the toolbox. This code creates a LoadTools method that you can call in the formDesigner_Load event to load the data toolbox group into the toolbox.
The following examples show what the code looks like.
To write the code in Visual Basic.NET
| Visual Basic.NET code. Paste ABOVE the formDesigner class. |
Copy Code
|
|---|---|
Imports GrapeCity.ActiveReports.Design.Toolbox Imports GrapeCity.ActiveReports.Design |
|
| Visual Basic.NET code. Paste INSIDE the formDesigner class. |
Copy Code
|
|---|---|
Private Sub LoadTools(ByVal arToolbox As Toolbox) 'Add Data Providers Me.arToolbox.AddToolboxItem(New System.Drawing.Design.ToolboxItem(GetType(System.Data.DataSet)), "Data") Me.arToolbox.AddToolboxItem(New System.Drawing.Design.ToolboxItem(GetType(System.Data.DataView)), "Data") Me.arToolbox.AddToolboxItem(New System.Drawing.Design.ToolboxItem(GetType(System.Data.OleDb.OleDbConnection)), "Data") Me.arToolbox.AddToolboxItem(New System.Drawing.Design.ToolboxItem(GetType(System.Data.OleDb.OleDbDataAdapter)), "Data") Me.arToolbox.AddToolboxItem(New System.Drawing.Design.ToolboxItem(GetType(System.Data.Odbc.OdbcConnection)), "Data") Me.arToolbox.AddToolboxItem(New System.Drawing.Design.ToolboxItem(GetType(System.Data.Odbc.OdbcDataAdapter)), "Data") Me.arToolbox.AddToolboxItem(New System.Drawing.Design.ToolboxItem(GetType(System.Data.SqlClient.SqlConnection)), "Data") Me.arToolbox.AddToolboxItem(New System.Drawing.Design.ToolboxItem(GetType(System.Data.SqlClient.SqlDataAdapter)), "Data") End Sub |
|
To write the code in C#
| C# code. Paste ABOVE the formDesigner class. |
Copy Code
|
|---|---|
using GrapeCity.ActiveReports.Design.Toolbox; using GrapeCity.ActiveReports.Design; |
|
| C# code. Paste INSIDE the formDesigner class. |
Copy Code
|
|---|---|
private void LoadTools(Toolbox arToolbox) { //Add Data Providers this.arToolbox.AddToolboxItem(new System.Drawing.Design.ToolboxItem(typeof(System.Data.DataSet)), "Data"); this.arToolbox.AddToolboxItem(new System.Drawing.Design.ToolboxItem(typeof(System.Data.DataView)), "Data"); this.arToolbox.AddToolboxItem(new System.Drawing.Design.ToolboxItem(typeof(System.Data.OleDb.OleDbConnection)), "Data"); this.arToolbox.AddToolboxItem(new System.Drawing.Design.ToolboxItem(typeof(System.Data.OleDb.OleDbDataAdapter)), "Data"); this.arToolbox.AddToolboxItem(new System.Drawing.Design.ToolboxItem(typeof(System.Data.Odbc.OdbcConnection)), "Data"); this.arToolbox.AddToolboxItem(new System.Drawing.Design.ToolboxItem(typeof(System.Data.Odbc.OdbcDataAdapter)), "Data"); this.arToolbox.AddToolboxItem(new System.Drawing.Design.ToolboxItem(typeof(System.Data.SqlClient.SqlConnection)), "Data"); this.arToolbox.AddToolboxItem(new System.Drawing.Design.ToolboxItem(typeof(System.Data.SqlClient.SqlDataAdapter)), "Data"); } |
|
Adding an OnExit method
- Right-click anywhere on the formDesigner, and select View Code.
- In the code view that appears, add the following code to create an OnExit method that you can call from the Exit menu item we create later.
The following examples show what the code looks like.
To write the code in Visual Basic.NET
To write the code in C#Visual Basic.NET code. Paste INSIDE the formDesigner class. Copy CodePrivate Sub OnExit(ByVal sender As Object, ByVal e As EventArgs) MyBase.Close() End Sub
C# code. Paste INSIDE the formDesigner class. Copy Codeprivate void OnExit(object sender, EventArgs e) { Close(); }
Adding code to set up the toolbox, menus, and toolstrips
- In the Design view of the form, double-click the title bar on the formDesigner. This creates formDesigner_Load event handling method.
- Add code to the handler to:
- Set up the toolbox
- Set up the menu and tool strips
- Add an Exit command to the menu
The following examples show what the code for the method looks like.
To write the code in Visual Basic.NETTo write the code in C#Visual Basic.NET code. Paste INSIDE the formDesigner Load event. Copy Code' Add controls to the toolbox LoadTools(arToolbox) arDesigner.Toolbox = arToolbox ' Add Menu and ToolStrips to the Form Dim menuStrip As ToolStrip = arDesigner.CreateToolStrips(DesignerToolStrips.Menu)(0) Dim fileMenu As ToolStripDropDownItem = CType(menuStrip.Items(0), ToolStripDropDownItem) ' Add an Exit command to the File menu fileMenu.DropDownItems.Add(New ToolStripMenuItem("Exit", Nothing, AddressOf OnExit)) Dim panel As ToolStripPanel = (New ToolStripContainer()).TopToolStripPanel panel.Join(menuStrip, 0) panel.Join(arDesigner.CreateToolStrips(DesignerToolStrips.Zoom)(0), 1) panel.Join(arDesigner.CreateToolStrips(DesignerToolStrips.Undo)(0), 1) panel.Join(arDesigner.CreateToolStrips(DesignerToolStrips.Edit)(0), 1) panel.Join(arDesigner.CreateToolStrips(DesignerToolStrips.Report)(0), 1) panel.Join(arDesigner.CreateToolStrips(DesignerToolStrips.Layout)(0), 2) panel.Join(arDesigner.CreateToolStrips(DesignerToolStrips.Format)(0), 2)
C# code. Paste INSIDE the formDesigner Load event. Copy Code// Add controls to the toolbox LoadTools(arToolbox); arDesigner.Toolbox = arToolbox; // Add Menu and ToolStrip to the Form ToolStrip menuStrip = arDesigner.CreateToolStrips(DesignerToolStrips.Menu)[0]; ToolStripDropDownItem fileMenu = (ToolStripDropDownItem)menuStrip.Items[0]; // Add an Exit command to the File menu fileMenu.DropDownItems.Add(new ToolStripMenuItem("Exit", null, this.OnExit)); ToolStripPanel panel = (new ToolStripContainer()).TopToolStripPanel; panel.Join(menuStrip, 0); panel.Join(arDesigner.CreateToolStrips(DesignerToolStrips.Zoom)[0], 1); panel.Join(arDesigner.CreateToolStrips(DesignerToolStrips.Undo)[0], 1); panel.Join(arDesigner.CreateToolStrips(DesignerToolStrips.Edit)[0], 1); panel.Join(arDesigner.CreateToolStrips(DesignerToolStrips.Report)[0], 1); panel.Join(arDesigner.CreateToolStrips(DesignerToolStrips.Layout)[0], 2); panel.Join(arDesigner.CreateToolStrips(DesignerToolStrips.Format)[0], 2);
Removing Layer List from Section Report
Layers are supported in Page Reports and Rdl Reports, so the Layer List options appear disabled in Section Reports. Follow the steps below to remove the Layer List from Section Report.
- In the Code view of formDesigner, add the OnLayoutChanged event handler to modify the report layout.
To write the code in Visual Basic.NET
To write the code in C#Visual Basic.NET code. Paste INSIDE the formDesigner class. Copy Code' Create the event handler Public Sub New() InitializeComponent() AddHandler Me.arDesigner.LayoutChanged, AddressOf OnLayoutChanged End Sub
C# code. Paste INSIDE the formDesigner method. Copy Code// Create the event handler this.arDesigner.LayoutChanged += new LayoutChangedEventHandler(OnLayoutChanged);
- Add the following code to create OnLayoutChanged function. This code creates a method that you can call in the formDesigner_Load event. The following example shows what the code for the method looks like:
To write the code in Visual Basic.NETTo write the code in C#Visual Basic.NET code. Paste INSIDE the formDesigner class. Copy CodePrivate Sub OnLayoutChanged(ByVal sender As System.Object, ByVal e As LayoutChangedArgs) Handles arDesigner.LayoutChanged End Sub
C# code. Paste INSIDE the formDesigner class. Copy Codeprivate void OnLayoutChanged(object sender, LayoutChangedArgs e){}
- Go to the OnLayoutChanged function and add the following code to remove the Layer List from Section Report and add it to the Page Report or Rdl Report. The following example shows what the code for the method looks like:
To write the code in Visual Basic.NET
To write the code in C#Visual Basic.NET code. Paste INSIDE the OnLayoutChanged function. Copy CodeIf arDesigner.ReportType = DesignerReportType.Section Then tabControl.TabPages.Remove(TabPage1) tabControl.TabPages.Remove(TabPage2) tabControl.TabPages.Add(TabPage1) tabControl.Refresh() End If If arDesigner.ReportType = DesignerReportType.Page Then tabControl.TabPages.Remove(TabPage1) tabControl.TabPages.Remove(TabPage2) tabControl.TabPages.Add(TabPage1) tabControl.TabPages.Add(TabPage2) tabControl.Refresh() LoadTools(arToolbox) arDesigner.Toolbox = arToolbox End If If arDesigner.ReportType = DesignerReportType.Rdl Then tabControl.TabPages.Remove(TabPage1) tabControl.TabPages.Remove(TabPage2) tabControl.TabPages.Add(TabPage1) tabControl.TabPages.Add(TabPage2) tabControl.Refresh() End If
C# code. Paste INSIDE the OnLayoutChanged function. Copy Codeif (arDesigner.ReportType == DesignerReportType.Section) { tabControl.TabPages.Remove(tabPage1); tabControl.TabPages.Remove(tabPage2); tabControl.TabPages.Add(tabPage1); tabControl.Refresh(); } if (arDesigner.ReportType == DesignerReportType.Page) { tabControl.TabPages.Remove(tabPage1); tabControl.TabPages.Remove(tabPage2); tabControl.TabPages.Add(tabPage1); tabControl.TabPages.Add(tabPage2); tabControl.Refresh(); LoadTools(arToolbox); arDesigner.Toolbox = arToolbox; } if (arDesigner.ReportType == DesignerReportType.Rdl) { tabControl.TabPages.Remove(tabPage1); tabControl.TabPages.Remove(tabPage2); tabControl.TabPages.Add(tabPage1); tabControl.TabPages.Add(tabPage2); tabControl.Refresh(); }
- Add the following code in formDesigner Load event to call the OnLayoutChanged function.
To write the code in Visual Basic.NET
Visual Basic.NET code. Paste INSIDE the OnLayoutChanged function Copy CodeOnLayoutChanged(Nothing, Nothing)
To write the code in C#
C# code. Paste INSIDE the OnLayoutChanged function Copy CodeOnLayoutChanged(null, null);
Viewing the End User Report Designer
- Press F5 to run the project. The End User Report Designer opens with a Section Report.
- Go to the File menu and select New to open the Create New Report dialog.
- From Templates, you can select Page Report or Rdl Report to open in the designer along with its corresponding toolbox controls, Report Explorer and Layer List items.Ok
- Go to the File menu again. Notice that an Exit menu item has been added to the listed menu items.
You can also customize the End User Report Designer further by disabling the Section Report tab in the Page or RDL report toolbox. For this and other customizations refer to the End User Designer product sample.

