The EndUserDesigner Sample demonstrates how to set up a custom end-user report designer using the Designer, ReportExplorer, Layer List and ToolBox controls. This Sample is part of the ActiveReports Professional Edition.
Sample Location
Visual Basic.NET
<User Folder>\Documents\GrapeCity Samples\ActiveReports 10\Professional\EndUserDesigner\VB.NET
C#
<User Folder>\Documents\GrapeCity Samples\ActiveReports 10\Professional\EndUserDesigner\C#
Runtime Features
When you run the sample, the End User Designer appears in the Viewer control. This report designer provides the functionality of the ActiveReports Designer and supports three types of report layouts: Page Report, RDL Report and Section Report.
The End User Designer lets you create report layouts and edit them at design time or runtime. The Designer includes the Property Window with extensive properties for each element of the report, the Toolbox is filled with report controls and the Report Explorer with a tree view of report controls. Page reports and RDL reports provide the Layer List in a tabbed window with the Report Explorer. The Layer List window displays a list of layers in the report along with their visibility and lock options.
The End User Designer provides the following menu items:
File menu
- New - Creates a new report in the designer with the default report template.
- Open - Opens Open File Dialog to load a report.
- Open from server - Opens Open report from server dialog to open reports from the ActiveReports Server. See Server Reports for more information.
- Export - Exports a report to one of the available formats. This menu option is active during report preview only.
- Save - Saves a report.
- Save as - Saves a report at the path that you specify.
- Save to server - Opens Save report to server dialog to save reports to the ActiveReports Server. See Server Reports for more information.
- Exit - Closes the End User Designer.
Edit menu
- Undo - Undoes your last action and enables the Redo button.
- Redo - Redoes an undone action.
- Cut - Removes the selected item(s) and places them on the clipboard.
- Copy - Copies the selected item(s) to the clipboard.
- Paste - Adds the last item on the clipboard to the design surface.
- Delete - Deletes a selected control from your report layout.
- Select All- Selects all items in case of section reports or all items on the Active Layer of Page or RDL reports.
Report menu
- Convert to Master Report - (for RDL Report) Converts a RDL report to a Master Report.This menu item is enabled when you have a RDL report open. It disappears from the Report menu when a master report is applied to the report through Set Master Report.
- Report Parameters - opens the Parameters page of the Report dialog where you can manage, add and delete parameters.
- Embedded Images - opens Images page of the Report dialog, where you can select images to embed in a report. Once you add images to the collection, they appear in the Report Explorer under the Embedded Images node.
- Report Properties - opens the General page of the Report dialog where you can set report properties such as author, description and grid spacing for Page reports. For RDL reports, you can set the page header and footer properties, once you have added them to your report layout.
-
Set Master Report (for RDL Report)- This menu item is enabled when you have an RDL report open. It is disabled when an RDL report is open or when a Master Report is created with the Convert to Master Report menu item.
- Open From Server
Select Open From Server option to open the Open report from server dialog, and then select a master report (RDLX-master file format). - Open Local File
Select Open Local File option to open the Open dialog, and then select a master report.
- Open From Server
- Generate Excel Template - (for RDL Report) creates an Excel template of the report that you or the end user can customize for use with Excel exports to control the way the exported reports appear.
- View - opens the Designer, Script or Preview tab. See Designer Tabs for more details.
- Page Header - (for RDL Report) toggles the report Page Header on or off.
- Page Footer - (for RDL Report) toggles the report Page Footer on or off.
Note: Except for View option, all other options in Report menu are disabled for a Section report.
For more information on the Designer features, please see ActiveReports Designer.
Project Details
ExportForm
This is the form with the Export dialog for Page report, Rdl report and Section report.
A user sees the Export dialog under the Preview tab in the File menu > Export. This dialog allows to select the export type and to browse for the file location in local folders where the report is exported. See Exporting for details on the type of export formats supported in Section report, Page report and RDL report.
ExportForm controls
| Control | Name | Description |
|---|---|---|
| ComboBox | cmbExportFormat | The Export Format combo box that allows to select options for the report export type. |
| Button | btnOK | The OK button in the lower part of the ExportForm. |
| Button | btnCancel | The Cancel button in the lower part of the ExportForm. |
| PropertyGrid | exportPropertyGrid | Provides interface for export options of each export type. |
| SaveFileDialog | exportSaveFileDialog | The Save File dialog that allows to specify the file name for saving an exported report file. |
| Label | lblExport | The Export label in the header of the ExportForm. |
| Label | lblExportFormat | The Export Format label of the Export Format combo box. |
| Label | lblExportOptions | The Export Options label of the Export property grid. |
| Label | lblSelectExportTxt | The Select Export text that describes the purpose of the ExportForm. |
| SplitContainer | exportSettings SplitContainer |
Represents a movable bar that divides the display area of the ExportForm into two resizable panels - the ExportForm header panel and the ExportForm panel with the Export Format combo box and the Property Grid. |
| SplitContainer | exportHeader SplitContainer |
Represents a movable bar that divides the Export Format section consisting of the Export Format combo box with the Export Format label and the Property Grid of ExportForm. |
Right-click the ExportForm in the Solution Explorer and select View Code to see the code implementation for the Export form.
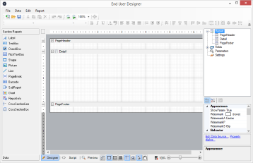
EndUserDesigner form
This is the form with a basic end-user report designer that contains the following elements. These elements are dragged from the Visual Studio toolbox onto the form.
End User Designer controls
| Control | Name | Description |
|---|---|---|
| Designer | reportDesigner | The Designer control that allows you to create and modify a report. |
| ReportExplorer | reportExplorer | Gives you a visual overview of the report elements in the form of a tree view where each node represents a report element. |
| TabControl | reportExplorerTabControl | Represents a movable bar that divides the display area of the designer into two tabs -the Report Explorer and the Layer List |
| PropertyGrid | reportPropertyGrid | Provides an interface for each element of the report. |
| Toolbox | reportToolbox | Displays all of the controls specific to the type of report that has focus. |
| LayerList | layerList | Represents a list of Layers in the report along with their visibility and lock options. |
| SplitContainer | mainContainer | Represents a movable bar that divides the display area of the Designer into two resizable panels. |
| SplitContainer | designerExplorerPropertyGridContainer | Represents a movable bar that divides the display area of the designer into two resizable panels -the toolbox and the toolstrip. |
| SplitContainer | bodyContainer | Represents a movable bar that divides the display area of the Viewer into two resizable panels. |
| SplitContainer | explorerPropertyGridContainer | Represents a movable bar that divides the display area of the designer into two resizable panels - the report explorer and the property grid. |
| ToolStripContainer | toolStripContainer | Provides a central panel on top of the Designer to hold the Toolstrip element with the menu items. |
Right-click the EndUserDesigner form in the Solution Explorer and select View Code to see the code implementation for the End User Designer.
See Also