MultiRow provides a Touch Toolbar for performing operations such as copying and pasting of selected cells using touch gestures. This section describes how to operate and customize the touch toolbar.
Touch Toolbar
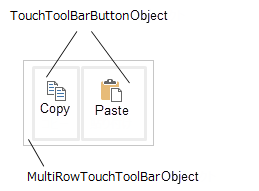
The touch toolbar has a structure where the TouchToolBarButton object is placed in the MultiRowTouchToolBar object, and you can assign an action to TouchToolBarButton. Since it is possible to customize the touch toolbar, you can perform various operations using the touch toolbar on the MultiRow control.
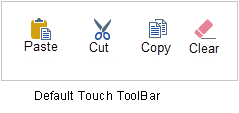
In MultiRow, a default touch toolbar allows you to perform operations such as cut, copy, paste, and delete, so you can use the touch toolbar without any configuration.
How to Display
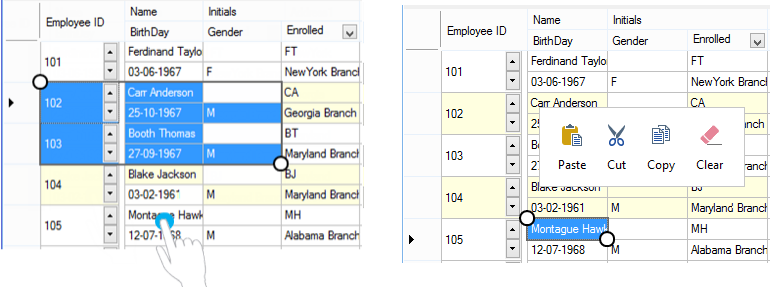
The touch toolbar can be displayed by tapping, or pressing the selected cells.
- The touch toolbar is only displayed on a touch-enabled device.
- The touch toolbar is displayed only when a touch operation is performed. It is not displayed at the time of a mouse operation.
Tapping Selected Cells
- Display of Touch Toolbar
In a state when the gripper and the frame border surrounding the selected cells are displayed, the touch toolbar is displayed if you tap inside the frame border.
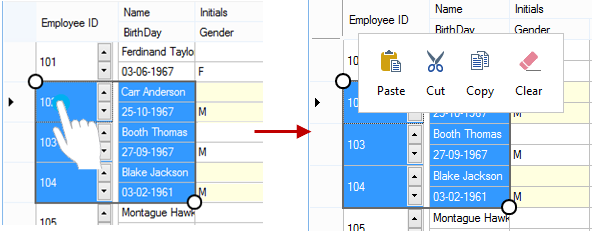
When there is a blank area included in the frame border of selected cells, the touch toolbar is displayed even if you tap on that blank area.

- Hiding the touch toolbar
In a state where some cells are selected, and the touch toolbar is displayed, the touch toolbar can be hidden by tapping inside the grid. At that time, the state of the selected cells is retained.
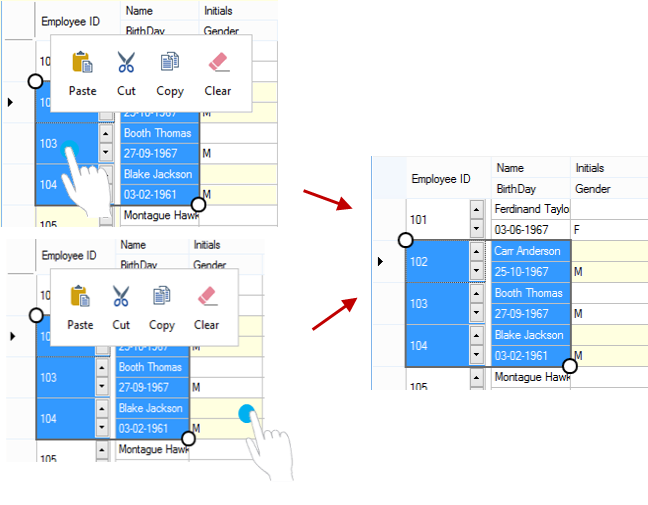
If you tap inside the grid in a state where all the rows of the grid are selected and the touch toolbar is being displayed, the touch toolbar is hidden and the tapped cell is selected.

Display by Long Press
In MultiRow, if you press a cell, the cell is selected and the touch toolbar is displayed.
- Selected Cells
If you press inside the frame border of the selected cells, the touch toolbar is displayed, and the state of the selected cells is retained.

- Cells Outside the Selected Range
If you press a cell outside the frame border of the selected cells, the touch toolbar is displayed, and the pressed cell is selected.
Disabling the Touch Toolbar
Since, the default touch toolbar is set in the GcMultiRow.TouchToolBar property of the GcMultiRow control, the default touch toolbar is displayed if no settings are performed.
If you do not want the default touch toolbar to be displayed, you can set the TouchToolBar property to Null.
Using Code
This example sets the TouchToolBar property.
[VB]
GcMultiRow1.TouchToolBar = Nothing |
[CS]
gcMultiRow1.TouchToolBar = null; |
Customizing the Default Touch Toolbar
The default touch toolbar has four items (cut, copy, paste, and delete) set in it, but you can hide these items, and also add new items to it.
Using Code
The following code creates an instance of the default touch toolbar, and assigns a touch toolbar to the GcMultiRow control.
[VB]
Dim defaultTouchToolBar1 = New DefaultTouchToolBar(GcMultiRow1) ' Hide Cut of the default touch toolbar defaultTouchToolBar1.Items(1).Visible = False ' Set the touch toolbar to the GcMultiRow control GcMultiRow1.TouchToolBar = defaultTouchToolBar1 |
[CS]
DefaultTouchToolBar defaultTouchToolBar1 = new DefaultTouchToolBar(gcMultiRow1); // Hide Cut of the default touch toolbar defaultTouchToolBar1.Items[1].Visible = false; // Set the touch toolbar to the GcMultiRow control gcMultiRow1.TouchToolBar = defaultTouchToolBar1; |
The following codes uses the RemoveAt method to remove an item from the default touch toolbar.
[VB]
Dim defaultTouchToolBar1 = New DefaultTouchToolBar(GcMultiRow1) ' Remove Copy of the default toolbar defaultTouchToolBar1.Items.RemoveAt(2) ' Set the touch toolbar to the GcMultiRow control GcMultiRow1.TouchToolBar = defaultTouchToolBar1 |
[CS]
DefaultTouchToolBar defaultTouchToolBar1 = new DefaultTouchToolBar(gcMultiRow1); // Remove Copy of the default toolbar defaultTouchToolBar1.Items.RemoveAt(2); // Set the touch toolbar to the GcMultiRow control gcMultiRow1.TouchToolBar = defaultTouchToolBar1; |
In addition, you can use the Insert method to add a new item to the default touch toolbar. This example adds a new item to the toolbar.

[VB]
Dim defaultTouchToolBar1 = New DefaultTouchToolBar(GcMultiRow1)
'Add an item to the default toolbar
Dim selectallBtn As New TouchToolBarButton(SelectionActions.SelectAll) With {.Text = "Select all", .Name = "AllSelect", |
[CS]
DefaultTouchToolBar defaultTouchToolBar1 = new DefaultTouchToolBar(gcMultiRow1);
// Add an item to the default toolbar TouchToolBarButton
selectallBtn = new TouchToolBarButton(SelectionActions.SelectAll) { Text = "Select all", Name = "AllSelect", |
Customizing the Touch Toolbar
You can use the MultiRowTouchToolBar class to create a new touch toolbar, without using the default toolbar.
Using Code
The following code creates a touch toolbar on which Copy and Paste are placed.

[VB]
Imports GrapeCity.Win.MultiRow
GcMultiRow1.Template = Template.CreateGridTemplate(5)
GcMultiRow1.RowCount = 6
Dim touchToolBar As MultiRowTouchToolBar = New MultiRowTouchToolBar(GcMultiRow1)
Dim copyBtn = New TouchToolBarButton(EditingActions.Copy) With {.Text = "Copy", .Name = "CopyItem", |
[CS]
using GrapeCity.Win.MultiRow;
gcMultiRow1.Template = Template.CreateGridTemplate(5);
gcMultiRow1.RowCount = 6;
MultiRowTouchToolBar touchToolBar = new MultiRowTouchToolBar(gcMultiRow1);
TouchToolBarButton copyBtn = new TouchToolBarButton(EditingActions.Copy) { Text = "Copy", Name = "CopyItem", |
You can process operations of your own using the Click event of TouchToolBarButton.
Using Code
The following code performs sorting in the touch toolbar.
[VB]
Imports GrapeCity.Win.MultiRow Private Sub Form1_Load(sender As Object, e As EventArgs) Handles MyBase.Load
GcMultiRow1.Template = Template.CreateGridTemplate(3)
GcMultiRow1.AllowUserToAddRows = False
GcMultiRow1.RowCount = 5
' Set the sample data
GcMultiRow1.Rows(0).SetValues(New String(2) {"E", "1", "VB"})
GcMultiRow1.Rows(1).SetValues(New String(2) {"D", "2", "VB"})
GcMultiRow1.Rows(2).SetValues(New String(2) {"C", "3", "CS"})
GcMultiRow1.Rows(3).SetValues(New String(2) {"B", "4", "VB"})
GcMultiRow1.Rows(4).SetValues(New String(2) {"A", "5", "CS"})
' Set the touch toolbar Dim touchToolBar = New MultiRowTouchToolBar(GcMultiRow1)
Dim ascSortBtn = New TouchToolBarButton() With {.Text = "Sort in Ascending Order", .Name = "Sort", |
[CS]
using GrapeCity.Win.MultiRow;
private void Form1_Load(object sender, EventArgs e)
{
gcMultiRow1.Template = Template.CreateGridTemplate(3);
gcMultiRow1.AllowUserToAddRows = false;
gcMultiRow1.RowCount = 5;
// Set the sample data
gcMultiRow1.Rows[0].SetValues(new string[3] { "E", "1", "VB" });
gcMultiRow1.Rows[1].SetValues(new string[3] { "D", "2", "VB" });
gcMultiRow1.Rows[2].SetValues(new string[3] { "C", "3", "CS"});
gcMultiRow1.Rows[3].SetValues(new string[3] { "B", "4", "VB" });
gcMultiRow1.Rows[4].SetValues(new string[3] { "A", "5", "CS" });
// Set the touch toolbar
MultiRowTouchToolBar touchToolBar = new MultiRowTouchToolBar(gcMultiRow1);
TouchToolBarButton ascSortBtn = new TouchToolBarButton() { Text = "Sort in Ascending Order", Name = "Sort", |
Using Context Menu in the Touch Toolbar
You can use a context menu in the touch toolbar, using the ![]() ContextMenuStrip class and
ContextMenuStrip class and ![]() ToolStripDropDownButton class of the .NET Framework.
ToolStripDropDownButton class of the .NET Framework.
Using Code
The following code sets a context menu in the touch toolbar.

[VB]
Imports GrapeCity.Win.MultiRow
Dim touchToolBar = New MultiRowTouchToolBar(GcMultiRow1)
Dim dropDownMenu = New ToolStripDropDownButton()
dropDownMenu.Image = New Bitmap("Touch_dropdown.png")
dropDownMenu.ShowDropDownArrow = False
dropDownMenu.ImageScaling = ToolStripItemImageScaling.None
' Set the context menu
Dim menu = New System.Windows.Forms.ContextMenuStrip()
menu.Items.Add("Add Row") menu.Items.Add("Delete Row")
menu.Items.Add("Select All")
dropDownMenu.DropDown = menu
touchToolBar.Items.AddRange(New ToolStripItem() {dropDownMenu})
GcMultiRow1.TouchToolBar = touchToolBar
|
[CS]
using GrapeCity.Win.MultiRow;
MultiRowTouchToolBar touchToolBar = new MultiRowTouchToolBar(gcMultiRow1);
ToolStripDropDownButton dropDownMenu = new ToolStripDropDownButton();
dropDownMenu.Image = new Bitmap(@"Touch_dropdown.png");
dropDownMenu.ShowDropDownArrow = false;
dropDownMenu.ImageScaling = ToolStripItemImageScaling.None;
// Set the context menu
ContextMenuStrip menu = new System.Windows.Forms.ContextMenuStrip();
menu.Items.Add("Add Row");
menu.Items.Add("Delete Row");
menu.Items.Add("Select All");
dropDownMenu.DropDown = menu;
touchToolBar.Items.AddRange(new ToolStripItem[] { dropDownMenu });
gcMultiRow1.TouchToolBar = touchToolBar;
|
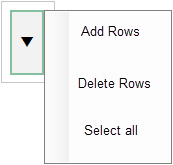
You can set the space between items in the context menu, by setting the ContextMenuStrip.Items.AutoSize property to False and setting the Height property, so that it is easy to operate through touch.
Using Code
This example sets the menu height.
[VB]
' Set the context menu
Dim menu = New System.Windows.Forms.ContextMenuStrip()
menu.Items.Add("Add Row")
menu.Items.Add("Delete Row")
menu.Items.Add("Select All")
' Set the space between items in the context menu
menu.Items(0).AutoSize = False
menu.Items(0).Height = 50
menu.Items(1).AutoSize = False
menu.Items(1).Height = 50
menu.Items(2).AutoSize = False
menu.Items(2).Height = 50
dropDownMenu.DropDown = menu
|
[CS]
// Set the context menu
ContextMenuStrip menu = new System.Windows.Forms.ContextMenuStrip();
menu.Items.Add("Add Row");
menu.Items.Add("Delete Row");
menu.Items.Add("Select All");
// Set the space between items in the context menu
menu.Items[0].AutoSize = false;
menu.Items[0].Height = 50;
menu.Items[1].AutoSize = false;
menu.Items[1].Height = 50;
menu.Items[2].AutoSize = false;
menu.Items[2].Height = 50;
dropDownMenu.DropDown = menu;
|
 |
Because the context menu used in the touch toolbar uses the features of ContextMenuStrip and ToolStripDropDownButton of the .NET Framework, it is not a feature provided by MultiRow. |
Using the Touch Toolbar in Cell Notes
The touch toolbar can also be used in Cell Notes.
In a cell note, you can display the touch toolbar by any of the following actions:
- Press the selected cell note when it is not in edit mode.
- Press a cell note which is not selected.
If you want to use the same touch toolbar in every cell note, you can use the TouchToolBar property of the GcMultiRow.DefaultCellNoteStyle property.
Using Code
This example adds a button to the touch toolbar.
[VB]
Imports GrapeCity.Win.MultiRow
Dim touchToolBar = New MultiRowTouchToolBar(GcMultiRow1)
' Set a touch toolbar button
Dim noteDeleteBtn = New TouchToolBarButton() With {.Text = "Delete", .Name = "NoteDelete", |
[CS]
using GrapeCity.Win.MultiRow;
MultiRowTouchToolBar touchToolBar = new MultiRowTouchToolBar(gcMultiRow1);
// Set a touch toolbar button
TouchToolBarButton noteDeleteBtn = new TouchToolBarButton() { Text = "Delete", Name = "NoteDelete", |
If you want to use the touch toolbar in a specific cell note, you can use the TouchToolBar property of the CellNote.Style property as in this example.
[VB]
Imports GrapeCity.Win.MultiRow
Dim touchToolBar = New MultiRowTouchToolBar(GcMultiRow1)
' Set a touch toolbar button
Dim notestyleBtn = New TouchToolBarButton() With {.Text = "Edit", .Name = "NoteEdit", |
[CS]
using GrapeCity.Win.MultiRow;
MultiRowTouchToolBar touchToolBar = new MultiRowTouchToolBar(gcMultiRow1);
// Set a touch toolbar button
TouchToolBarButton notestyleBtn = new TouchToolBarButton() { Text = "Edit", Name = "NoteEdit", |