In this tutorial, you will learn how to use features related to selection, such as whether to use multiple or single selection, the types of selectors to use, and which selection attributes to use in the control.
-
Start a new project.
-
From the Visual Basic Project menu, select Components, then check the box labeled ComponentOne True DBCalendar 8.0. Click OK to add the TDBCalendar control icons to the Toolbox.
-
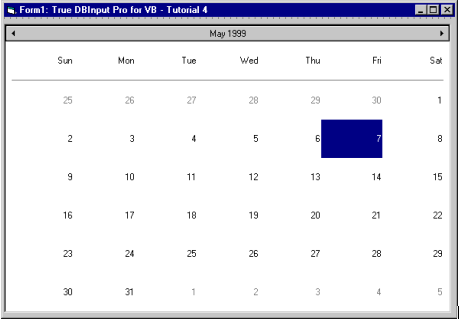
Place a True DBCalendar control (TDBCalendar1) on the form (Form1) as shown in the following figure.
-
Using the General property page of TDBCalendar1, set the MultiSelect to 1- Simple.
-
Place the following into the Form_Load:
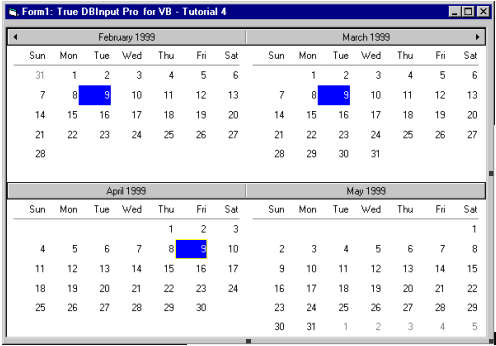
Example Title Copy CodeTDBCalendar1.Selections.Add CDate(“1998/2/9”) TDBCalendar1.Selections.Add CDate(“1998/3/9”) TDBCalendar1.Selections.Add CDate(“1998/4/9”)
Since the control is set to multiple selection, 2/9, 3/9 and 4/9 can be selected beforehand.
-
Using the Attributes property page of TDBCalendar1, set it to the SelAttrib, choose the Colors button to set the BackColor to Blue and the ForeColor to White.
-
Using the General property page of TDBCalendar1, set SelectStyle to 1 - Box.
-
Using the Appearance property page of TDBCalendar1, set MonthCols to 2, and MonthRows to 2.
Run the program and observe the following:
-
If the steps were followed in order, the calendar will be in multiple selection mode.
-
Since 3 days (2/9, 3/9 and 4/9) were selected beforehand, they should appear in the calendar as selected dates.
-
Selected dates should be displayed with a blue background and white text.
-
The calendar selector is set to a box set around the current day cell.
This concludes Tutorial 4.