Edit Chart 2D Data
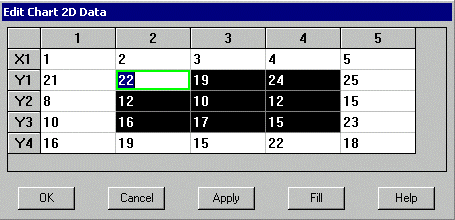
Chart2D Data Using Array Layout, Ready to Fill with 22
Use the down/up/left/right arrow keys or mouse to select the appropriate cell to make the current cell. If using the mouse, you may scroll the selections using the scroll bar. If keys are used, the scrolling will take place automatically.
The current cell is indicated by a green or red border around the cell. The green border indicates that the current cell is unmodified or that the edit has been completed (enter key pressed). The red border indicates that the current cell is being edited.
To edit the data in the cell, select the cell, and then enter digits and characters via the keyboard. If you wish to edit the existing data, select the cell, then double click the cell, and you may insert or delete characters.
In some cases, you may wish to set multiple cells to the same value. In this case, select the upper left corner of the rectangle comprised of those cells you wish to set, set the value of that cell, then left click the mouse and drag the mouse to the opposite corner of the rectangle. This will highlight multiple cells and enable the Fill button. When the appropriate rectangle is highlighted, release the left mouse button and press the Fill button. All highlighted cells will be changed to the value of the current cell.
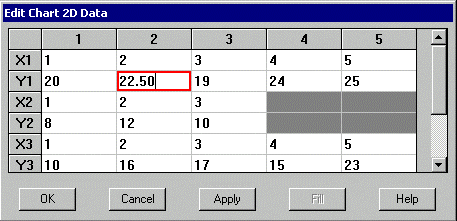
Chart2D Data Using General Layout, Current Cell Modified
Note that the Series Data editor appears differently for Array layouts than it does for General layouts. Array layouts share the same X or independent values, so each series will have the same number of data points and X values. General layouts have independent X values. When editing General layouts, both X and Y values are displayed and can be edited. Note that each series may have a different number of data points.
Pressing the Apply button will cause the chart display to change in a manner consistent with the new settings. Once the Apply button has been pressed, it is only possible to cancel changes made since Apply was pressed.
When finished modifying the settings, press Cancel to return to the property pages without applying changes, or press OK to apply the changes and return to the property pages.