Adding text to the status bar is a simple as clicking in the C1Window status bar area and typing. In this topic you'll add a drop-down box to the dialog window's status bar that will change the content of the dialog window.
To customize the status bar, complete the following steps:
1. Navigate to the Visual Studio Toolbox and add the C1Window control to your page, and resize the control.
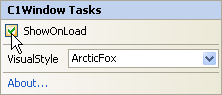
2. Open the C1Window Tasks menu from its smart tag and select the ShowOnLoad checkbox to set the ShowOnLoad property to True:
For more information on accessing the smart tag, see C1Window Smart Tag.
3. In the C1Window Tasks menu click the VisualStyle drop-down arrow and select Office2007Blue.
4. Select the C1Window control and set the following in the Properties window:
• Set the Width property to 325.
• Set the Height property to 200.
• Set the Text property to "Search!".
• Set the ContentUrl property to "http://www.yahoo.com".
5. Click once in the status bar of the dialog window and type "Go to: ".
6. Switch to Source view and notice that the text you just added is enclosed in the <StatusTemplate> tag.
7. Add a drop-down list to the <StatusTemplate> tag so that it appears like the following:
<StatusTemplate>
Go to:
<asp:DropDownList ID="searchSites" runat="server" onchange="ddlChange(this)">
<asp:ListItem Value="http://www.yahoo.com/" Selected="True">Yahoo!</asp:ListItem>
<asp:ListItem Value="http://www.google.com/">Google</asp:ListItem>
<asp:ListItem Value="http://www.wikipedia.com/">Wikipedia</asp:ListItem>
</asp:DropDownList>
</StatusTemplate>
8. Add the following script between the <head> and </head> tags of your page:
<script id="c1d_script" type="text/javascript">
function ddlChange(sender)
{
var option = sender.options[sender.selectedIndex];
$get("<%= C1Window1.ClientID %>").control.setUrl(option.value);
}
</script>
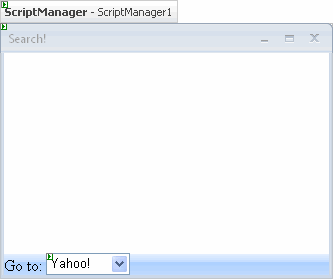
9. Switch to Design view and note that your page now looks similar to the following:
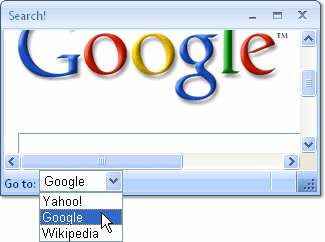
Run your application and observe:
The dialog window appears with the drop-down list in the status bar; select a Web site from the list and observe that the dialog window loads that Web site:
|
