In this step you'll create and set up a Web site and add eight C1Expander controls. Complete the following steps to add C1Expander controls to a Web site:
- From the Visual Studio File menu select New | Project. The New Project dialog box will appear.
- In the New Project dialog box expand a language in the left-hand pane and select Web. In the right pane, choose ASP.NET Empty Web Application, enter a Name for your application, and select OK. A new application will be created.
- In the Solution Explorer, right-click the project and choose Add Reference.
- In the Add Reference dialog box, locate and select the C1.Web.Wijmo.Controls and C1.Web.Wijmo.Controls.Design assemblies and click OK. The references will be added.
- Right-click the project in the Solution Explorer and from the context menu choose Add | New Item.
- In the Add New Item dialog box choose Web Form from the list of templates, name the item "Default.aspx", and click Add. The new page should open.
- In Source view add the following DIV tags to the body of your page, between the page's initial <div></div> tags:
<div id="row1" style="width: 550px; float:none; clear:both;">
<div id="box1" style="float:left;"></div>
<div id="box2" style="float:left;"></div>
<div id="box3" style="float:left;"></div>
<div id="box4" style="float:left;"></div>
</div>
<div id="row2" style="width: 550px; float:none; clear:both;">
<div id="box5" style="float:left;"></div>
<div id="box6" style="float:left;"></div>
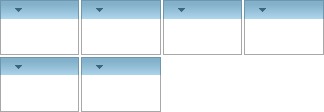
</div>This will create two rows, each containing four small boxes.
-
Place your mouse between the
<div id="box1" style="float:left;">and</div>tags, navigate to the Visual Studio Toolbox, and double-click the C1Expander control to add the control to the box. -
Repeat the previous step with each box to add a total of six C1Expander controls to the page, one in each box (C1Expander1 to C1Expander 4 in the top row and C1Expander5 to C1Expander6 in the bottom row).
-
Run your application and observe that the page appears similar to the following:
-
Click on the header of one of the C1Expander controls. Observe that clicking on any C1Expander's header will collapse the C1Expander control. Clicking on a collapsed C1Expander's header will expand the control.
For example, when all of the controls are collapsed the page will look as follows:

In this step you added C1Expander controls to the form. In the next step of the quick start, you'll add content to those controls.