ActiveReports allows you to set up grouping in unbound reports. When setting up grouping, the group header's DataField property is used to retrieve the grouping data from the database in the same manner as a textbox's DataField property. This walkthrough illustrates how to set up grouping in an unbound report.
This walkthrough is split into the following activities:
- Adding code to connect the report to a data source
- Adding controls to contain the data
- Using the DataInitialize event to add fields to the report's fields collection
- Using the FetchData event to populate the report fields
- Adding code to close the connection to the data source
- Viewing the report
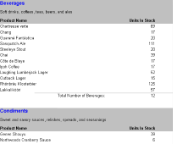
When you complete this walkthrough you get a layout that looks similar to the following at design time and at run time.
Design-Time Layout
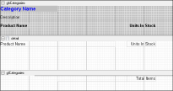
Run-Time Layout
To add an ActiveReport to the Visual Studio project
- Create a new Visual Studio project.
- From the Project menu, select Add New Item.
- In the Add New Item dialog that appears, select ActiveReports 13 Section Report (code-based) and in the Name field, rename the file as rptGroupUnbound.
- Click the Add button to open a new section report in the designer.
See Adding an ActiveReport to a Project for information on adding different report layouts.
To add code to connect the report to a data source
- Double-click the gray area below the report. This creates an event-handling method for the report's ReportStart event.
- Add code to the handler to:
- Set the data source connection string
- Set the data source SQL query
- Open the connection and retrieve the data with the data reader
The following examples show what the code for the method looks like in Visual Basic.NET and C#.
To write the code in Visual Basic.NET
| Visual Basic.NET code. Paste JUST ABOVE the ReportStart event. |
Copy Code
|
|---|---|
Dim connection As System.Data.OleDb.OleDbConnection Dim reader As System.Data.OleDb.OleDbDataReader |
|
| Visual Basic.NET code. Paste INSIDE the ReportStart event. |
Copy Code
|
|---|---|
'Create the data connection and change the data source path as necessary
Dim connectionString As String
connectionString = "Provider=Microsoft.Jet.OLEDB.4.0;Data Source=C:\Users\[User Folder]\Documents\GrapeCity Samples\ActiveReports 13\Data\NWIND.mdb"
connection = New System.Data.OleDb.OleDbConnection(connectionString)
connection.Open()

Dim sqlString As String
sqlString = "SELECT * FROM categories INNER JOIN products ON categories.categoryid= products.categoryid ORDER BY categories.CategoryID"
Dim command As New System.Data.OleDb.OleDbCommand(sqlString, connection)
'Retrieve data
reader = command.ExecuteReader()
|
|
To write the code in C#
| C# code. Paste JUST ABOVE the ReportStart event. |
Copy Code
|
|---|---|
private System.Data.OleDb.OleDbConnection connection; private System.Data.OleDb.OleDbDataReader reader; |
|
| C# code. Paste INSIDE the ReportStart event. |
Copy Code
|
|---|---|
//Create the data connection and change the data source path as necessary string connectionString = @"Provider=Microsoft.Jet.OLEDB.4.0;Data Source=C:\Users\[User Folder]\Documents\GrapeCity Samples\ActiveReports 13\Data\NWIND.mdb"; connection=new System.Data.OleDb.OleDbConnection(connectionString); connection.Open(); string sqlString = "SELECT * FROM categories INNER JOIN products ON categories.categoryid = products.categoryid ORDER BY categories.CategoryID"; System.Data.OleDb.OleDbCommand command = new System.Data.OleDb.OleDbCommand(sqlString, connection); //Retrieve data reader = command.ExecuteReader(); |
|
To create a layout for the report
- On the design surface of the report, right-click and select Insert, then Group Header/Footer to add group header and footer sections.
- Select the group header and in the Properties window, set the properties as follows.
Property Name Property Value Name ghCategories BackColor Silver CanShrink True DataField CategoryID GroupKeepTogether All KeepTogether True - Select the group footer, and in the Properties Window, change the Name property to gfCategories.
- Select the Detail section, and in the Properties Window, change the CanShrink property to True.
- From the toolbox, drag the following controls to the Group Header section (drag the bottom edge of the section down to display all of the controls) and in the Properties window, set the properties of each control as follows.
TextBox1
Property Name Property Value DataField CategoryName Name txtCategoryName Text Category Name Location 0, 0 in Size 2, 0.2 in ForeColor Blue BackColor Silver Font > Size 12 Font > Bold True TextBox2
Property Name Property Value DataField Description Name txtDescription Text Description Location 0, 0.3 in Size 6, 0.2 in Label1
Property Name Property Value Name lblProductName Text Product Name Location 0, 0.6 in Font > Bold True Label2
Property Name Property Value Name lblUnitsInStock Text Units In Stock Location 4.4, 0.6 in Font > Bold True Alignment Right - From the toolbox, drag two Textbox controls to the Detail section and in the Properties window, set the properties of each control as follows.
TextBox1
Property Name Property Value DataField ProductName Name txtProductName Text Product Name Location 0, 0 in Size 4, 0.2 in TextBox2
Property Name Property Value DataField UnitsInStock Name txtUnitsInStock Text Units In Stock Location 4.4, 0 in Alignment Right - From the toolbox, drag the following controls to the Group Footer section and in the Properties window, set the properties of each control as follows.
Label
Property Name Property Value DataField TotalLabel Name lblTotalLabel Location 2, 0 in Size 2.4, 0.2 in TextBox
Property Name Property Value DataField ProductName Name txtTotalItems Text Total Items Location 4.4, 0 in SummaryType SubTotal SummaryFunc Count SummaryRunning Group SummaryGroup ghCategories Alignment Right Line
Property Name Property Value Name Line1 LineWeight 3 X1 1.2 X2 6.45 Y1 0 Y2 0 - Right-click the Page Header section and select Delete.
To add fields using the DataInitialize event
To write the code in Visual Basic
- Right-click in any section of the design surface of the report, and select View Code to display the code view for the report.
- At the top left of the code view of the report, click the drop-down arrow and select (YourReportName Events).
- At the top right of the code window, click the drop-down arrow and select DataInitialize. This creates an event-handling method for the report's DataInitialize event.
- Add code to the handler to add fields to the report's Fields collection.
The following example shows what the code for the method looks like.
| Visual Basic.NET code. Paste INSIDE the DataInitialize event. |
Copy Code
|
|---|---|
Fields.Add("CategoryID")
Fields.Add("CategoryName")
Fields.Add("ProductName")
Fields.Add("UnitsInStock")
Fields.Add("Description")
Fields.Add("TotalLabel")
|
|
To write the code in C#
- Click in the gray area below the report to select it.
- Click the events icon in the Properties Window to display available events for the report.
- Double-click DataInitialize. This creates an event-handling method for the report's DataInitialize event.
- Add code to the handler to add fields to the report's Fields collection.
The following example shows what the code for the method looks like.
| C# code. Paste INSIDE the DataInitialize event. |
Copy Code
|
|---|---|
Fields.Add("CategoryID");
Fields.Add("CategoryName");
Fields.Add("ProductName");
Fields.Add("UnitsInStock");
Fields.Add("Description");
Fields.Add("TotalLabel");
|
|
To populate the fields using the FetchData event
To write the code in Visual Basic
- At the top left of the code view for the report, click the drop-down arrow and select (YourReportName Events).
- At the top right of the code window, click the drop-down arrow and select FetchData. This creates an event-handling method for the report's FetchData event.
- Add code to the handler to retrieve information to populate the report fields.
The following example shows what the code for the method looks like.
| Visual Basic.NET code. Paste INSIDE the FetchData event. |
Copy Code
|
|---|---|
Try
   reader.Read()
   Me.Fields("CategoryID").Value = reader("categories.CategoryID")
   Me.Fields("CategoryName").Value = reader("CategoryName")
   Me.Fields("ProductName").Value = reader("ProductName")
   Me.Fields("UnitsInStock").Value = reader("UnitsInStock")
   Me.Fields("Description").Value = reader("Description")
   Me.Fields("TotalLabel").Value = "Total Number of " + reader("CategoryName") + ":"
   eArgs.EOF = False
Catch
   eArgs.EOF = True
End Try
|
|
To write the code in C#
- Back in design view, click in the gray area below the report to select it.
- Click the events icon in the Properties window to display available events for the report.
- Double-click FetchData. This creates an event-handling method for the report's FetchData event.
- Add code to the handler to retrieve information to populate the report fields.
The following example shows what the code for the method looks like.
| C# code. Paste INSIDE the FetchData event. |
Copy Code
|
|---|---|
try
   {
      reader.Read();
      Fields["CategoryID"].Value = reader["categories.CategoryID"].ToString();
      Fields["CategoryName"].Value = reader["CategoryName"].ToString();
      Fields["ProductName"].Value = reader["ProductName"].ToString();
      Fields["UnitsInStock"].Value = reader["UnitsInStock"].ToString();
      Fields["Description"].Value = reader["Description"].ToString();
      Fields["TotalLabel"].Value = "Total Number of " + reader["CategoryName"].ToString() + ":";
      eArgs.EOF = false;
   }
catch
   {
      eArgs.EOF = true;
   }
|
|
To add code to close the connection to the data source
To write the code in Visual Basic
- At the top left of the code view for the report, click the drop-down arrow and select (YourReportName Events).
- At the top right of the code window, click the drop-down arrow and select ReportEnd. This creates an event-handling method for the report's ReportEnd event.
- Add code to the handler to close the connection.
| Visual Basic.NET code. Paste INSIDE the ReportEnd event. |
Copy Code
|
|---|---|
reader.Close() connection.Close() |
|
To write the code in C#
- Back in design view, click in the gray area below the report to select it.
- Click the events icon in the Properties window to display available events for the report.
- Double-click ReportEnd. This creates an event-handling method for the report's ReportEnd event.
- Add code to the handler to close the connection.
The following example shows what the code for the method looks like.
| C# code. Paste INSIDE the ReportEnd event. |
Copy Code
|
|---|---|
reader.Close(); connection.Close(); |
|
To view the report
- Click the preview tab to view the report at design time.
OR
- Open the report in the Viewer. See Windows Forms Viewer for further information.