This walkthrough illustrates how to create a report that includes the Table of Contents (ToC) control and displays the document map on a report page.
The TableOfContents control allows you to quickly navigate to desired data inside a report. You can use the TableOfContents control to embed the list of contents in the report body for printing and rendering, unlike the Document Map that is only available in the Viewers and cannot be rendered or printed.
- To add an ActiveReports to the Visual Studio project
- To connect the report to a data source
- To add a dataset
- To create a layout for the report
- To configure the appearance of Table of Contents
- To view the report
When you complete this walkthrough you get a layout that looks similar to the following at design time and at run time.
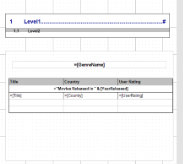
Design-Time Layout
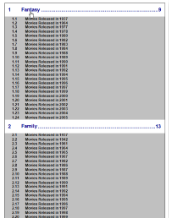
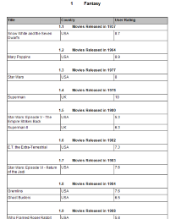
Run-Time Layout
To add an ActiveReports to the Visual Studio project
- Create a new Visual Studio Windows Forms Application project.
- From the Project menu, select Add New Item.
- In the Add New Item dialog that appears, select ActiveReports 13 RDL Report and in the Name field, rename the file as ReportsWithToC.rdlx.
- Click the Add button to open a new RDL report.
See Adding an ActiveReport to a Project for information on adding different report layouts.
To connect the report to a data source
This walkthrough uses the Movies table from the Reels database. By default, in ActiveReports, the Reels.mdb file is located in the [User Documents folder]\GrapeCity Samples\ActiveReports 13\Data folder.
- In the Report Explorer, right-click the Data Sources node and select the Add Data Source option or select Data Source from the Add button.
- In the Report Data Source Dialog that appears, select the General page and in the Name field, enter a name like ReportData.
- On this page, create a connection to the Reels database. See Connect to a Data Source for information on connecting to a data source.
To add a dataset
- In the Report Explorer, right-click the data source node and select the Add Data Set option or select Data Set from the Add button.
- In the DataSet Dialog that appears, select the General page and enter the name of the dataset as MovieCatalog. This name appears as a child node to the data source icon in the Report Explorer.
- On the Query page of this dialog, in the Query field enter the following SQL query.
SQL Query Copy CodeSELECT Genre.GenreName, Movie.Title, Movie.YearReleased, Movie.UserRating, Movie.Country FROM Genre INNER JOIN (Movie INNER JOIN MovieGenres ON Movie.MovieID = MovieGenres.MovieID) ON Genre.GenreID = MovieGenres.GenreID ORDER BY YearReleased ASC
- Click the Validate DataSet icon at the top right hand corner above the Query box to validate the query.

- Click OK to close the dialog. Your data set and queried fields appear as nodes in the Report Explorer.
To create a layout for the report
- From the toolbox, drag the List control onto the design surface and in the Properties window, set the following properties.
Property Name Property Value DataSetName MovieCatalog Location 0.25in, 1.875in Size 6in, 4in PageBreakAtStart True
Note: Applicable for RDL reports only. - With the List data region selected, under the Properties window, click the Property dialog link to open the List dialog
- Go to the Detail Grouping page and on the General tab, under Group on, set the Expression field to
=Fields!GenreName.Value. - Click OK to close the dialog
- In the Report Explorer, from the MovieCatalog dataset, drag and drop the GenreName field inside the List data region and in the Properties window, set the following properties.
Property Name Property Value Location 0.25in, 0.375in Font Normal, Arial, 12pt, Bold TextAlign Center Size 5.625in, 0.25in Label =Fields!GenreName.Value Note: Setting the control's Label property adds an entry of the control in the document map. - From the toolbox, drag and drop the Table data region inside the List data region and in the Properties window, set the following properties.
Property Name Property Value Location 0.125in, 1in Size 6in, 0.75in DataSetName MovieCatalog BorderStyle Solid RepeatHeaderOnNewPage True - In the Table data region, place your mouse over the cells of the table details row to display the field selection adorner.
-
Click the adorner to show a list of available fields from the MovieCatalog dataset and add the following fields to the cells of the table details row.
This automatically places an expression in the details row and simultaneously places a static label in the header row of the same column.Cell Field Left Cell Title Middle Cell Country Right Cell UserRating Tip: You can also directly drag fields from the Report Explorer onto the textbox cells of the Table data region. - Select the table header row using the row handle to the left and in the Properties Window set the following properties.
Property Name Property Value Font > FontWeight Bold TextAlign Left BackgroundColor Silver BoderStyle Solid - Select the table detail row using the row handle to the left, and in the Properties Window set the following properties.
Property Name Property Value TextAlign Left BorderStyle Solid - Right-click the table detail row using the row handle to the left, and select Insert Group...
- In the Table - Groups dialog that appears, on the General tab, under Group on, set the Expression field to
=Fields!YearReleased.Value. - Click OK to close the dialog.
- Select the textboxes inside the table group row using the CTRL key and left mouse button, right-click the selection and select Merge Cells.
- Select the merged cell and in the Properties window, set the following properties.
Property Name Property Value Font Normal, Arial, 10pt, Bold HeadingLevel Heading 2 Note: Setting the control's HeadingLevel property adds an entry of the control in the document map.TextAlign Center Value ="Movies Released in " & Fields !YearReleased.Value - From the Visual Studio toolbox, drag a TableOfContents control onto the design surface and in the Properties window, set the following properties.
Property Name Property Value Location 0.25in, 0.5in Size 6in, 0.875in BorderStyle Solid
To configure the appearance of Table of Contents
- With the TableOfContents control selected, select the Levels (Collection) property and then click the ellipsis button that appears.
- In the LevelDesigner Collection Editor dialog that appears, under Members, use the Add button to add Level2 to the TableOfContents.
- Under Members, select Level1 and click the Property Pages button above the LevelDesigner Collection Editor properties grid.
- In the Level Properties dialog that appears, set the following properties.
Properties
Property Name Property Value Font > Size 14 Font > Weight Bold Color DarkBlue Padding > Left 10pt Padding > Top 10pt Padding > Right 10pt Padding > Bottom 10pt Fill character . - In the LevelDesigner Collection Editor, select the Level2 entry under Members and click the Property Pages button above the LevelDesigner Collection Editor Properties grid.
- In the Level Properties dialog that appears, set the following properties.
Properties
Property Name Property Value Font > Weight Bold Padding > Left 20pt Padding > Top 10pt Padding > Right 0pt Padding > Bottom 0pt DisplayPageNumber False - Click OK to close the LevelDesigner Collection Editor dialog.
- In the Report Explorer, select the Report node and in the Properties window set the following properties:
Properties
Property Name Property Value DocumentMap > Source Labels and Headings DocumentMap > NumberingStyle 1, 2, 3, 4, 5
To view the report
- Click the preview tab to view the report at design time.
OR
- Open the report in the Viewer. See Windows Forms Viewer for further information.
See Also