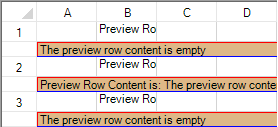
You can display a preview row to provide more information about a record. The preview row is displayed below the row for which it provides information. You can specify colors and other formatting for the preview row as well. The following figure shows preview rows with text (the rows without row header numbers):

Set the PreviewRowInfo Visible property to true to see the preview row. Use the PreviewRowInfo ColumnIndex property to specify which column’s text you want to see in the preview row. If the cell text is null, then the preview row content is null. You can also use the PreviewRowFetch event to specify the preview row text. You can set various properties for the PreviewRowInfo class such as BackColor, Border, Font, and so on.
The column header or footer does not display a preview row. A child sheet in a hierarchy does not inherit the preview row settings from the parent sheet. If the sheet with the preview row has child sheets, the preview row is shown below the rows with plus symbols. If a row that has a preview row has spanned rows, the span is not displayed. The preview row is read-only (no keyboard or mouse events, focus, and/or selections).
The preview row is printed and exported to PDF when printing or printing to PDF. The height of the preview row can be increased to show all the preview row text. If there are multiple horizontal pages, the preview row content is displayed in the left-most page.
The API members involved in this feature include (see the PreviewRowInfo class for a complete list):
- PreviewRowInfo class
- ColumnIndex property
- BackColor property
- Visible property
Using the Properties Window
- At design time, in the Properties window, select the Sheet.
- In the SheetView Collection Editor (Misc section), select the PreviewRowInfo option and set properties.
Using Code
Set the PreviewRowInfo class properties for the sheet.
Example
This example sets preview row properties.
| C# |
Copy Code
|
|---|---|
private void Form1_Load(object sender, EventArgs e) { FarPoint.Win.BevelBorder bord = new FarPoint.Win.BevelBorder(FarPoint.Win.BevelBorderType.Raised, Color.Red, Color.Blue); fpSpread1.Sheets[0].Cells[0, 1, 10, 1].Text = "Preview Row"; fpSpread1.Sheets[0].PreviewRowInfo.Visible = true; fpSpread1.Sheets[0].PreviewRowInfo.BackColor = Color.BurlyWood; fpSpread1.Sheets[0].PreviewRowInfo.ForeColor = Color.Black; fpSpread1.Sheets[0].PreviewRowInfo.Border = bord; } private void fpSpread1_PreviewRowFetch(object sender, FarPoint.Win.Spread.PreviewRowFetchEventArgs e) { FarPoint.Win.Spread.SheetView sheetView = e.View.GetSheetView(); if (sheetView.SheetName == "Sheet1") { if (e.PreviewRowContent == string.Empty) e.PreviewRowContent = "The preview row content is empty"; if ((e.Row + 1) % 2 == 0) e.PreviewRowContent = string.Format("Preview Row Content is: {0}", e.PreviewRowContent); } } |
|
| VB |
Copy Code
|
|---|---|
Private Sub Form1_Load(ByVal sender As System.Object, ByVal e As System.EventArgs) Handles MyBase.Load Dim bord As New FarPoint.Win.BevelBorder(FarPoint.Win.BevelBorderType.Raised, Color.DarkBlue, Color.Blue) FpSpread1.Sheets(0).Cells(0, 1, 10, 1).Text = "Preview Row" FpSpread1.Sheets(0).PreviewRowInfo.Visible = True FpSpread1.Sheets(0).PreviewRowInfo.BackColor = Color.BurlyWood FpSpread1.Sheets(0).PreviewRowInfo.ForeColor = Color.Black FpSpread1.Sheets(0).PreviewRowInfo.Border = bord End Sub Private Sub FpSpread1_PreviewRowFetch(ByVal sender As Object, ByVal e As FarPoint.Win.Spread.PreviewRowFetchEventArgs) Handles FpSpread1.PreviewRowFetch Dim sheetView As FarPoint.Win.Spread.SheetView sheetView = e.View.GetSheetView() If sheetView.SheetName = "Sheet1" Then If (e.PreviewRowContent = String.Empty) Then e.PreviewRowContent = "The preview row content is empty" End If If ((e.Row + 1) / 2 = 0) Then e.PreviewRowContent = String.Format("Preview Row Content is: {0}", e.PreviewRowContent) End If End If End Sub |
|
Using the Spread Designer
- Select Sheet from the drop-down combo list located on the top right side of the Designer.
- From the Misc section, select the PreviewRowInfo option to set properties.
- From the File menu, select Save and Exit to save the changes.