You can set a cell to display date and time and only allow user inputs of date and time using the date-time cell. You determine the format of the date and time to display.
You use the DateTimeCellType class to set the date-time cell and its properties.
The default values use the Regional Settings or Regional Options in the Windows environment. You can specify the format using several properties. For a complete list of date and time formats, refer to the DateTimeFormat enumeration and the DateTimeFormat property. If a date time cell displays dates and times in long date and time format, and the current date and time is "10/29/2002 11:10:01", the Text property returns "Tuesday, October 29, 2002 11:10:01 AM" as the formatted data of the cell. The Value property returns the date-time object of that date and time.
The date-time cell also has an EditorValue property that allows you to determine what is written to the data model.
By default, in a date-time cell, if you double-click on the cell in edit mode at run-time, a pop-up calendar (or clock) appears. You can determine whether to allow this, and you can specify the text that displays on the OK and Cancel buttons. For more information, refer to Customizing the Pop-Up Date-Time Control.
Spread uses the TimeDefault property to fill in the time portion that is not set into the cell. When you use the popup calendar to set the date for the cell, the time is set to midnight. If you want a different time, you would need to use the SubEditorClosed event and change the value in the cell. (You can also create your own sub-editor to create a clock and calendar form to pop up for the cell.) You can look in ISubEditor interface for more information on how to implement this. As for the value, the Value property returns is a DateTime object that encapsulates both the date and time. Query the TimeOfDay property from the returned DateTime object to get the time of day.
For more information on the properties and methods of this cell type, refer to the DateTimeCellType class.
Using the Properties Window
- At design time, in the Properties window, select the Spread component.
- Select the Sheets property.
- Click the button to display the SheetView Collection Editor.
- In the Members list, select the sheet in which the cells appear.
- In the property list, select the Cells property and then click the button to display the Cell, Column, and Row Editor.
- Select the cells for which you want to set the cell type.
- In the property list, select the CellType property and choose the DateTime cell type.
- Expand the list of properties under the CellType property. Select and set these specific properties as needed.
- Click OK to close the Cell, Column, and Row Editor.
- Click OK to close the SheetView Collection Editor.
Using Code
- Define the date-time cell by creating an instance of the DateTimeCellType class.
- Specify the message to display if invalid.
- Specify the format of the date to display.
- Assign the date-time cell type to a cell or range of cells by setting the CellType property for a cell, column, row, or style to the DateTimeCellType object.
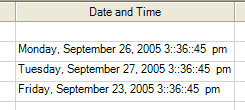
Example
Display the date as Tuesday, March 04 (day of week, month and number of day) in the second row, second column cell.
| C# |
Copy Code
|
|---|---|
FarPoint.Win.Spread.CellType.DateTimeCellType datecell = new FarPoint.Win.Spread.CellType.DateTimeCellType(); datecell.DateSeparator = " | "; datecell.TimeSeparator = "."; datecell.DateTimeFormat = FarPoint.Win.Spread.CellType.DateTimeFormat.ShortDateWithTime; datecell.MaximumDate = new System.DateTime(2100, 1, 1); datecell.MinimumDate = new System.DateTime(1990, 12, 31); datecell.MaximumTime = new System.TimeSpan(15, 59, 59); datecell.MinimumTime = new System.TimeSpan(11, 0, 0); fpSpread1.ActiveSheet.Columns[1].Width = 175; fpSpread1.ActiveSheet.Cells[1, 1].CellType = datecell; fpSpread1.ActiveSheet.Cells[1, 1].Value = System.DateTime.Now; |
|
| VB |
Copy Code
|
|---|---|
Dim datecell As New FarPoint.Win.Spread.CellType.DateTimeCellType() datecell.DateSeparator = " | " datecell.TimeSeparator = "." datecell.DateTimeFormat = FarPoint.Win.Spread.CellType.DateTimeFormat.ShortDateWithTime datecell.MaximumDate = new System.DateTime(2100, 1, 1) datecell.MinimumDate = new System.DateTime(1990, 12, 31) datecell.MaximumTime = new System.TimeSpan(15, 59, 59) datecell.MinimumTime = new System.TimeSpan(11, 0, 0) fpSpread1.ActiveSheet.Columns(1).Width = 175 fpSpread1.ActiveSheet.Cells(1, 1).CellType = datecell fpSpread1.ActiveSheet.Cells(1, 1).Value = System.DateTime.Now |
|
Using the Spread Designer
- Select the cell or cells in the work area.
- In the property list, in the Misc category, select CellType. From the drop-down list, choose the DateTime cell type. Now expand the CellType property and various properties are available that are specific to this cell type. Select and set those properties as needed.
Or right-click on the cell or cells and select Cell Type. From the list, select DateTime. In the CellType editor, set the properties you need. Click Apply.
- From the File menu choose Apply and Exit to apply your changes to the component and exit Spread Designer.