Spread for WinForms enables users to configure a worksheet with alternating rows and columns having different appearances.
Setting up alternating styles for rows and columns helps users in highlighting important information and differentiating it using various color codes while working with the spreadsheets. One of the most important advantages of this feature is that it requires low memory footprints which allows users to style their worksheets while maintaining the efficiency of the spreadsheets.
There are two ways with which you can set alternating rows and columns in the spreadsheet:
- Working in Flat Style Mode - See this section only if you're working with V12 and later versions.
- Working in Composite Style Mode - See this section if you're working with older versions (prior to V12).
Working in Flat Style Mode
The flat style mode (the new style system) is supported only for Spread WinForms V12 or later versions. In order to enable the flat style mode, it is important to ensure that the LegacyBehaviors property is set to "Style".
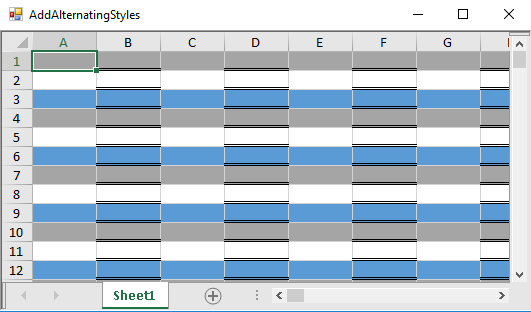
The alternating rows and columns feature is supported in the flat style mode and works similar to the table style. Any settings from alternating styles will be overridden by the table style and cell style.
An example image depicting alternating row style applied while working in flat style mode is shared below:
Using Code
The following example code shows how you can add alternating styles to rows in the worksheet while working in the flat style mode.
| C# |
Copy Code
|
|---|---|
// Adding alternating styles to Rows
fpSpread1.AsWorkbook().ActiveSheet.Styles.AlternatingRows.Count = 3;
fpSpread1.AsWorkbook().ActiveSheet.Styles.AlternatingRows[0].Interior.ThemeColor = ThemeColors.Accent3;
fpSpread1.AsWorkbook().ActiveSheet.Styles.AlternatingRows[2].Interior.ThemeColor = ThemeColors.Accent5;
fpSpread1.AsWorkbook().ActiveSheet.Styles.AlternatingColumns.Count = 2;
fpSpread1.AsWorkbook().ActiveSheet.Styles.AlternatingColumns[1].Borders[BordersIndex.Bottom].LineStyle = BorderLineStyle.Double;
|
|
| VB |
Copy Code
|
|---|---|
'Adding alternating styles to Rows
fpSpread1.AsWorkbook().ActiveSheet.Styles.AlternatingRows.Count = 3
fpSpread1.AsWorkbook().ActiveSheet.Styles.AlternatingRows(0).Interior.ThemeColor = ThemeColors.Accent3
fpSpread1.AsWorkbook().ActiveSheet.Styles.AlternatingRows(2).Interior.ThemeColor = ThemeColors.Accent5
fpSpread1.AsWorkbook().ActiveSheet.Styles.AlternatingColumns.Count = 2
fpSpread1.AsWorkbook().ActiveSheet.Styles.AlternatingColumns(1).Borders(BordersIndex.Bottom).LineStyle = BorderLineStyle.Double
|
|
This example code shows how you can add alternating styles to the columns in the worksheet while working in the flat style mode.
| C# |
Copy Code
|
|---|---|
// Adding alternating styles to Columns
fpSpread1.AsWorkbook().ActiveSheet.Styles.AlternatingColumns.Count = 3;
fpSpread1.AsWorkbook().ActiveSheet.Styles.AlternatingColumns[0].Interior.ThemeColor = ThemeColors.Accent3;
fpSpread1.AsWorkbook().ActiveSheet.Styles.AlternatingColumns[2].Interior.ThemeColor = ThemeColors.Accent5;
|
|
| VB |
Copy Code
|
|---|---|
'Adding alternating styles to Columns
fpSpread1.AsWorkbook().ActiveSheet.Styles.AlternatingRows.Count = 3
fpSpread1.AsWorkbook().ActiveSheet.Styles.AlternatingRows(0).Interior.ThemeColor = ThemeColors.Accent3
fpSpread1.AsWorkbook().ActiveSheet.Styles.AlternatingRows(2).Interior.ThemeColor = ThemeColors.Accent5
fpSpread1.AsWorkbook().ActiveSheet.Styles.AlternatingColumns.Count = 2
fpSpread1.AsWorkbook().ActiveSheet.Styles.AlternatingColumns(1).Borders(BordersIndex.Bottom).LineStyle = BorderLineStyle.Double
|
|
Using the Spread Designer
- Open the Spread Designer.
- In the Properties window at the right, select the Spread tab from the topmost dropdown.
- Set the LegacyBehaviors property to Style in order to enable the Flat style mode.
- Next, select the Sheet for which you want to set the alternating rows.
- From the property list for that sheet, in the Appearance category, select the AlternatingRows property.
- If you want to add additional alternating rows patterns, set the Count property to the number of patterns you want.
- Click the AlternatingRows button to display the AlternatingRow Collection Editor as shown in the following figure.
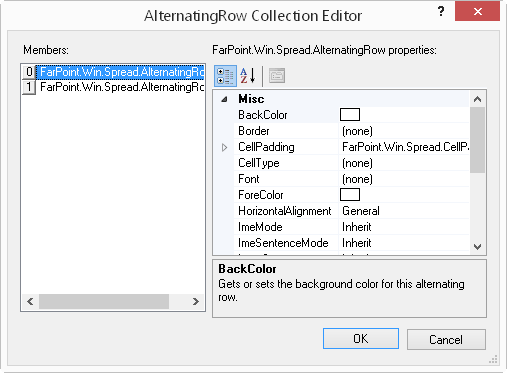
- Select alternating row pattern for which to set properties.
- Set properties for the selected pattern using the property list.
- Click OK to close the AlternatingRow Collection Editor.
- From the File menu choose Apply and Exit to apply your changes to the component and exit Spread Designer.
Working in Composite Style Mode
The composite style mode (the old style system) is supported for older versions (prior to Spread WinForms V12).
While working in this style mode, it is important to remember that users can only set alternating rows in the worksheet and the alternating columns feature is not available in the composite style mode.
For instance - In a ledger, alternating rows often have a green background. Using the Spread component, you can set up multiple alternating row appearance, which is applied in sequence, starting from the first row.
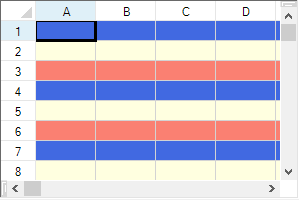
An example image depicting alternating row style applied while working in the composite style mode is shared below:
Using Code
This example code creates a sheet that has three different appearance settings for rows. The first row uses the default appearance. The second row has a light blue background with navy text, and the third row has a light yellow background with navy text. This pattern repeats for all subsequent rows.
| C# |
Copy Code
|
|---|---|
// Adding alternating styles for rows
fpSpread1.Sheets[0].AlternatingRows.Count = 3;
fpSpread1.Sheets[0].AlternatingRows[0].BackColor = Color.RoyalBlue;
fpSpread1.Sheets[0].AlternatingRows[0].ForeColor = Color.Navy;
fpSpread1.Sheets[0].AlternatingRows[1].BackColor = Color.LightYellow;
fpSpread1.Sheets[0].AlternatingRows[1].ForeColor = Color.Navy;
fpSpread1.Sheets[0].AlternatingRows[2].BackColor = Color.Salmon;
fpSpread1.Sheets[0].AlternatingRows[2].ForeColor = Color.Navy;
|
|
| VB |
Copy Code
|
|---|---|
'Adding alternating styles for rows
fpSpread1.Sheets(0).AlternatingRows.Count = 3
fpSpread1.Sheets(0).AlternatingRows(0).BackColor = Color.RoyalBlue
fpSpread1.Sheets(0).AlternatingRows(0).ForeColor = Color.Navy
fpSpread1.Sheets(0).AlternatingRows(1).BackColor = Color.LightYellow
fpSpread1.Sheets(0).AlternatingRows(1).ForeColor = Color.Navy
fpSpread1.Sheets(0).AlternatingRows(2).BackColor = Color.Salmon
fpSpread1.Sheets(0).AlternatingRows(2).ForeColor = Color.Navy
|
|
Using the Spread Designer
- Select the sheet tab for the sheet for which you want to set the alternating rows.
- From the property list for that sheet, in the Appearance category, select the AlternatingRows property.
- If you want to add additional alternating rows patterns, set the Count property to the number of patterns you want.
- Click the AlternatingRows button to display the AlternatingRow Collection Editor as shown in the following figure.
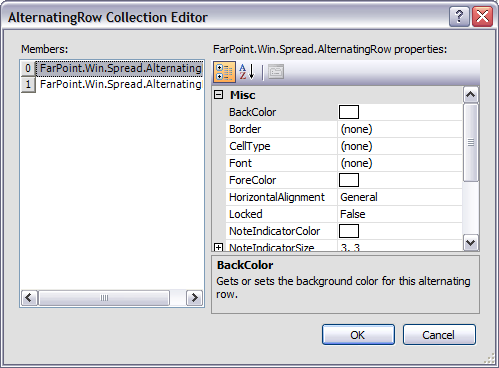
- Select alternating row pattern for which to set properties.
- Set properties for the selected pattern using the property list.
- Click OK to close the AlternatingRow Collection Editor.
- From the File menu choose Apply and Exit to apply your changes to the component and exit Spread Designer.