By default the Spread component displays sequential letters in the bottom row of the column header and sequentially increasing numbers in the right-most column of the row header. If your sheet displays multiple column header rows or row header columns, you can specify which column or row displays these default labels.
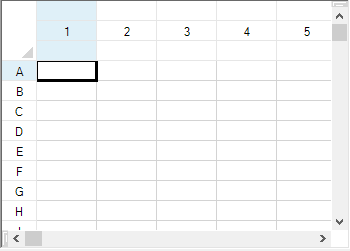
In the following figure, the column headers show numbers instead of letters and the labels are shown in the second row instead of the bottom row. You can also choose not to display the default labels.
You can also set the number (or letter) at which to start the sequential numbering (or lettering) of the labels using a property of the sheet. Use the StartingColumnNumber property or StartingRowNumber property of the SheetView object to set the number or letter displayed in the first column header or first row header respectively on the sheet. The starting number or letter is used only for display purposes and has no effect on the actual row and column coordinates.
Note: The value of a starting number or letter is an integer, so if the header displays letters and set the starting letter to 10, the first header cell contains the letter J.
For more information, refer to these API members:
- RowHeader class AutoText and AutoTextIndex properties
- ColumnHeader class AutoText and AutoTextIndex properties
- SheetView class RowHeaderAutoText and RowHeaderAutoTextIndex properties
- SheetView class ColumnHeaderAutoText and ColumnHeaderAutoTextIndex properties
- HeaderAutoText enumeration
You can also choose to display custom text in the headers instead of or in addition to the automatic label text. For instructions, see Customizing Header Label Text.
Using the Properties Window
- At design time, in the Properties window, select the Spread component.
- Select the Sheets property.
- Click the button to display the SheetView Collection Editor.
- Click the sheet for which you want to change the header labels.
- To change the header labels displayed, change the setting of the ColumnHeaderAutoText or RowHeaderAutoText property.
- To change the row or column in the header in which the label is displayed, change the setting of the ColumnHeaderAutoTextIndex or RowHeaderAutoTextIndex property.
- Click OK to close the editor.
Using a Shortcut
- To change the settings for the column header, set the Sheet object's ColumnHeaderAutoText and ColumnHeaderAutoTextIndex properties.
- To change the settings for the row header, set the Sheet object's RowHeaderAutoText and RowHeaderAutoTextIndex properties.
Example
This example code sets the column header to display numbers instead of letters.
| C# |
Copy Code
|
|---|---|
// Set the column header to display numbers instead of letters.
fpSpread1.Sheets[0].ColumnHeader.RowCount = 3;
fpSpread1.Sheets[0].ColumnHeaderAutoTextIndex = 1;
fpSpread1.Sheets[0].ColumnHeaderAutoText = FarPoint.Win.Spread.HeaderAutoText.Numbers;
fpSpread1.Sheets[0].RowHeaderAutoText = FarPoint.Win.Spread.HeaderAutoText.Letters;
|
|
| VB |
Copy Code
|
|---|---|
' Set the column header to display numbers instead of letters.
fpSpread1.Sheets(0).ColumnHeader.RowCount = 3
fpSpread1.Sheets(0).ColumnHeaderAutoTextIndex = 1
fpSpread1.Sheets(0).ColumnHeaderAutoText = FarPoint.Win.Spread.HeaderAutoText.Numbers
fpSpread1.Sheets(0).RowHeaderAutoText = FarPoint.Win.Spread.HeaderAutoText.Letters
|
|
Using the Spread Designer
- Select the sheet tab for the sheet for which you want to modify the header label (automatic text) settings.
- In the properties list, in the Appearance category, double-click the ColumnHeader or RowHeader property to display the properties for the column or row header.
- Change the settings of the AutoText and AutoTextIndex properties to specify the header label to display and which column or row in the header should display the automatic text.
- From the File menu choose Apply and Exit to apply your changes to the component and exit Spread Designer.