You can customize the appearance of filtered rows to allow you to see which rows are filtered in and which ones are filtered out. Rows that meet the criteria for the row filter are said to be "filtered in"; rows that do not meet the criteria are said to be "filtered out." Filtering may either hide the rows that are filtered out, or change the styles for both filtered-in and filtered-out rows. If you want the styles to change, so that you can continue to display all the data but highlight rows that match some criteria, then you must define a filtered-in style and a filtered-out style.
You define styles by creating NamedStyle objects that contain all the style settings. Then when the row filtering is applied to a column, you specify those defined style settings by referring to the NamedStyle object for that filtered state.
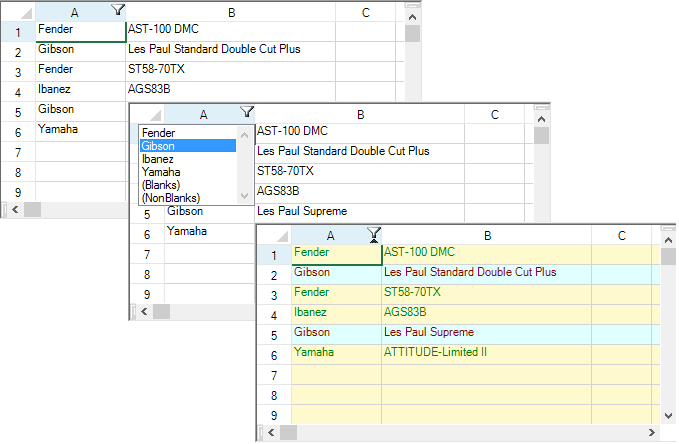
In the figure below, from the example code given here, the choice of Gibson in the filter items results in the rows with that filter item being formatted with one appearance style and all the other rows being formatted with another appearance style.
For more information about the row filter that uses styles, refer to the StyleRowFilter class.
Using Code
- Define the style settings in a NamedStyle object.
- Apply the NamedStyle object to the filter.
- Allow filtering for a specified column or columns.
Example
This example creates a filter.
| C# |
Copy Code
|
|---|---|
// Define styles to apply to filtered rows. FarPoint.Win.Spread.NamedStyle inStyle = new FarPoint.Win.Spread.NamedStyle(); FarPoint.Win.Spread.NamedStyle outStyle = new FarPoint.Win.Spread.NamedStyle(); inStyle.BackColor = Color.LightCyan; inStyle.ForeColor = Color.DarkRed; outStyle.BackColor = Color.LemonChiffon; outStyle.ForeColor = Color.Green; // Create a new filter column definition for the first column (Definition of the default setting). FarPoint.Win.Spread.FilterColumnDefinition fcdef = new FarPoint.Win.Spread.FilterColumnDefinition(0); // Create a StyleRowFilter object (Style filter), and add the above filtering column definition. FarPoint.Win.Spread.StyleRowFilter styleFilter = new FarPoint.Win.Spread.StyleRowFilter(fpSpread1.ActiveSheet, inStyle, outStyle); styleFilter.AddColumn(fcdef); // Set the row filtering object you created to sheets. fpSpread1.ActiveSheet.RowFilter = styleFilter; fpSpread1.ActiveSheet.AutoFilterMode = FarPoint.Win.Spread.AutoFilterMode.FilterGadget; // Fill the data area with text data. fpSpread1.ActiveSheet.DefaultStyle.CellType = new FarPoint.Win.Spread.CellType.TextCellType(); fpSpread1.ActiveSheet.SetText(0, 0, "Fender"); fpSpread1.ActiveSheet.SetText(1, 0, "Gibson"); fpSpread1.ActiveSheet.SetText(2, 0, "Fender"); fpSpread1.ActiveSheet.SetText(3, 0, "Ibanez"); fpSpread1.ActiveSheet.SetText(4, 0, "Gibson"); fpSpread1.ActiveSheet.SetText(5, 0, "Yamaha"); fpSpread1.ActiveSheet.SetText(0, 1, "AST-100 DMC"); fpSpread1.ActiveSheet.SetText(1, 1, "Les Paul Standard Double Cut Plus"); fpSpread1.ActiveSheet.SetText(2, 1, "ST58-70TX"); fpSpread1.ActiveSheet.SetText(3, 1, "AGS83B"); fpSpread1.ActiveSheet.SetText(4, 1, "Les Paul Supreme"); fpSpread1.ActiveSheet.SetText(5, 1, "ATTITUDE-Limited II"); fpSpread1.ActiveSheet.SetColumnWidth(0, 90); fpSpread1.ActiveSheet.SetColumnWidth(1, 210); |
|
| VB |
Copy Code
|
|---|---|
' Create a named style object for Filter-In rows. Dim inStyle As New FarPoint.Win.Spread.NamedStyle Dim outStyle As New FarPoint.Win.Spread.NamedStyle inStyle .BackColor = Color.LightCyan inStyle .ForeColor = Color.DarkRed outStyle.BackColor = Color.LemonChiffon outStyle.ForeColor = Color.Green ' Create a new filter column definition for the first column (definition of the default setting). Dim fcdef As New FarPoint.Win.Spread.FilterColumnDefinition(0) ' Create a StyleRowFilter object (Style filter), and add the above filtering column definition. Dim styleFilter As New FarPoint.Win.Spread.StyleRowFilter(fpSpread1.ActiveSheet, inStyle, outStyle) styleFilter.AddColumn(fcdef) ' Set the row filtering object you created to sheets. fpSpread1.ActiveSheet.RowFilter = styleFilter fpSpread1.ActiveSheet.AutoFilterMode = FarPoint.Win.Spread.AutoFilterMode.FilterGadget ' Fill the data area with text data. fpSpread1.ActiveSheet.DefaultStyle.CellType = New FarPoint.Win.Spread.CellType.TextCellType fpSpread1.ActiveSheet.SetText(0, 0, "Fender") fpSpread1.ActiveSheet.SetText(1, 0, "Gibson") fpSpread1.ActiveSheet.SetText(2, 0, "Fender") fpSpread1.ActiveSheet.SetText(3, 0, "Ibanez") fpSpread1.ActiveSheet.SetText(4, 0, "Gibson") fpSpread1.ActiveSheet.SetText(5, 0, "YAMAHA") fpSpread1.ActiveSheet.SetText(0, 1, "AST-100 DMC") fpSpread1.ActiveSheet.SetText(1, 1, "Les Paul Standard Double Cut Plus") fpSpread1.ActiveSheet.SetText(2, 1, "ST58-70TX") fpSpread1.ActiveSheet.SetText(3, 1, "AGS83B") fpSpread1.ActiveSheet.SetText(4, 1, "Les Paul Supreme") fpSpread1.ActiveSheet.SetText(5, 1, "ATTITUDE-Limited II") fpSpread1.ActiveSheet.SetColumnWidth(0, 90) fpSpread1.ActiveSheet.SetColumnWidth(1, 210) |
|