Spread provides a limited set of functionality in support of "inking" on Tablet PCs that are enabled with Microsoft’s Tablet PC SDK. Microsoft Windows XP Tablet PC Edition is a superset of the Windows XP Professional operating system that adds pen-based capabilities to full notebook computers. This feature in Spread is called "ink notation". In this version inking on a given viewport of the spreadsheet is allowed.
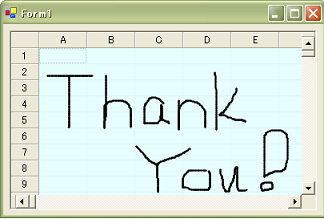
The drawing feature allows the use of a pen (stylus) on the Tablet PC for drawing and writing on the spreadsheet. This process, sometimes called inking, allows users to write in digital ink, which appears as natural-looking handwriting on the screen. The spreadsheet saves the ink notation.
Getting Set Up
Before you can use this feature, you must perform these steps:
- Go to the Microsoft site and download the latest version Tablet PC SDK.
- Make sure the Ink assembly is in the GAC before running the StartInkNotation method in Spread.
Using Ink Notation
To use ink notation, use one of the FpSpread.StartInkNotation methods. There are various overloads to allow you to specify the viewport, alpha-blending, and background color of the ink viewport, as follows:
- The default setting that specifies the active viewport as the viewport that can be inked in.
- You specify the viewport that will allow inking.
- You can specify the background color and alpha-blending (transparency) to allow you to highlight the inking viewport and see the spreadsheet underneath.
When you call the StartInkNotation method, Spread checks to see if the Ink assembly is in the GAC. If it cannot find it, the method returns False and goes no further. If it is there, it loads it and then it loads the FarPoint.Ink assembly (which is installed with Spread, but is not loaded until now). Spread attempts to load FpInk dynamically at run time, and it will succeed if FpInk is in the GAC, along with Microsoft.Ink (the MS Ink assembly). Microsoft.Ink is part of the Microsoft Tablet PC SDK.
When inking, the cursor changes to a drawing point; you can draw with the stylus. You finish drawing by clicking the right mouse button to call up the context menu. Click Save Notation to save the notation, the inking that you have done, to the Spread component. The notation is saved as a "shape" residing over a part of the spreadsheet. Inking is done on the drawing/presentation space layer, so similar to shapes, the inking is drawn on top of the spreadsheet. It is drawn only in the viewport, not over the headers or scroll bars or other parts of the Spread component. It appears as a shape, so it can be selected, moved, rotated, and resized. When it is saved, it is given a name beginning with "inkShape" and a unique number.
When you want to erase what you have done, right-click to get the context menu and select Erase Mode, and the stylus becomes an eraser, or more accurately a selector of what gets erased. If you click on a stroke or part of an ink notation, it erases that segment. If you write in cursive and all the notation is continuous, then if selected, the entire notation is erased. The context menu choice, Clear Notation, clears the entire notation, regardless of the number of discontinuous strokes.
In ink notation, the cursor changes to a pen point with the thickness and color (black is the default) of the pen.
When the user right-clicks on the mouse, a context menu is displayed as shown in the following figure.
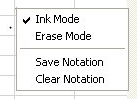
The Ink Mode is displayed checked while the user is inking (or writing or drawing). In Erase Mode, the user is erasing the inking previously done, which erases the segment or stroke that is clicked when in Erase Mode. With Save Notation, the user accepts the ink notation and it is permanently displayed on the sheet. The Clear Notation clears all of the ink notation drawn since the last save.