You can quickly customize the appearance of a cell or range of cells (or rows or columns) by applying a "style". You can create your own named style and save it to use again, similar to a template, or you can simply change the properties of the default style. The style includes appearance settings that apply to cells, such as background color, text color, font, borders, and cell type. A style can be applied to any number of cells. Just as a skin can be applied to a sheet, so a style can be applied to cells.
Note: The word "appearance" is used for the general look of the cell, not simply the settings in the Appearance class, which contains only a few settings and is used for the appearance of several parts of the interface. Most of the appearance settings for a cell are in the StyleInfo class.
You typically set the style for the cell by using the StyleName property for the cell. You can also use the ParentStyleName to set a style for a range of cells that may individually have different StyleName values set. A cell inherits all the style information from the parent style (ParentStyleName). When you set the parent style, you are setting the Parent property of the StyleInfo object assigned to each cell in the range. The parent for a named style can also be set by the Parent property of the NamedStyle object. So different cells (for example, cells in different rows or columns) may have different named styles but have the same parent style. For example, the cells may have different text colors (set in the named style) but inherit the same background color (set in the parent style).
For more information, refer to the DefaultStyleCollection class and the NamedStyle class. When you set the style (StyleName), you set the entire StyleInfo object in the style model for each cell in the range to the one in the NamedStyleCollection with the specified name. The default parent style is set in the DataAreaDefault field in the DefaultStyleCollection class.
You can also create and apply appearance settings to an entire sheet by using sheet skins. For instructions on creating sheet skins, see Creating a Custom Skin for a Sheet.
For more information on the underlying model for styles, refer to Understanding the Style Model.
Using Code
- Call the NamedStyle object constructor, and set its parameters to specify the name and settings for the style. You can also set the parent name.
- Set the style settings.
- Set the custom named style by assigning the style name to the cell or cells.
Example
This example code sets the first square of cells on the active sheet to use the same custom style that sets the background color to blue and sets the text color depending on which column.
| C# |
Copy Code
|
|---|---|
FarPoint.Win.Spread.NamedStyle backstyle = new FarPoint.Win.Spread.NamedStyle("BlueBack"); backstyle.BackColor = Color.Blue; FarPoint.Win.Spread.NamedStyle text1style = new FarPoint.Win.Spread.NamedStyle("OrangeText", "BlueBack"); text1style.ForeColor = Color.Orange; FarPoint.Win.Spread.NamedStyle text2style = new FarPoint.Win.Spread.NamedStyle("YellowText", "BlueBack"); text2style.ForeColor = Color.Yellow; fpSpread1.NamedStyles.Add(backstyle); fpSpread1.NamedStyles.Add(text1style); fpSpread1.NamedStyles.Add(text2style); fpSpread1.ActiveSheet.Cells[0,0,4,0].StyleName = "OrangeText"; fpSpread1.ActiveSheet.Cells[0,1,4,1].StyleName = "YellowText"; |
|
| VB |
Copy Code
|
|---|---|
Dim backstyle As New FarPoint.Win.Spread.NamedStyle("BlueBack") backstyle.BackColor = Color.Blue Dim text1style As New FarPoint.Win.Spread.NamedStyle("OrangeText", "BlueBack") text1style.ForeColor = Color.Orange Dim text2style As New FarPoint.Win.Spread.NamedStyle("YellowText", "BlueBack") text2style.ForeColor = Color.Yellow fpSpread1.NamedStyles.Add(backstyle) fpSpread1.NamedStyles.Add(text1style) fpSpread1.NamedStyles.Add(text2style) fpSpread1.ActiveSheet.Cells(0,0,4,0).StyleName = "OrangeText" fpSpread1.ActiveSheet.Cells(0,1,4,1).StyleName = "YellowText" |
|
Example
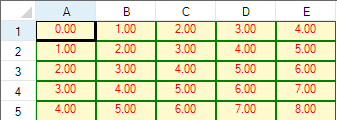
Configure the default style for the entire sheets by specifying DefaultStyle property (StyleInfo) in SheetView class. This approach is convenient when you want to apply one unique style to all cells in a sheet, as shown in the data area of the spreadsheet in this figure.
| C# |
Copy Code
|
|---|---|
private void Form1_Load(object sender, System.EventArgs e) { fpSpread1.ActiveSheet.RowCount = 5; fpSpread1.ActiveSheet.ColumnCount = 5; // Configure respective default styles. fpSpread1.ActiveSheet.DefaultStyle.BackColor = Color.LemonChiffon; fpSpread1.ActiveSheet.DefaultStyle.ForeColor = Color.Red; fpSpread1.ActiveSheet.DefaultStyle.CellType = new FarPoint.Win.Spread.CellType.NumberCellType(); fpSpread1.ActiveSheet.DefaultStyle.HorizontalAlignment = FarPoint.Win.Spread.CellHorizontalAlignment.Center; fpSpread1.ActiveSheet.DefaultStyle.Border = new FarPoint.Win.LineBorder(Color.Green); for (int i = 0; i < fpSpread1.ActiveSheet.RowCount; i++) { for (int j = 0; j < fpSpread1.ActiveSheet.ColumnCount; j++) { fpSpread1.ActiveSheet.SetValue(i, j, i + j); } } } |
|
| VB |
Copy Code
|
|---|---|
Private Sub Form1_Load(ByVal sender As Object, ByVal e As System.EventArgs) Handles MyBase.Load fpSpread1.ActiveSheet.RowCount = 5 fpSpread1.ActiveSheet.ColumnCount = 5 ' Configure respective default styles. fpSpread1.ActiveSheet.DefaultStyle.BackColor = Color.LemonChiffon fpSpread1.ActiveSheet.DefaultStyle.ForeColor = Color.Red fpSpread1.ActiveSheet.DefaultStyle.CellType = New FarPoint.Win.Spread.CellType.NumberCellType fpSpread1.ActiveSheet.DefaultStyle.HorizontalAlignment = FarPoint.Win.Spread.CellHorizontalAlignment.Center fpSpread1.ActiveSheet.DefaultStyle.Border = New FarPoint.Win.LineBorder(Color.Green) For i As Integer = 0 To fpSpread1.ActiveSheet.RowCount - 1 For j As Integer = 0 To fpSpread1.ActiveSheet.ColumnCount - 1 fpSpread1.ActiveSheet.SetValue(i, j, i + j) Next Next End Sub |
|
Using the NamedStyleCollection Editor
- In the Form window, click the Spread component or the Sheet object for which you want to create the style in the NamedStyleCollection. For the Spread component, in the Appearance category, select the NamedStyles property. For the Sheet object, in the Misc category, select the NamedStyles property.
- Click on the button to launch the NamedStyleCollection Editor.
- In the NamedStyleCollection Editor, select the Add tab.
- Set the properties in the Named Style Properties list to create the style you want.
- Set the Name property to specify the name for your custom style.
- Click OK to close the editor.
- Select the cells (or rows or columns) to apply the style to.
- In the property window, set the StyleName to the custom named style previously added.