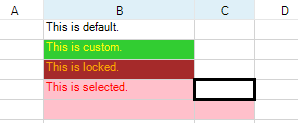
You can set the background and foreground (text) colors for a cell or for a group of cells. An example of the different ways to set the colors for a cell is shown in the following figure. The code that created these cell colors is provided in the example.
You can specify the background color for a cell in code by using the BackColor property for that cell. You can specify the text color in code by using the ForeColor property.
You can also specify the colors to display when the cells are selected using SelectionBackColor and SelectionForeColor for the sheet. For more information on selections, refer to Customizing the Selection Appearance.
You can also specify a different color (for background or for text) in locked cells using the LockBackColor and LockForeColor properties of the SheetView or Appearance objects. For more information on locked cells, refer to Locking a Cell.
Using the Properties Window
- At design time, in the Properties window, select the Spread component.
- Select the Sheets property.
- Click the button to display the SheetView Collection Editor.
- In the Members list, select the sheet in which the cells appear.
- In the properties list, select the Cells property and then click the button to display the Cell, Column, and Row Editor.
- Select the cells for which you want to set the color.
- In the properties list, select the BackColor property and select a color from the Custom, Web, or System tab. Select the ForeColor property and select that color.
- Click OK to close the Cell, Column, and Row Editor.
- Click OK to close the SheetView Collection Editor.
Using a Shortcut
Set the BackColor property or the ForeColor property for the Cells object.
Example
This example code sets the background color and text color for the second cell, sets the colors for locked cells, and sets the colors for selections.
| C# |
Copy Code
|
|---|---|
fpSpread1.ActiveSheet.Cells[0,1].Value = "This is default."; fpSpread1.ActiveSheet.Cells[1,1].Value = "This is custom."; fpSpread1.ActiveSheet.Cells[2,1].Value = "This is locked."; fpSpread1.ActiveSheet.Cells[3,1].Value = "This is selected."; fpSpread1.ActiveSheet.Cells[1,1].BackColor = Color.LimeGreen; fpSpread1.ActiveSheet.Cells[1,1].ForeColor = Color.Yellow; fpSpread1.ActiveSheet.Cells[2,1].Locked = true; fpSpread1.ActiveSheet.Protect = true; fpSpread1.ActiveSheet.LockBackColor = Color.Brown; fpSpread1.ActiveSheet.LockForeColor = Color.Orange; fpSpread1.ActiveSheet.SelectionStyle = FarPoint.Win.Spread.SelectionStyles.SelectionColors; fpSpread1.ActiveSheet.SelectionPolicy = FarPoint.Win.Spread.Model.SelectionPolicy.Range; fpSpread1.ActiveSheet.SelectionUnit = FarPoint.Win.Spread.Model.SelectionUnit.Cell; fpSpread1.ActiveSheet.SelectionBackColor = Color.Pink; fpSpread1.ActiveSheet.SelectionForeColor = Color.Red; |
|
| VB |
Copy Code
|
|---|---|
fpSpread1.ActiveSheet.Cells(0,1).Value = "This is default." fpSpread1.ActiveSheet.Cells(1,1).Value = "This is custom." fpSpread1.ActiveSheet.Cells(2,1).Value = "This is locked." fpSpread1.ActiveSheet.Cells(3,1).Value = "This is selected." fpSpread1.ActiveSheet.Cells(1,1).BackColor = Color.LimeGreen fpSpread1.ActiveSheet.Cells(1,1).ForeColor = Color.Yellow fpSpread1.ActiveSheet.Cells(2,1).Locked = True fpSpread1.ActiveSheet.Protect = True fpSpread1.ActiveSheet.LockBackColor = Color.Brown fpSpread1.ActiveSheet.LockForeColor = Color.Orange fpSpread1.ActiveSheet.SelectionStyle = FarPoint.Win.Spread.SelectionStyles.SelectionColors fpSpread1.ActiveSheet.SelectionPolicy = FarPoint.Win.Spread.Model.SelectionPolicy.Range fpSpread1.ActiveSheet.SelectionUnit = FarPoint.Win.Spread.Model.SelectionUnit.Cell fpSpread1.ActiveSheet.SelectionBackColor = Color.Pink fpSpread1.ActiveSheet.SelectionForeColor = Color.Red |
|
Using Code
Set the BackColor property or the ForeColor property for a Cell object.
Example
This example code sets the background color for cell A1 to Azure and the foreground color to Navy, then sets the background color for cells C3 through D4 to Bisque.
| C# |
Copy Code
|
|---|---|
FarPoint.Win.Spread.Cell cellA1; cellA1 = fpSpread1.ActiveSheet.Cells[0, 0]; cellA1.BackColor = Color.Azure; cellA1.ForeColor = Color.Navy; FarPoint.Win.Spread.Cell cellrange; cellrange = fpSpread1.ActiveSheet.Cells[2,2,3,3]; cellrange.BackColor = Color.Bisque; |
|
| VB |
Copy Code
|
|---|---|
Dim cellA1 As FarPoint.Win.Spread.Cell cellA1 = fpSpread1.ActiveSheet.Cells(0, 0) cellA1.BackColor = Color.Azure cellA1.ForeColor = Color.Navy Dim cellrange As FarPoint.Win.Spread.Cell cellrange = fpSpread1.ActiveSheet.Cells(2, 2, 3, 3) cellrange.BackColor = Color.Bisque |
|
Using the Spread Designer
- In the work area, select the cell or cells for which you want to set the background color.
- In the properties list (in the Misc category), select the BackColor property to set the background color.
- Click the drop-down button to display the color picker and choose the color from the available colors.
- To set the text color, repeat those steps and select ForeColor property in the properties list.
- From the File menu choose Apply and Exit to apply your changes to the component and exit Spread Designer.