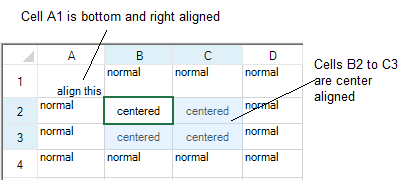
You can determine how the contents are aligned in a cell or in a group of cells. In code, simply set the HorizontalAlignment property and the VerticalAlignment properties, and make use of the CellHorizontalAlignment and CellVerticalAlignment enumerations. In the Spread Designer, set those properties accordingly. The following figure shows the result of the code in the first example.
There are additional properties in the Cell class such as TextIndent and CellPadding that can be used to create extra margins around cell text.
For an explanation of how the alignment affects the overflow of data, refer to Allowing Cell Data to Overflow
You can keep the cell alignment when editing with the AllowEditorVerticalAlign property.
Using the Properties Window
- At design time, in the Properties window, select the Spread component.
- Select the Sheets property.
- Click the button to display the SheetView Collection Editor.
- In the Members list, select the sheet in which the cells appear.
- In the properties list, select the Cells property and then click the button to display the Cell, Column, and Row Editor.
- Select the cells for which you want to set the alignment.
- In the properties list, select the HorizontalAlignment property and choose the alignment.
- To set the vertical alignment, select the VerticalAlignment property in the properties list and choose the alignment.
- Click OK to close the Cell, Column, and Row Editor.
- Click OK to close the SheetView Collection Editor.
Using a Shortcut
Set the HorizontalAlignment property and the VerticalAlignment properties for the Cells shortcut object.
Example
This example code sets the horizontal alignment of the first cell (A1) to be right-aligned, the vertical alignment of that cell to be bottom-aligned, and the horizontal alignment and vertical alignment of cells from B2 to C3 to be centered. The preceding figure illustrates the results.
| C# |
Copy Code
|
|---|---|
fpSpread1.Sheets[0].Cells[0,0].HorizontalAlignment = FarPoint.Win.Spread.CellHorizontalAlignment.Right; fpSpread1.Sheets[0].Cells[0,0].VerticalAlignment = FarPoint.Win.Spread.CellVerticalAlignment.Bottom; fpSpread1.Sheets[0].Cells[1,1,2,2].HorizontalAlignment = FarPoint.Win.Spread.CellHorizontalAlignment.Center; fpSpread1.Sheets[0].Cells[1,1,2,2].VerticalAlignment = FarPoint.Win.Spread.CellVerticalAlignment.Center; |
|
| VB |
Copy Code
|
|---|---|
fpSpread1.Sheets(0).Cells(0,0).HorizontalAlignment = FarPoint.Win.Spread.CellHorizontalAlignment.Right fpSpread1.Sheets(0).Cells(0,0).VerticalAlignment = FarPoint.Win.Spread.CellVerticalAlignment.Bottom fpSpread1.Sheets(0).Cells(1,1,2,2).HorizontalAlignment = FarPoint.Win.Spread.CellHorizontalAlignment.Center fpSpread1.Sheets(0).Cells(1,1,2,2).VerticalAlignment = FarPoint.Win.Spread.CellVerticalAlignment.Center |
|
Using Code
Set the HorizontalAlignment property and the VerticalAlignment properties for the Cell object.
Example
This example code sets the horizontal alignment for a specific cell and the vertical alignment for a range of cells.
| C# |
Copy Code
|
|---|---|
FarPoint.Win.Spread.Cell cellA1; cellA1 = fpSpread1.ActiveSheet.Cells[0, 0]; cellA1.HorizontalAlignment = FarPoint.Win.Spread.CellHorizontalAlignment.Right; cellA1.VerticalAlignment = FarPoint.Win.Spread.CellVerticalAlignment.Bottom; FarPoint.Win.Spread.Cell cellrange; cellrange = fpSpread1.ActiveSheet.Cells[1,1,2,2]; cellrange.HorizontalAlignment = FarPoint.Win.Spread.CellHorizontalAlignment.Center; cellrange.VerticalAlignment = FarPoint.Win.Spread.CellVerticalAlignment.Center; |
|
| VB |
Copy Code
|
|---|---|
Dim cellA1 As FarPoint.Win.Spread.Cell cellA1 = fpSpread1.ActiveSheet.Cells(0, 0) cellA1.HorizontalAlignment = FarPoint.Win.Spread.CellHorizontalAlignment.Right cellA1.VerticalAlignment = FarPoint.Win.Spread.CellVerticalAlignment.Bottom Dim cellrange As FarPoint.Win.Spread.Cell cellrange = fpSpread1.ActiveSheet.Cells(1, 1, 2, 2) cellrange.HorizontalAlignment = FarPoint.Win.Spread.CellHorizontalAlignment.Center cellrange.VerticalAlignment = FarPoint.Win.Spread.CellVerticalAlignment.Center |
|
Using the Spread Designer
- In the work area, select the cell or cells for which you want to set the horizontal alignment of the cell contents.
- In the properties list (in the Misc category), select the HorizontalAlignment property.
- Click the drop-down button to display the choices and choose the alignment.
- Repeat these steps and in the properties list, select VerticalAlignment to set the vertical alignment of the cell or cells.
- From the File menu choose Apply and Exit to apply your changes to the component and exit Spread Designer.