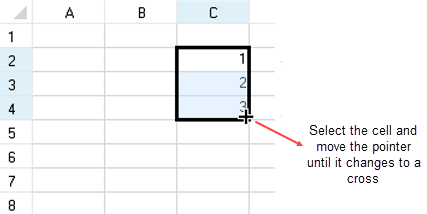
You can also allow the end user to drag-and-fill data from one cell or a range of cells to another cell or range of cells. With a cell or range of cells selected, you can fill other cells either in a row (or rows if more than one column is selected) or a column (or columns if more than one row is selected).
In order to fill cells with drag and fill, the AllowDragFill property in the FpSpread class must be set to true. In order to show the drag fill button and the drag fill context menu, the EnableDragFillMenu property must be set to true.
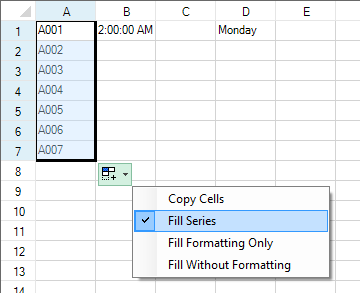
You can also specify the type of fill you want by using the RangeDragFillMode property that allows you to choose from the following options in the drag fill drop down context menu icon that appears on your screen:
- Copy Cells
- Fill Series
- Fill Formatting Only
- Fill Without Formatting
The Copy Cells option copies the data to the selected range. The Fill Series option increments or decrements the values based on the series. Drag down or to the right to increment the values. Drag up or to the left to decrement the values. Spread uses the data model to determine whether the data can be incremented when using the series fill. The displayed values have a higher priority with the built-in cell types when using the series fill. The Fill Formatting Only option and the Fill Without Formatting option allows you to fill cells with or without the same formatting as in the originally selected cell.
The AutoFill options that are available in the Drag Fill context menu depends on the type of selected data and the DragFillDataOnly property.
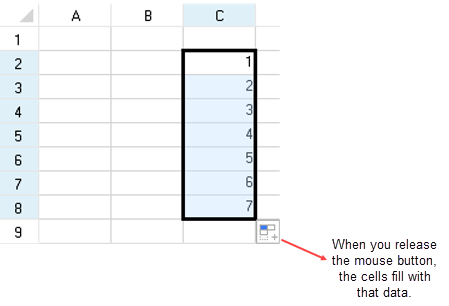
The example shown below depicts the drag and fill operation that uses the copy option to fill several cells in a column.

The following example uses the fill series option.
You can customize the direction of the fill using the FillDirection enumeration.
For more information on event arguments, refer to DragFillBlock event, DragFillBlockEventArgs, and DragFillBlockCompletedEventArgs.
Using the Properties Window
- At design time, in the Properties window, select the Spread component.
- Select (in the Behavior category) the AllowDragFill property.
- Select True from the drop-down list to allow drag-and-fill feature, or select False to prohibit it.
- Select the EnableDragFillMenu property.
- Select True from the drop-down list to allow the drag fill button and drag fill context menu, or select False to prohibit it.
Using a Shortcut
Allow the drag-and-fill feature by setting the AllowDragFill property in the FpSpread component.
Allow the drag fill button and drag fill context menu by setting the EnableDragFillMenu property in the FpSpread component.
Example
This example code sets the component to allow the drag-fill feature, drag fill button and the drag fill context menu.
| C# |
Copy Code
|
|---|---|
fpSpread1.AllowDragFill = true; fpSpread1.EnableDragFillMenu = true; |
|
| VB |
Copy Code
|
|---|---|
fpSpread1.AllowDragFill = True fpSpread1.EnableDragFillMenu = True |
|
Using Code
Allow the drag fill feature by setting the AllowDragFill property in the FpSpread component.
Allow the drag fill button and drag fill context menu by setting the EnableDragFillMenu property in the FpSpread component.
Example
This example code sets the child sheet to allow the drag fill feature, drag fill button and the drag fill context menu.
| C# |
Copy Code
|
|---|---|
// To enable Drag Fill operation fpSpread1.ActiveSheet.Reset(); fpSpread1.DragFillDataOnly = false; fpSpread1.AllowDragFill = true; fpSpread1.EnableDragFillMenu = true; this.fpSpread1.ActiveSheet.Cells[0, 0].Value = "A001"; this.fpSpread1.ActiveSheet.Cells[0, 1].Value = DateTime.Today; this.fpSpread1.ActiveSheet.Cells[0, 3].Text = "Monday"; |
|
| VB |
Copy Code
|
|---|---|
' To enable Drag Fill operation fpSpread1.ActiveSheet.Reset() fpSpread1.DragFillDataOnly = False fpSpread1.AllowDragFill = True fpSpread1.EnableDragFillMenu = True Me.fpSpread1.ActiveSheet.Cells(0, 0).Value = "A001" Me.fpSpread1.ActiveSheet.Cells(0, 1).Value = DateTime.Today Me.fpSpread1.ActiveSheet.Cells(0, 3).Text = "Monday" |
|
Using the Spread Designer
- Select the Spread component (or select Spread from the pull-down menu).
- In the property list for the component (in the Behavior category), select the AllowDragFill property.
- Click the drop-down arrow to display the choices and select True.
- In the property list for the component, select the EnableDragFillMenu property.
- Click the drop-down arrow to display the choices and select True.
- From the File menu, choose Apply and Exit to apply your changes to the component and exit Spread Designer.
If the DragFillDataOnly property is set to false and the selected data can be filled as series, all the options will appear in the context menu. If the RangeDragFillMode property is set to Series, then the context menu will show only the Fill Series option and if it is set to Copy, then the context menu will show only the Copy Cells option. If the selected data cannot be filled as series, the context menu will show only three options: Copy Cells, Fill Formatting Only, Fill Without Formatting.
If the DragFillDataOnly property is set to true and the selected data can be filled as series, the context menu will show only two options: Copy Cells and Fill Series. If the RangeDragFillMode property is set to Series, then the context menu will show only the Fill Series option and if it is set to Copy, then the context menu will show only the Copy Cells option. If the selected data cannot be filled as series, the context menu will show only one option: Copy Cells.