You can display all the text in the cell with the shrink to fit option. The font size is reduced if the text is too long for the visible area of the cell.
This property is available for the currency, datetime, mask, number, percent, regular expression, text, or general cell.
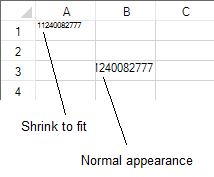
The following image shows the difference between a cell with the ShrinkToFit property set to True and a cell with the property set to False.
Using Code
- Create a cell that supports the shrink to fit option such as the regular expression cell.
- Set the ShrinkToFit property.
- Set the CellType property.
- Type a valid value for the cell such as 11240082777 for the regular expression cell in this example.
Example
This example reduces the font size so the text is displayed in the cell.
| C# |
Copy Code
|
|---|---|
FarPoint.Win.Spread.CellType.RegularExpressionCellType testcell = new FarPoint.Win.Spread.CellType.RegularExpressionCellType(); testcell.ShrinkToFit = true; testcell.RegularExpression = "^\\d{11}$"; fpSpread1.Sheets[0].Cells[0, 0].CellType = testcell; |
|
| VB |
Copy Code
|
|---|---|
Dim testcell As New FarPoint.Win.Spread.CellType.RegularExpressionCellType() testcell.ShrinkToFit = True testcell.RegularExpression = "^\d{11}$" fpSpread1.Sheets(0).Cells(0, 0).CellType = testcell |
|
Using the Spread Designer
- Select the cell or cells in the work area.
- In the property list, in the Misc category, select CellType. From the drop-down list, choose the cell type.
- Expand the CellType property and set the ShrinkToFit property to True.
- From the File menu choose Apply and Exit to apply your changes to the component and exit Spread Designer.
See Also