The Spread component on your form already has a sheet, ready for you to configure. In this step, you are going to set up the columns and cells in the sheet to resemble a checkbook register.
- Double-click on the form in your project to open the code window.
- Select the line of code
C# Copy Code// Put user code to initialize the page here.VB Copy Code'Put user code to initialize the page here.and type the following code to replace it:
C# Copy Codeif (this.IsPostBack) return; // Set up component and rows and columns in sheet. FpSpread1.Height = Unit.Pixel(300); FpSpread1.Width = Unit.Pixel(763); FpSpread1.Sheets[0].ColumnCount = 8; FpSpread1.Sheets[0].RowCount = 100;
VB Copy CodeIf (IsPostBack) Then Return End If ' Set up component and rows and columns in sheet. FpSpread1.Height = Unit.Pixel(300) FpSpread1.Width = Unit.Pixel(763) FpSpread1.Sheets(0).ColumnCount = 8 FpSpread1.Sheets(0).RowCount = 100
This code sets up the component to be 300 pixels high and 763 pixels wide, and the sheet to have 8 columns and 100 rows.
- Now we need to set up the columns to have custom headings. Add the following code below the code you added in Step 2:
C# Copy Code// Add text to column heading. FpSpread1.ColumnHeader.Cells[0, 0].Text = "Check #"; FpSpread1.ColumnHeader.Cells[0, 1].Text = "Date"; FpSpread1.ColumnHeader.Cells[0, 2].Text = "Description"; FpSpread1.ColumnHeader.Cells[0, 3].Text = "Tax?"; FpSpread1.ColumnHeader.Cells[0, 4].Text = "Cleared?"; FpSpread1.ColumnHeader.Cells[0, 5].Text = "Debit"; FpSpread1.ColumnHeader.Cells[0, 6].Text = "Credit"; FpSpread1.ColumnHeader.Cells[0, 7].Text = "Balance";
VB Copy Code' Add text to column heading. FpSpread1.ColumnHeader.Cells(0, 0).Text = "Check #" FpSpread1.ColumnHeader.Cells(0, 1).Text = "Date" FpSpread1.ColumnHeader.Cells(0, 2).Text = "Description" FpSpread1.ColumnHeader.Cells(0, 3).Text = "Tax?" FpSpread1.ColumnHeader.Cells(0, 4).Text = "Cleared?" FpSpread1.ColumnHeader.Cells(0, 5).Text = "Debit" FpSpread1.ColumnHeader.Cells(0, 6).Text = "Credit" FpSpread1.ColumnHeader.Cells(0, 7).Text = "Balance"
- Now set up the column widths to properly display our headings and the data you will add. Add the following code below the code you added in Step 3:
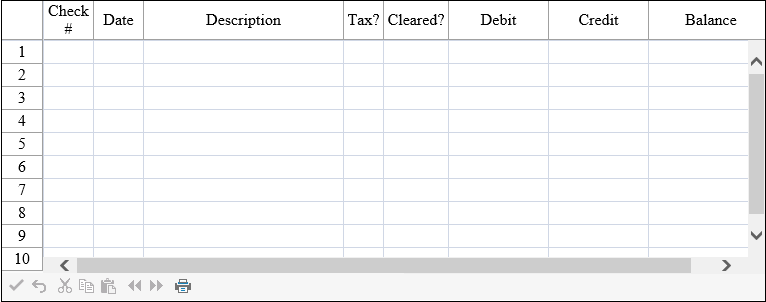
C# Copy Code// Set column widths. FpSpread1.Sheets[0].Columns[0].Width = 50; FpSpread1.Sheets[0].Columns[1].Width = 50; FpSpread1.Sheets[0].Columns[2].Width = 200; FpSpread1.Sheets[0].Columns[3].Width = 40; FpSpread1.Sheets[0].Columns[4].Width = 65; FpSpread1.Sheets[0].Columns[5].Width = 100; FpSpread1.Sheets[0].Columns[6].Width = 100; FpSpread1.Sheets[0].Columns[7].Width = 125;VB Copy Code' Set column widths. FpSpread1.Sheets(0).Columns(0).Width = 50 FpSpread1.Sheets(0).Columns(1).Width = 50 FpSpread1.Sheets(0).Columns(2).Width = 200 FpSpread1.Sheets(0).Columns(3).Width = 40 FpSpread1.Sheets(0).Columns(4).Width = 65 FpSpread1.Sheets(0).Columns(5).Width = 100 FpSpread1.Sheets(0).Columns(6).Width = 100 FpSpread1.Sheets(0).Columns(7).Width = 125 - Save your project, then from the Debug menu choose Start to run your project.
Your ASP.NET page should look similar to the following picture.