The MultiRow control connects to the database using ADO.NET in the same way as the standard .NET Framework controls. The following example uses database products and samples.
- Microsoft SQL Server 2005 or 2008
- Northwind and pubs Sample Databases
Connection to the Database
Register the SQL Server database in the project. This is independent of MultiRow.
- Start Visual Studio and create a new Windows application.
- Click Data - Add New Data Source in Visual Studio.
- On the Data Source Configuration Wizard page, select Database and click Next.
- On the Choose Your Data Connection page, click New Connection and add a connection with the following configuration.
- Data source - Microsoft SQL Server (SqlClient)
- Server name (Example) - (local)\SQLEXPRESS
- Select or enter a database name - Northwind
- After adding the connection, click Next.
- On the Save the Connection String to the Application Configuration File page, click Next.
- On the Choose your Database Objects page, check the following tables:
- Customers
- Orders
- Click Finish.
- Check that the Orders and Customers tables have been added to the Data Sources window of Visual Studio.
Designing Templates
Create the template for MultiRow and assign the fields to the table.
- Click Project - Add New Item in Visual Studio.
- On the Add New Item page, select the MultiRow 7.0 Templates and click the Add button.
- Check that the Template1.vb design page is displayed.
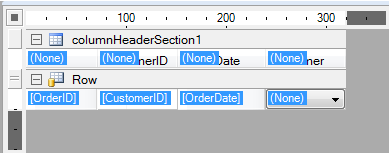
- Create the headers with the following structure.

- Drag ColumnHeaderCell to columnHeaderSection1 from the Toolbox window (repeat this 4 times).
- In the Value property of the dragged cells, set ID, CustomerID, OrderDate, and Customer.
- Adjust the height of columnHeaderSection1 to be same as the cell height.
- Create rows with the following structure.

- Drag RowHeaderCell to row from the Toolbox window.
- Drag TextBoxCell to row from the Toolbox window (repeat twice).
- Drag ComboBoxCell to row from the Toolbox window.
- In the DataField property of the dragged cells, set OrderID, CustomerID, and OrderDate (the DataField property of ComboBoxCell stays as it is).
- Adjust the row height to the same as the cell height.
- Match the template width to the cell width.
- Save the project.
Connecting to the Grid
Place the GcMultiRow control on the form and assign the data source and template to the grid.
- Open the design view of the form (Form1).
- Select the Orders table from the Data Sources window and click Customize... from the drop-down list.
- On the Options page that is displayed, check GcMultiRow in the list of Associated controls.
- Close the dialog by clicking on the OK button.
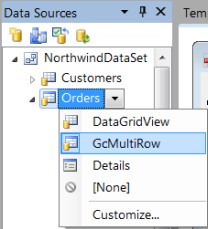
- Select the Orders table in the Data Sources window, and click on GcMultiRow in the drop-down list.
- Drag and drop the Orders table onto the design view of the form (Form1).
- If GcMultiRow displays a trial version dialog, close it by clicking on the OK button.
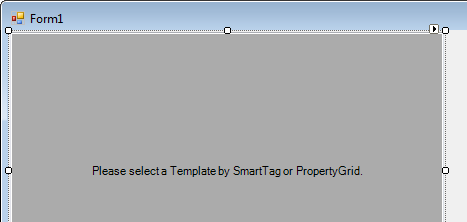
- Verify that the BindingNavigator (ordersBindingNavigator) and GcMultiRow (ordersGcMultiRow) have been placed on the form.
- Click on Build - Build Solution in Visual Studio.
- Drag and drop Template1 to the form from the Toolbox window.

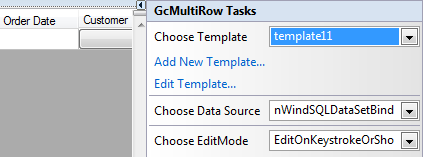
- Select the ordersGcMultiRow control on the form, and select Choose Template from the smart tag. Select template11 from the drop-down.
This completes assigning the data source and template to the grid. If you run the project, the datasource values will be read into the grid.
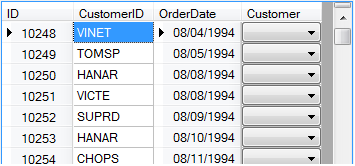
Setting the Lookup columns
The CustomerID column values in the Orders table are same as the values of the CustomerID column in the Customers table. Use the values of this CustomerID column as the base and enumerate the values in the CompanyName column of the Customers table.
- Select the Customers table from the Data Sources window, and drag and drop to the design screen of the form (Form1).
- Delete the DataGirdView placed on the form.
- Open the code editor of the form and paste the following code.
[VB]
Imports GrapeCity.Win.MultiRow

Private Sub Form1_Load(ByVal sender As System.Object, ByVal e As System.EventArgs)
    Dim myTemplate As Template1 = New Template1()
    Dim comboBoxCell As ComboBoxCell = DirectCast(myTemplate.Row("comboBoxCell1"), ComboBoxCell)
    comboBoxCell.DataSource = Me.customersBindingSource
    comboBoxCell.DisplayMember = "CompanyName"
    comboBoxCell.ValueMember = "CustomerID"
    comboBoxCell.DataField = "CustomerID"
    Me.ordersGcMultiRow.Template = myTemplate

    ' TODO: This code reads the data into 'northwindDataSet.Customers' table. Please move or delete as required.
    Me.customersTableAdapter.Fill(Me.northwindDataSet.Customers)
    ' TODO: This code reads the data into 'northwindDataSet.Orders' table. Please move or delete as required.
    Me.ordersTableAdapter.Fill(Me.northwindDataSet.Orders)
End Sub
[CS]
using GrapeCity.Win.MultiRow;

private void Form1_Load(object sender, EventArgs e)
{
    Template1 myTemplate = new Template1();
    ComboBoxCell comboBoxCell = myTemplate.Row["comboBoxCell1"] as ComboBoxCell;
    comboBoxCell.DataSource = this.customersBindingSource;
    comboBoxCell.DisplayMember = "CompanyName";
    comboBoxCell.ValueMember = "CustomerID";
    comboBoxCell.DataField = "CustomerID";
    this.ordersGcMultiRow.Template = myTemplate;

    // TODO: This code reads the data into 'northwindDataSet.Customers' table. Please move or delete as required.
    this.customersTableAdapter.Fill(this.northwindDataSet.Customers);
    // TODO: This code reads the data into 'northwindDataSet.Orders' table. Please move or delete as required.
    this.ordersTableAdapter.Fill(this.northwindDataSet.Orders);
}
If you run the project, you can verify that the CompanyName column values have been enumerated into the Customer cells.

You can also verify that changing this value will change the values in the CustomerID cells bound to the same column.
