In this tutorial, you will learn how to drop down an arbitrary control from a grid cell. This example uses a ListBox control containing pre-defined input values in order to facilitate user data entry. The list will drop down whenever the user initiates editing, such as by clicking the current cell. You will also learn how to place a button in the cell which, when clicked, will cause the ListBox control to appear. You can drop down any control from a grid cell using techniques similar to those described in this tutorial.
-
Start with the project constructed in Tutorial 6.
-
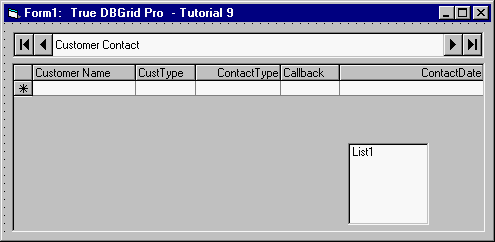
Add a ListBox control (List1) to the form (Form1) as shown in the figure.

-
Set the Visible property of List1 to False.
Adding code to drop down a ListBox control
The CustType field in the second column (Column1) of the grid displays numeric values ranging from 1 through 5 which represent the following customer types:
1 = Prospective
2 = Normal
3 = Buyer
4 = Distributor
5 = OtherWe shall drop down List1, which will contain textual customer type descriptions, and allow users to double-click an item in order to enter the associated value into the grid.
-
In the Form_Load event, we place code to add the customer types to List1. We also place a button in the CustType column using the Button property. The Form_Load event handler now looks like this:
Example Title Copy CodePrivate Sub Form_Load() ' Define RSClone as a clone. Data1.Refresh Set RSClone = Data1.Recordset.Clone() ' Add customer types to List1. List1.AddItem "Prospective" List1.AddItem "Normal" List1.AddItem "Buyer" List1.AddItem "Distributor" List1.AddItem "Other" ' Place a button in the CustType column. TDBGrid1.Columns("CustType").Button = True End Sub -
If a cell in the CustType column becomes current, a button will be placed at the right edge of the cell. Clicking the button will trigger the grid's ButtonClick event. We will drop down List1 whenever the button is clicked:
Example Title Copy CodePrivate Sub TDBGrid1_ButtonClick(ByVal ColIndex As Integer) ' Assign the Column object to Co because it will be used more than once. Dim Co As Column Set Co = TDBGrid1.Columns(ColIndex) ' Position and drop down List1 at the right edge of the current cell. List1.Left = TDBGrid1.Left + Co.Left + Co.Width List1.Top = TDBGrid1.Top + TDBGrid1.RowTop(TDBGrid1.Row) List1.Visible = True List1.ZOrder 0 List1.SetFocus End Sub -
In the grid's BeforeColEdit event, we add the following code to drop down List1 if we are editing the CustType column (Column1). Note that the code below will not work if the MarqueeStyle property is set to 6 - Floating Editor. See Highlighting the Current Row or Cell for more details.
Example Title Copy CodePrivate Sub TDBGrid1_BeforeColEdit( _ ByVal ColIndex As Integer, _ ByVal KeyAscii As Integer, Cancel As Integer) ' BeforeColEdit is called before the grid enters into edit mode. You can ' decide what happens and whether standard editing proceeds. This allows ' you to substitute different kinds of editing for the current cell, as is ' done here. If ColIndex = 1 Then ' Let the user edit by entering a key. If KeyAscii <> 0 Then Exit Sub ' Otherwise, cancel built-in editing and call the ButtonClick event to ' drop down List1. Cancel = True TDBGrid1_ButtonClick (ColIndex) End If End Sub -
We allow the user to enter data into the CustType column of the grid by double-clicking the desired selection in List1:
Example Title Copy CodePrivate List1_DblClick() ' When an item is selected in List1, copy its index to the proper column in ' TDBGrid1, then make List1 invisible. TDBGrid1.Columns(1).Text = List1.ListIndex + 1 List1.Visible = False End Sub
-
Finally, we make List1 invisible whenever it loses focus or when the user scrolls the grid:
Example Title Copy CodePrivate Sub List1_LostFocus() ' Hide the list if it loses focus. List1.Visible = False End Sub Private Sub TDBGrid1_Scroll(Cancel As Integer) ' Hide the list if we scroll. List1.Visible = False End Sub
Run the program and observe the following:
-
TDBGrid1 displays data from the joined table as in Tutorial 6.
-
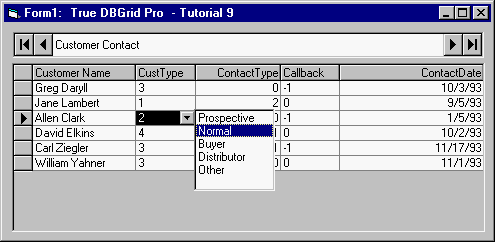
Click a cell in the CustType column to make it the current cell as indicated by the highlight. A button will be displayed at the right edge of the cell. Click the button to fire the ButtonClick event. List1 will drop down at the right edge of the cell as shown in the following illustration.

-
You can use the mouse or the Up Arrow and Down Arrow keys to move the highlight bar of List1. If you click another cell in the grid, List1 will lose focus and become invisible.
-
Double-click any item in List1. The current cell in the grid will be updated with the selected item, and List1 will disappear until you initiate editing again.
-
If you move the current cell to another column, the button will disappear from the cell in the CustType column.
-
Make a cell in the CustType column current again. This time, instead of clicking the button, click the text area of the current cell to put it in edit mode. Before the grid enters edit mode, it fires the BeforeColEdit event, and List1 appears at the right edge of the current cell as if you had clicked the in-cell button. You can use the list to select an item for data entry as in the previous steps.
This concludes Tutorial 9.