In this tutorial, you will learn how to attach a multicolumn True DBDropDown control to a grid cell. Unlike the built-in combo demonstrated in Tutorial 7, the TDBDropDown control can be bound to a Data control, which makes it ideal for data entry involving a secondary lookup table. The drop-down control appears whenever the user clicks a button within the current cell. This button appears automatically when the user gives focus to a column that has a drop-down control connected to it.
-
Start with the project constructed in Tutorial 6.
-
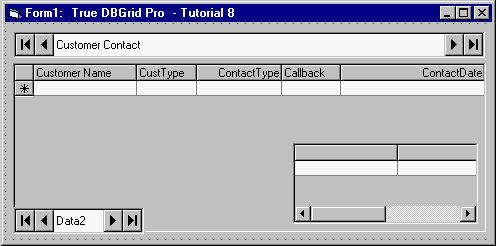
Add a True DBDropDown control (TDBDropDown1) and another Data control (Data2) to the form (Form1) as shown in the figure:
-
Set the DatabaseName property of Data2 to TDBGDemo.MDB, the RecordSource property to CustType, and the Visible property to False.
-
Set the DataSource property of True DBDropDown to Data2, and the ListField property to TypeId.
-
In the Columns property page of TDBGrid1, set the DropDown property of the CustType column to TDBDropDown1.
Modifying the True DBDropDown control
-
Right-click the True DBDropDown control to display its context menu.
-
Choose Edit to enter visual editing mode just as you would with a True DBGrid control. You can now interactively change the drop-down control's column layout.
-
Resize the first column so that it is approximately 3/8 of an inch wide.
-
Choose Properties from the visual editing menu to display the Property Pages dialog for the True DBDropDown control.
-
In the General property page, check ColumnHeaders and IntegralHeight. Clear AllowColMove, AllowColSelect, and AllowRowSizing. Set the ScrollBars property to 2 - Vertical. The IntegralHeight property is only supported by the TDBDropDown control. When set to True, it prevents the drop-down control from displaying partial rows.
-
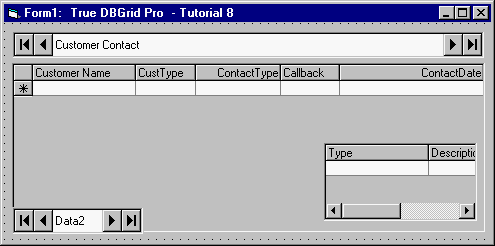
In the Columns property page, set the DataField property for Column0 to TypeId and the DataField property for Column1 to TypeDesc.
-
Set the Caption properties for Column0 and Column1 to "Type" and "Description". The form should now appear as follows.
Run the program and observe the following:
-
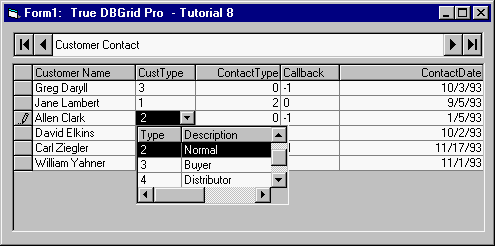
TDBGrid1 displays data from the joined table as in Tutorial 6.
-
Click a cell in the CustType column to make it the current cell as indicated by the highlight. A button will be displayed at the right edge of the cell. Click the button to display the True DBDropDown control as shown in the following figure.
-
You can use the Up Arrow and Down Arrow keys to move the highlight bar of True DBDropDown. If you click another cell in the grid, True DBDropDown will lose focus and become invisible.
-
Select any item in True DBDropDown. The current cell in the grid will be updated with the selected item, and True DBDropDown will disappear until you initiate editing again.
- If you move the current cell to another column, the button will disappear from the cell in the CustType column.
This concludes Tutorial 8.