In this tutorial, you will learn how to use the UnboundColumnFetch event to display two fields (FirstName and LastName) together in one column. You will also learn how to use an SQL statement to create a join between two tables in a database. The project we set up for this tutorial will also be used in Tutorials 7 through 12.
-
Start a new project.
-
Place a Data control (Data1) and a True DBGrid control (TDBGrid1) on the form (Form1).
-
Set the DatabaseName property of Data1 to TDBGDemo.MDB, and the RecordSource property to the following SQL statement:
SELECT * FROM Contacts INNER JOIN Customers ON Contacts.UserCode = Customers.UserCode
The Contacts table contains records of recent customer contacts, but in the table, the customers contacted are recorded by their internal UserCode only, making the table difficult to use by itself. The Customers table contains customer data such as UserCode, FirstName, LastName, and so forth. Therefore, we create a join so that we can view the recent contact information along with the corresponding customer data.
-
Set the Caption property of Data1 to "Customer Contact".
-
Set the DataSource property of TDBGrid1 to Data1.
Configuring the grid at design time
We shall configure the grid using its context menus and property pages. For more details, see Design Time Interaction.
-
Right-click the grid to display its context menu.
-
Choose Edit from the context menu. The grid will enter its visual editing mode, enabling you to interactively change the grid's row and column layout.
-
By default, the grid contains two columns. We are going to create three more. Right-click anywhere in the grid to display the visual editing menu. Choose the Append command to add a new column at the end of the grid. Execute this command two more times to create two more columns. A total of five columns are now in the grid.
-
Right-click again to display the visual editing menu. This time choose Properties to display the Property Pages dialog. Select the Columns property page by clicking the Columns tab. The tree node Columns(00) is selected. Double-click the selection or click the + to the left of Columns(00). The tree will expand to reveal the available properties for the first column, Column0, which you will configure as an unbound column. Select the Caption property, then type "Customer Name" into the text box on the right side of the page. Keep the default values for the other properties, including DataField. If the DataField property of a column is blank (that is, equal to an empty string), but its Caption property is not, True DBGrid considers it an unbound column.
-
Click the – to the left of Columns(00) to close this branch, then open the Columns(01) object. Click the DataField property to reveal a list of all the fields in the joined table. Choose CustType (the last item) from the list. The Caption property will default to the same name.
-
Repeat the previous step with the remaining three columns. Columns(02): DataField = ContactType, Column(03): DataField = Callback, Columns(04): DataField = ContactDate.
-
After configuring the five columns, click the OK button at the bottom of the Property Pages dialog to accept the changes.
-
Note that you are still in the grid's visual editing mode. Place the mouse cursor over the column dividers within the column header area. It will turn into a horizontal double-arrow cursor, indicating that column resizing can now occur. Drag the dividers (use the horizontal scroll bar to bring a column into view if necessary) so that the grid looks like the one in the following figure.
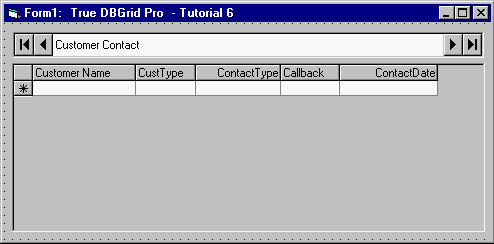
Notice that there is a gray area between the rightmost column (Contact Date) and the right edge of the grid. We can eliminate this gray area by setting the ExtendRightColumn property to True.
-
Open the Property Pages dialog again as in step 9. This time, select the Splits property page by clicking the Splits tab. Expand the Splits(00) object and double-click the ExtendRightColumn node to toggle its value. Accept the change by clicking the Apply button, which is used to commit changes without closing the dialog. The rightmost column is now extended to the right edge of the grid, which now looks like this (move the Property Pages dialog to observe if necessary).
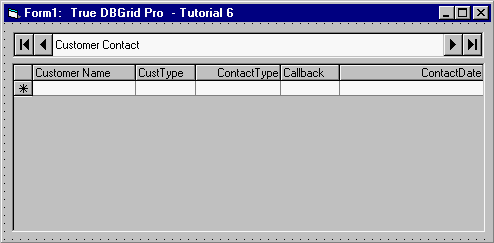
By default, the grid has one split. Although you have not created any additional splits, you are still working with the properties of the default split. The ExtendRightColumn property is on the Splits property page because each split in the grid can have a different value for this property. Properties such as this are referred to as split-specific properties.
-
Scroll down to the MarqueeStyle property and select 2 - Highlight Cell. For more information on this property, see Highlighting the Current Row or Cell.
-
Click the OK button at the bottom of the Property Pages dialog to accept the changes. You have now finished configuring the grid.
Displaying data in the unbound column
In step 9, Column0 of the grid was configured as an unbound column, so you must supply its data using the UnboundColumnFetch event. When the grid needs to display data in an unbound column, it fires this event to get the necessary data. The following code shows how to display the combined FirstName and LastName fields in the unbound column. For more information, see Unbound Columns.
-
Declare RSClone as a RecordSet in the General section of Form1 so that the RSClone variable will be available in all procedures in Form1:
Example Title Copy CodeDim RSClone As Recordset
-
In the Form_Load event, set RSClone to be a clone of Data1.Recordset. The Data1.Refresh statement is necessary to make sure Data1 is initialized before cloning its RecordSet.
Example Title Copy CodePrivate Sub Form_Load() Data1.Refresh Set RSClone = Data1.Recordset.Clone() End Sub -
Finally, define data in the unbound column by combining the FirstName and LastName fields of the RecordSet in the grid's UnboundColumnFetch event:
Example Title Copy CodePrivate Sub TDBGrid1_UnboundColumnFetch( _ Bookmark As Variant, _ ByVal Col As Integer, Value As Variant) RSClone.Bookmark = Bookmark Value = RSClone("FirstName") & " " & RSClone("LastName") End SubWhen the UnboundColumnFetch event is called, the Bookmark argument specifies which row of data is being requested by the grid. Note that Bookmark does not usually refer to the current row, since the grid displays more than one row at a time. Hence we use a clone (RSClone) to get data from the RecordSet so that we do not change the current row position of the Data control. In this example, we only have one unbound column, so we ignore the Col argument.
Run the program and observe the following:
-
TDBGrid1 displays data from the joined table according to the five columns configured at design time.
-
The first column displays the combined FirstName and LastName fields as defined in the UnboundColumnFetch event.
-
Since the MarqueeStyle is 2 - Highlight Cell, the entire cell is highlighted (not just the cell text) and there is no blinking cursor—the cell is not in edit-ready mode. If you click the current cell, it will enter edit mode with the blinking text cursor (caret) appearing at the beginning of the cell's contents. You can also initiate editing simply by typing, in which case the current cell contents will be replaced by what you type.
-
Note: The default MarqueeStyle is 6 - Floating Editor. The floating editor highlights the cell text (not the entire cell) as does the datasheet in Microsoft Access. The cell is in edit-ready mode with a blinking caret present at the beginning of the highlighted text. In this mode, you can click anywhere within the floating editor to position the insertion point.
-
The CustType, ContactType and Callback columns display numeric values which are quite cryptic to users. You might also comment that the data presentation is not so appealing. In the next three tutorials (7, 8, and 9), we will illustrate techniques to improve both the display and the user interface.
This concludes Tutorial 6.