In this tutorial, you will learn how True DBGrid interacts with other bound controls and with Visual Basic code that manipulates the same Recordset to which the grid is bound.
-
Start a new project.
-
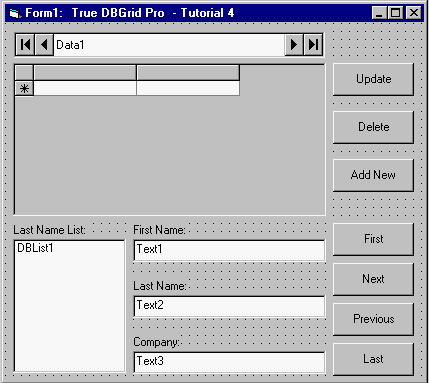
Place the following controls on the form (Form1) as shown in the figure: a Data control (Data1), a True DBGrid control (TDBGrid1), a DBList control (DBList1), three text controls (Text1 to 3), seven command buttons (Command1 to 7), and four labels (Label1 to 4).
-
Set the DatabaseName property of Data1 to TDBGDemo.MDB, and the RecordSource property to Customer.
-
Set the DataSource property of TDBGrid1 to Data1, and the AllowAddNew and AllowDelete properties to True.
-
Set the DataSource and RowSource control properties of DBList1 to Data1, and the ListField control, DataField, and BoundColumn control properties to LastName.
-
Set the DataSource properties of Text1, Text2 and Text3 to Data1, and the DataField properties to FirstName, LastName, and Company, respectively.
-
Set the Caption properties of Label1-Label4 and Command1-Command7 as shown in the preceding figure.
We will be using code to affect the record position and data of the database. The seven buttons on this form will contain all of the code we use in this tutorial (the bound controls require no code).
-
Add the following code to the Update button, Command1:
Example Title Copy CodePrivate Sub Command1_Click() ' True DBGrid will automatically respond to the update and will clear the ' "modified indicator" (the pencil icon) on the record selector column to ' indicate that the modified data has been written to the database. Data1.Recordset.Edit Data1.Recordset.Update TDBGrid1.SetFocus End Sub
This button triggers an immediate update of all modified data in the bound controls (the grid and the three text controls) without moving the current row position.
-
Add the following code to the Delete button, Command2:
Example Title Copy CodePrivate Sub Command2_Click() ' When the current record is deleted, Jet Engine leaves the record pointer at ' the deleted record. Use MoveNext to move the current record to the row after ' the deleted record. Data1.Recordset.Delete Data1.Recordset.MoveNext ' If the last record is deleted, move the current record to the last record. If Data1.Recordset.EOF = True Then Data1.Recordset.MoveLast End If TDBGrid1.SetFocus End Sub
When the current record is deleted from code, the Data control leaves the record pointer at the deleted record. Therefore, the preceding code uses the MoveNext method of the Recordset to move the current record to the row after the deleted record.
-
Add the following code to the AddNew button, Command3:
Example Title Copy CodePrivate Sub Command3_Click() ' This "Add New" button moves the cursor to the "new (blank) row" at the end ' so that user can start adding data to the new record. ' Move to last record so that "new row" will be visible. Data1.Recordset.MoveLast ' Move the cursor to the "addnew row". TDBGrid1.Row = TDBGrid1.Row + 1 TDBGrid1.SetFocus End Sub
The above code demonstrates how to move the current cell to the new (blank) row at the end so that the user can start adding data to the new record.
-
Add the following code to the First button, Command4:
Example Title Copy CodePrivate Sub Command4_Click() ' True DBGrid will follow the record movement. Data1.Recordset.MoveFirst TDBGrid1.SetFocus End SubThis button positions the record pointer to the first record in the Recordset.
-
Add the following code to the Next button, Command5:
Example Title Copy CodePrivate Sub Command5_Click() ' True DBGrid will follow the record movement. Data1.Recordset.MoveNext ' Keep the record away from EOF which is not a valid position. If Data1.Recordset.EOF = True Then Data1.Recordset.MovePrevious End If TDBGrid1.SetFocus End Sub
This button moves the current row to the next record.
-
Add the following code to the Previous button, Command6:
Example Title Copy CodePrivate Sub Command6_Click() ' True DBGrid will follow the record movement. Data1.Recordset.MovePrevious ' Keep the record away from BOF which is not a valid position. If Data1.Recordset.BOF = True Then Data1.Recordset.MoveNext End If TDBGrid1.SetFocus End Sub
This button moves the current row to the previous record.
-
Add the following code to the Last button, Command7:
Example Title Copy CodePrivate Sub Command7_Click() ' True DBGrid will follow the record movement. Data1.Recordset.MoveLast TDBGrid1.SetFocus End SubThis button positions the record pointer to the last record in the Recordset.
Run the program and observe the following:
-
Use the mouse or the keyboard to change the current row position in the grid, and observe the other bound controls (DBList and Text) changing their record positions along with the grid, even though they contain no code.
-
Click the Next, Previous, Last, and First buttons of the Data control and observe that the record positions on all bound controls are automatically synchronized.
-
Click the Next, Previous, Last, and First command buttons and observe that they have the same effects as the corresponding buttons on the Data control.
-
Modify data in a few cells (in the same row) on the grid. Press the Update command button. Observe that the modified data has been updated to the database and the pencil icon on the record selector column disappears. Other bound controls on the form now display the modified data.
-
Modify data in one or more of the Text controls. Press the Update or the Next command button. The grid will automatically update its data to reflect the new changes.
-
Move the current cell of the grid to any record you wish to delete, then click the Delete command button. The record will be deleted and disappears from the grid. The grid automatically moves the current row to the record after the deleted record. Other bound controls on the form also respond by moving their record positions.
This concludes Tutorial 4.