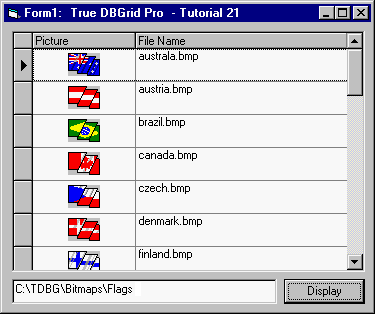
In this tutorial, you will learn how to use Style objects to display arbitrary bitmaps within grid cells. In addition to font, color, and alignment settings, Style objects support both background and foreground pictures. Background pictures can be centered, tiled, or stretched to fill the entire cell. Foreground pictures can be positioned relative to the cell text, and can also be displayed using a transparent color.
-
Start a new project.
-
Place a True DBGrid control (TDBGrid1), a command button (Command1), and a TextBox control (Text1) on the form (Form1)
-
Set the DataMode property of TDBGrid1 to 4 - Storage (the default value of this property is 0 - Bound).
-
Set the AllowUpdate property to False.
-
Right-click TDBGrid1 to display its context menu and choose the Edit option to enter the grid's visual editing mode. Place the mouse cursor over the row divider, and increase the row size to about double the current height.
-
Right-click TDBGrid1 again to display its context menu and this time choose Properties to display the Property Pages dialog.
-
Select the Columns property page by clicking the Columns tab. Set the Caption property of Columns(00) and Columns(01) to "Picture" and "File Name", respectively.
-
Select the Splits tab and expand the Splits(00) object. Set the ExtendRightColumn property to True.
-
Set the Caption property of Command1 to "Display".
Adding XArrayDB to the project
As in Tutorial 19, we will use the XArrayDB object, therefore we need to add its reference to the project.
-
Select References from the Project menu to display a list of available type library references. Select the check box labeled ComponentOne XArrayDB Object (XADB8.OCX), then press the OK button.
-
Add the following declaration to the General section of Form1:
Example Title Copy CodeDim x As New XArrayDB
-
Enter the following code in the Form_Load event:
Example Title Copy CodePrivate Sub Form_Load() ' Initially we resize the XArrayDB to 0 rows and 2 columns. x.ReDim 0, -1, 0, 1 Set TDBGrid1.Array = x ' Enable FetchCellStyle Event. TDBGrid1.Columns(0).FetchStyle = dbgFetchCellStyleColumn TDBGrid1.MarqueeStyle = dbgDottedRowBorder End Sub -
Add the following code to the Click event of Command1:
Example Title Copy CodePrivate Sub Command1_Click() Dim s As String Dim i As Integer x.ReDim 0, -1, 0, 1 i = 0 ' Fill the XArrayDB object with all bitmap file names found in this ' directory. s = Dir(Text1.Text & "\*.bmp") While s <> "" If s <> "." And s <> ".." Then x.ReDim 0, x.UpperBound(1) + 1, 0, 1 x(i, 1) = s i = i + 1 End If s = Dir Wend ' Reinitialize the grid. TDBGrid1.Bookmark = Null TDBGrid1.ReBind End Sub -
Enter the following code in the FetchCellStyle event:
Example Title Copy CodePrivate Sub TDBGrid1_FetchCellStyle( _ ByVal Condition As Integer, ByVal Split As Integer, _ Bookmark As Variant, ByVal Col As Integer, _ ByVal CellStyle As TrueDBGrid80.StyleDisp) Dim PathFileName As String ' Full Path file name of a picture. PathFileName = Text1.Text & "\" & _ TDBGrid1.Columns(1).CellText(Bookmark) ' Load the picture CellStyle.BackgroundPicture = LoadPicture(PathFileName) End Sub
Run the program and observe the following:
-
True DBGrid is initially displayed with no rows. In the text box, type the name of a directory containing bitmap files (with a .bmp extension), then press the Display button. The grid will display pictures in the first column and their filenames in the second.

-
You have created a fully functional bitmap browser with just a few lines of code.
For more information, see Applying Pictures to Grid Elements.
This concludes Tutorial 21.