In this tutorial, you will learn how to bind True DBGrid to a Visual Basic Data control and create a fully functional database browser without writing a single line of code. You will also learn about the basic properties associated with the Data control and True DBGrid. You will then be able to run the program and observe the run-time features of the grid.
-
Start a new project.
-
From the Visual Basic Project menu, select Components, then check the box labeled ComponentOne True DBGrid Pro 8.0. Click OK to add the TDBGrid (and TDBDropDown) control icons to the toolbox. The TDBGrid icon looks like this:

-
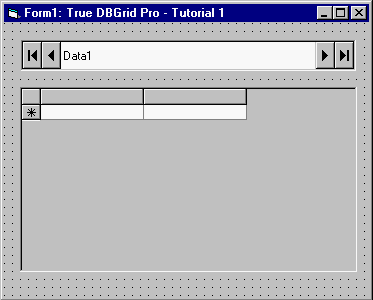
Place a Data control (Data1) and a True DBGrid control (TDBGrid1) on the form (Form1) as shown in the following figure.

-
Set the DatabaseName property of Data1 to TDBGDemo.MDB, and the RecordSource property to Composer.
-
Set the DataSource property of TDBGrid1 to Data1.
-
Set the AllowAddNew and AllowDelete properties of TDBGrid1 to True (note that the default value of AllowUpdate is True).
Run the program and observe the following:
-
True DBGrid retrieves the database schema information from the Data control and automatically configures itself to display all of the fields contained in the database table. Note that the field names are used as the default column headings.
-
True DBGrid automatically communicates with the Data control. Any actions taken on the Data control will be reflected in the grid. Click the navigation buttons on the Data control to move forward a record, back a record, to the last record, and to the first record. Note that the grid's current record stays in sync with the Data control.
-
You have created a fully functional database browser without writing a single line of code!
Refer to Run Time Interaction and try out the instructions for navigating, editing, and configuring the grid at run time.
To end the program, press the End button on the Visual Basic toolbar.
OLE DB support:
True DBGrid also supports OLE DB data sources such as the ADO Data Control (ADODC). The following steps demonstrate how to create a simple database browser using the ADO Data Control.
-
Start a new project.
-
From the Visual Basic Project menu, select Components, then check the boxes labeled ComponentOne True DBGrid Pro 8.0 (OLEDB) and Microsoft ADO Data Control (OLEDB). Click OK to add the selected control icons to the toolbox. The TDBGrid icon looks like this:

-
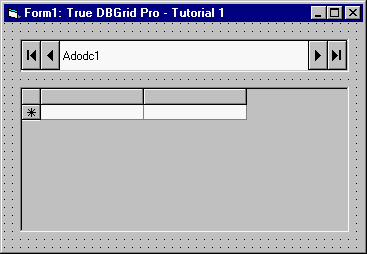
Place an ADO Data control (Adodc1) and a True DBGrid control (TDBGrid1) on the form (Form1) as shown in the following figure.

-
Display the custom property pages for Adodc1. Click the General tab and select the Use Connection String option. Click Build. The Microsoft OLE DB Provider for ODBC Drivers option should be highlighted. Click Next. Enter the datasource name (C:\Program Files\ComponentOne Studio\Common\TDBGDEMO.MDB) in the Use Data source name text box. You do not have to enter a user name or password. Test the connection to make sure it works. Close the dialog window.
Click the OK button to close the property page. -
Set the CommandType property to 2 - adCmdTable.
-
Set the RecordSource property to Composer.
-
Set the DataSource property of TDBGrid1 to Adodc1.
-
Set the AllowAddNew and AllowDelete properties of TDBGrid1 to True (note that the default value of AllowUpdate is True).
Congratulations, you have successfully completed Tutorial 1!