This tutorial demonstrates how you can use the drag-and-drop features of True DBGrid to drag data from one grid and drop it into another.
-
Start a new project.
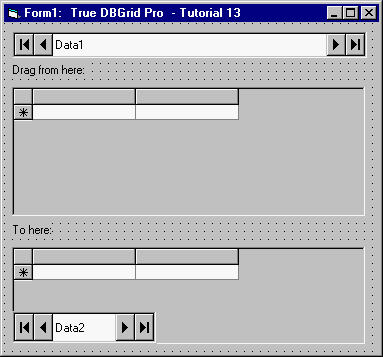
Place two Data controls (Data1 and Data2), two True DBGrid controls (TDBGrid1 and TDBGGrid2), and two Labels (Label1 and Label2) on the form (Form1) as shown in this figure:
-
Set the DatabaseName property of Data1 and Data2 to TDBGDemo.MDB, the RecordSource property of Data1 to Customers, and the RecordSource property of Data2 to CallList.
-
Set the DataSource property of TDBGrid1 to Data1, and the DataSource property of TDBGrid2 to Data2.
-
Set the DragIcon property of TDBGrid1 to ARW09LT.ICO, which can be found in the BITMAPS subdirectory of the True DBGrid installation directory, or in the ICONS\ARROWS subdirectory of the Visual Basic installation directory.
-
Set the Visible property of Data2 to False.
-
Set the Caption property of Label1 to "Drag from here:" and the Caption property of Label2 to "To here:".
Configuring the grids at design time
We shall configure TDBGrid1 and TDBGrid2 at design time using techniques described in previous tutorials. We will only briefly outline the steps below. If you are not familiar with the basic techniques, please refer to Tutorial 6 and Design Time Interaction before continuing.
-
Right-click TDBGrid1 to display its context menu. Choose Retrieve Fields to configure TDBGrid1's layout to the RecordSet defined by the RecordSource property of Data1.
-
Right-click TDBGrid1 again to display its context menu. This time choose Edit to enter the grid's visual editing mode.
-
Use the visual editing menu to delete the following columns from TDBGrid1: UserCode, Contacted, and CustType. To delete a column, first select it by clicking its header, then right-click the grid to display the visual editing menu, then select Delete from the menu.
-
Adjust the column widths of the grid (by dragging the column dividers in the column header area) so that all columns will fit within the grid's display area.
-
Right-click the grid to display the visual editing menu and choose Properties to display the Property Pages dialog. On the Splits page, expand Splits(00) and set the MarqueeStyle property to 1 - Solid Cell Border. On the Columns page, expand Column3 (Phone) and select its NumberFormat node. Type (###)###-#### into the combo box labeled Selection or String. The grid's NumberFormat property provides the same functionality as Visual Basic's Format function.
-
Repeat steps 8, 9, and 11 with TDBGrid2. Omit step 10 since we want to keep all three columns (Customer, Phone, and CallDate) in the grid.
-
Right-click the grid to display the visual editing menu and choose Properties to display the Property Pages dialog. On the Splits page, expand Splits(00) and set the MarqueeStyle property to 1 - Solid Cell Border. On the Columns page, expand Column1 (Phone) and set the NumberFormat property to (###)###-#### as in step 12. Then expand Column2 (CallDate) and set the NumberFormat property to MM/DD HH:NNa/p.
-
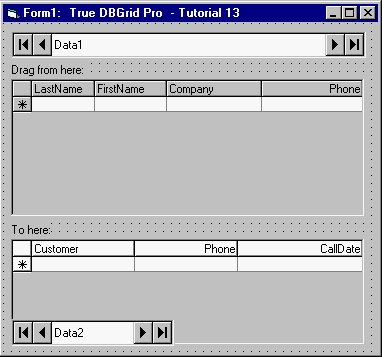
Click the OK button at the bottom of the Property Pages dialog to accept the changes. The grids on your form should now look like this.
If you choose, you can also set the ExtendRightColumn property of both grids to True (on the Splits property page) to eliminate the gray area between the rightmost column and the grid's right border.
Adding code to your project
This section describes the code needed to drag the contents of a cell or row from TDBGrid1 to TDBGrid2. The code assumes that if you drag from the Phone column, you want to drag only the phone number data to another cell in TDBGrid2. If you drag from any other column, however, the code assumes that you want to drag the entire row of data to TDBGrid2 in order to add a new record there.
-
Add the following subroutine to your project to reset the MarqueeStyle property of each grid, which is used to provide visual feedback while dragging is in progress. The reset routine will be called to perform clean-up after a drag-and-drop operation concludes.
Private Sub ResetDragDrop()
' Turn off drag-and-drop by resetting the highlight and data control caption.
If TDBGrid1.MarqueeStyle = dbgSolidCellBorder Then Exit Sub
TDBGrid1.MarqueeStyle = dbgSolidCellBorder
TDBGrid2.MarqueeStyle = dbgSolidCellBorder
Data1.Caption = "Drag a row, or just phone #"
End Sub
-
The DragCell event is fired when dragging is initiated in a grid cell. The following code prepares for dragging data from the cell:
Private Sub TDBGrid1_DragCell(ByVal SplitIndex As Integer, _
RowBookmark As Variant, ByVal ColIndex As Integer)
' DragCell is triggered when True DBGrid detects an attempt to drag data from a cell.
' Set the current cell to the one being dragged.
TDBGrid1.Col = ColIndex
TDBGrid1.Bookmark = RowBookmark
' See if the starting cell is in the "Phone" column.
Select Case TDBGrid1.Columns(ColIndex).Caption
Case "Phone"
' Highlight the phone number cell to indicate data from the cell
' is being dragged.
TDBGrid1.MarqueeStyle = dbgHighlightCell
Data1.Caption = "Dragging phone number..."
Case Else
' Highlight the entire row to indicate data from the entire row is
' being dragged.
TDBGrid1.MarqueeStyle = dbgHighlightRow
Data1.Caption = "Create new call when dropped..."
End Select
' Use Visual Basic manual drag support.
TDBGrid1.Drag vbBeginDrag
End Sub
-
The following code provides different visual feedback to the user when dragging over TDBGrid2:
Private Sub TDBGrid2_DragOver(Source As Control, _
X As Single, Y As Single, State As Integer)
' DragOver provides different visual feedback as we are dragging a row, or just the phone number.
Dim dragFrom As String
Dim overCol As Integer
Dim overRow As Long
dragFrom = TDBGrid1.Columns(TDBGrid1.Col).DataField
Select Case State
Case vbEnter
If dragFrom = "Phone" Then
TDBGrid2.MarqueeStyle = dbgHighlightCell
Else
TDBGrid2.MarqueeStyle = dbgNoMarquee
End If
Case vbLeave
TDBGrid2.MarqueeStyle = dbgHighlightCell
Case vbOver
If dragFrom = "Phone" Then
overCol = 1
Else
overCol = TDBGrid2.ColContaining(X)
End If
overRow = TDBGrid2.RowContaining(Y)
If overCol >= 0 Then TDBGrid2.Col = overCol
If overRow >= 0 Then TDBGrid2.Row = overRow
End Select
End Sub
-
When data is dropped on TDBGrid2, we either update the Phone column of TDBGrid2 or add a new record:
Private Sub TDBGrid2_DragDrop(Source As Control, _
X As Single, Y As Single)
' Allow phone drops right into the cell, other drops cause a new row to be added.
If TDBGrid1.Columns(TDBGrid1.Col).Caption = "Phone" Then
TDBGrid2.Columns(TDBGrid2.Col).Value = _
TDBGrid1.Columns(TDBGrid1.Col).Value
Data2.UpdateRecord
Else
Data2.Recordset.AddNew
Data2.Recordset!CallDate = Now
Data2.Recordset!Phone = Data1.Recordset!Phone
Data2.Recordset!Customer = Data1.Recordset!FirstName & _
" " & Data1.Recordset!LastName & ", " & _
Data1.Recordset!Company
Data2.Recordset.Update
Data2.Recordset.MoveLast
End If
ResetDragDrop
End Sub
-
The following code performs clean-up when the mouse returns to TDBGrid1 with the button up:
Private Sub TDBGrid1_MouseMove(Button As Integer, _
Shift As Integer, X As Single, Y As Single)
' If the button is up and we get MouseMove, that means we exited the form
' and tried to drop elsewhere. Reset the drag upon returning.
If Button = 0 Then ResetDragDrop
End Sub
Run the program and observe the following:
-
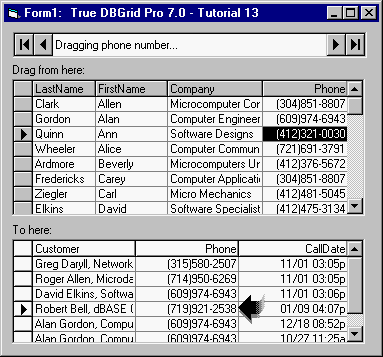
Hold down the left mouse button and drag from a cell in the Phone column of TDBGrid1. As you start dragging, the cell becomes current and is highlighted. The mouse pointer turns into the drag icon specified in step 5.
-
As you drag over TDBGrid2, the current cell in TDBGrid2 moves to the Phone column and is also highlighted. The current (highlighted) cell of TDBGrid2 stays in the Phone column and moves up and down with the drag motion as depicted here.
-
If you drop (release the left mouse button) on a row in TDBGrid2, the phone number from the highlighted cell in TDBGrid1 will be copied to the phone number column of the row where the drop occurs.
-
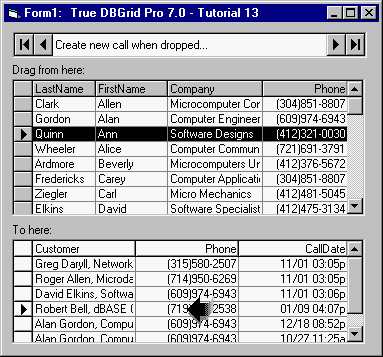
If you start dragging from a column in TDBGrid1 other than the Phone column, the entire row in TDBGrid1 is highlighted, indicating that the entire row of data is being dragged.
-
As you drag over TDBGrid2, the current cell marquee (a solid border around the cell) disappears as in the following figure.
-
If you drop the data on TDBGrid2, a new record is created using the data from the current row of TDBGrid1.
This concludes Tutorial 13.