This tutorial demonstrates the correlation between control properties and True DataControl expressions. For instance, if a button should be enabled if, and only if, a variable Name is nonempty, why not set the button’s Enabled property in the Properties window to:
| Example Title |
Copy Code
|
|---|---|
Name <> ""
|
|
Unfortunately, Visual Basic does not support this, but True DataControl does!
-
Start a new project.
-
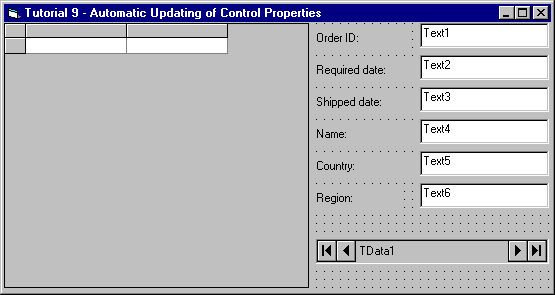
Place the following controls on the form (Form1) as shown in the figure: a TData control (TData1), a DataGrid control (DataGrid1), six TextBox controls (Text1 to 6) and six labels (Label1 to 6).
-
Set properties as follows (you can use the DataSource property page to set TData data source properties, as described in Tutorial 1):
Example Title Copy CodeTData1.ConnectionString Provider=Microsoft.Jet.OLEDB.3.51;Persist Security Info=False;Data Source=C:\Program Files\ComponentOne Studio\Common\TDDEMO.MDB TData1.CommandType 2 – adCmdTable TData1.RecordSource Orders DataGrid1.DataSource TData1 Text1.DataSource TData1 Text1.DataField OrderID Text2.DataSource TData1 Text2.DataField RequiredDate Text3.DataSource TData1 Text3.DataField ShippedDate Text4.DataSource TData1 Text4.DataField ShipName Text5.DataSource TData1 Text5.DataField ShipCountry Text6.DataSource TData1 Text6.DataField ShipRegion
Set the label captions as shown in the picture.
-
Open the True DataControl property pages for TData1 and go to the Property Expressions page. The Available Controls tree displays a hierarchical outline of all controls existing on your form. Expand some of them by clicking the plus sign (+) or pressing the plus sign on the numeric keypad. Properties that return objects (such as Font) can be expanded further to reveal their constituent properties. Select and expand the Label6 control. Next, select its Caption property. The name of the property, Label6.Caption, will appear in the Property text box. Press the New button or select New from the context menu to enable the Value Expression edit control and its adjacent ellipsis button.
-
Type the following text into the Value Expression text box:
Example Title Copy CodeIIF(ShipCountry = "USA", "State:", "Region:")
The following setting is added to the properties area in the left part of the page:
Example Title Copy CodeLabel6.Caption = IIF(ShipCountry = "USA", "State:", "Region:")
Here IIF(Condition, Value1, Value2) returns Value1 if Condition is True and Value2 otherwise. This is all you need to make the Caption property of Label6 assume one of two values according to the value of the ShipCountry field of TData1. The caption will be automatically set to State: when ShipCountry = ”USA” and Region: when ShipCountry <>“USA”.
-
Add two more property expressions following the steps above:
Example Title Copy CodeText3.Font.Bold = RequiredDate - ShippedDate < 10 Text2.BackColor = IIF(RequiredDate - ShippedDate > 20, &H000000FF&, &H80000005&)
Press Apply to save the changes.
-
Go to the Fields property page and change the order of fields by dragging the ShipCountry field and dropping it before the EmployeeID field. This operation is not essential for our tutorial; it is intended only to make the ShipCountry field appear in the grid before fields that are less relevant.
Run the Program and Observe the Following:
-
Set focus to the grid and press the down arrow key several times to visit several records following the first. Observe that ShippedDate is displayed in bold, and RequiredDate is displayed on a red background in accordance with the conditions specified at design time in Step 6. Select a record where ShipCountry = USA and observe that the label below Country changes from Region: to State: as specified in Step 5.
-
Please note that this tutorial was performed without requiring you to write a single line of code!
-
An important consideration is that you can use this feature of True DataControl not only in database applications, but in building any kind of application with a user interface. It is often difficult to keep all properties of all controls in sync with one another and with the constraints and conditions the application logic dictates. True DataControl property expressions can make such interfaces simpler, more reliable, and easier to maintain.
Close the program. You have successfully completed Tutorial 9.