In this tutorial, you will learn how to make a TData control the data source of data-bound controls, such as DataGrid and TextBox. You will also learn how to use the True DataControl property pages to perform the basic tasks of defining database connection and TData fields. You will be able to run the program and observe its run-time behavior.
-
Start a new project.
-
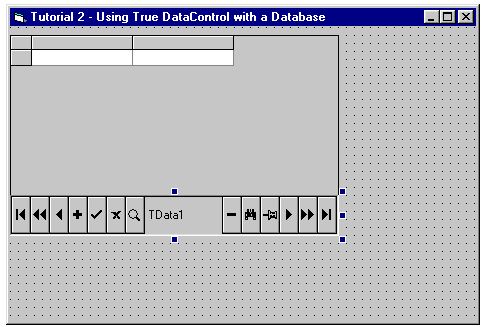
Place an ComponentOne True DataControl 8.0 (TData1) and a Microsoft DataGrid Control 8.0 OLEDB (DataGrid1) on the form (Form1) as shown in the illustration:
-
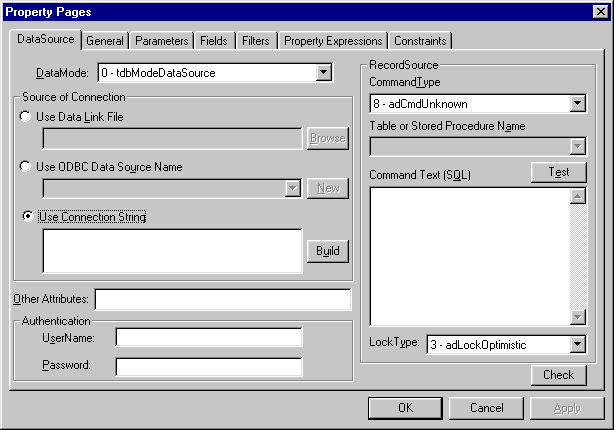
Select TData1, and click the right mouse button over it to open the control's context menu. Select the TData Properties option. This will open the True DataControl property pages dialog, where you can view and edit the properties of TData1. The dialog looks like this:

Note: As you will soon realize, in most cases there is no need to write Visual Basic code if you are building your application with True DataControl, which promotes codeless application development, because instead of writing code, you will specify properties and expressions in the True DataControl property pages. -
Establish a database connection for the TData control.
If you are familiar with the standard ADO data control (Microsoft ADODC) included with Visual Basic 6.0, you will find much commonality between them when specifying a database connection. In True DataControl, this is done in the DataSource property page.
Press the Build button on the DataSource property page. This will bring up the Data Link Properties dialog, with four tabs in it. Select the Provider tab to display the list of all available OLE DB providers installed on your system. Select the Microsoft Jet 3.51 OLE DB Provider and click the Connection tab. Here you can Select or enter a database name: select the C:\Program Files\ComponentOne Studio\Common\TDDEMO.MDB database file using the ellipsis button on the right side of the edit box. Press the Test connection button to make sure the database connection is specified correctly. Now press the OK button to close the Data Link Properties dialog. The following text now appears in the text box:
Example Title Copy CodeProvider=Microsoft.Jet.OLEDB.3.51;Persist Security Info=False;Data Source=C:\Program Files\ComponentOne Studio\Common\TDDEMO.MDB
The same text appears in the ConnectionString property of the TData1 control in the Visual Basic Properties window. You have specified the ConnectionString property, which defines the database connection for a TData control.
-
Once you have selected a database, you also need to specify the exact source of your data within the database. This is called the RecordSource in True DataControl, and consists of two properties: CommandType and RecordSource. Select 2 – adCmdTable in the CommandType combo box, then select Customers in the Table or Stored Procedure Name combo box. The page now looks like this:
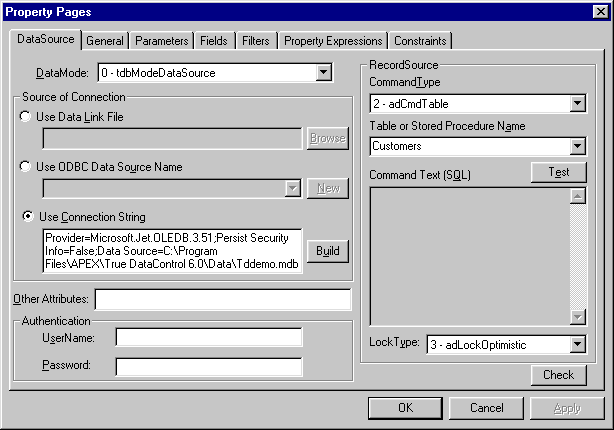
You can see that the RecordSource property in the Visual Basic Properties window is now set to Customers. Press the Test button on the DataSource property page to make sure your database connection and RecordSource are correct. You should see the following message: Test RecordSource succeeded.
-
Instead of using the DataSource property page controls, you can directly enter all necessary property settings in the Visual Basic Properties window. So far, we have specified the following settings:
Example Title Copy CodeTData1.ConnectionString Provider=Microsoft.Jet.OLEDB.3.51;Persist Security Info=False;Data Source=C:\Program Files\ComponentOne Studio\Common\TDDEMO.MDB TData1.CommandType 2 - adCmdTable TData1.RecordSource Customers
-
Select the General property page, and check all the check boxes in the Buttons group there. We want all available buttons on the TData control visible for our tutorial example. Click the OK button. Set the Tooltips property of TData1 to True in the Visual Basic Properties window.
-
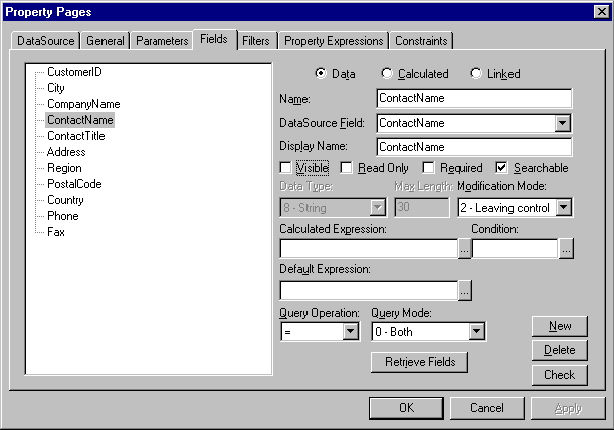
Select the Fields property page. Since you have already defined the database connection and RecordSource, you will see all fields of the Customers table. In this example, we need to expose three fields: CustomerID, CompanyName, and City. To do this, one at a time select each of the other fields in the data source tree-view window, and clear the Visible check box for all of them. An empty check box means that the field is accessible to your TData control, but is not exposed to controls that are bound to it.
-
To change the field order from that of the database table, drag and drop the field names. For example, press the left mouse button over the City field name. Without releasing the button, move your mouse to the CompanyName field position, then release the button. The City field is now visibly positioned before the CompanyName field.
-
Close the property pages by clicking the OK button or by pressing Enter. This will save the changes you have just made for TData1. The changes are saved in the control and not to your hard disk. They will be saved to your hard disk, however, when you save the form. The Apply button saves changes without closing the property pages. Select the Cancel button to discard any changes. As with all other controls, moving between property pages implicitly applies changes.
-
Set the DataSource property of DataGrid1 to TData1. This binds the DataGrid1 control to the TData1 control. TData1 becomes the data source for the grid. Set the grid’s AllowAddNew and AllowDelete properties to True.
Run the Program and Observe the Following:
-
DataGrid1 displays data from the Customers table: CustomerID, City, and CustomerName. There is one column for each TData field marked as Visible in the property pages.
-
TData1 has thirteen buttons on it, providing useful functions that you otherwise would have had to implement with tedious manual coding. These include data management functions, such as AddNew, Delete, Update, Cancel, and two standard dialogs: Find and Bookmarks. All buttons have tooltips, so you can easily identify them. Try the Find and Bookmarks buttons. The Find dialog is easy to use and self-explanatory. To use the Bookmarks dialog, press the Bookmarks button, enter a bookmark name and press Add. Repeat this on different data rows. You will see several bookmarks listed in the Bookmarks dialog. You can jump to any of these bookmarks pressing the Go To button.
-
Try the True DataControl query mode. This is a powerful feature that adds a lot to your application without requiring a single line of code. Press the Query button on the TData control. This will switch it to query mode: DataGrid1 becomes empty and contains one data row. Add another row to DataGrid1 and enter the following data in the two rows: CompanyName = B's Beverages in the first row and City = Rio de Janeiro in the second row. Press the Query button again to leave query mode. You will see that the query is applied and its result, four rows of data, appears in DataGrid1. Go back to query mode by pressing the Query button, and delete the first row (CompanyName = B's Beverages) from the grid. Apply the query pressing the Query button again; you will see that the result has changed accordingly. Returning to query mode, enter Hanari Carnes in the CompanyName field in the same row. Switch to the result mode, and you will see that now there is only one row satisfying the query. In formal querying terms, the query conditions are connected with the logical operator AND when they belong to the same row in query mode. Different rows in query mode are connected with OR.
Close the program. Congratulations, you have successfully completed Tutorial 2!
You will learn more about True DataControl's power in the following tutorials. This tutorial was intended to familiarize you with basic usage and to provide a glimpse of True Rapid Application Development.