In this tutorial you will see how easy it is to take an existing project that uses the ADO Data Control and replace it with the True DataControl.
1. The ADO folder under Tutorial 1 in the Tutorials directory contains a project with simple master detail relationship between two grids using the ADO data control. Open and run this project and observe the behavior of the Composition grid as you scroll through the Composers grid with the mouse, the arrow keys, or the data control.
2. Delete both ADO data controls from the project, and add two TData controls as shown.

Note: Remember to deselect the ADO data controls from the components window after removing them from the form.
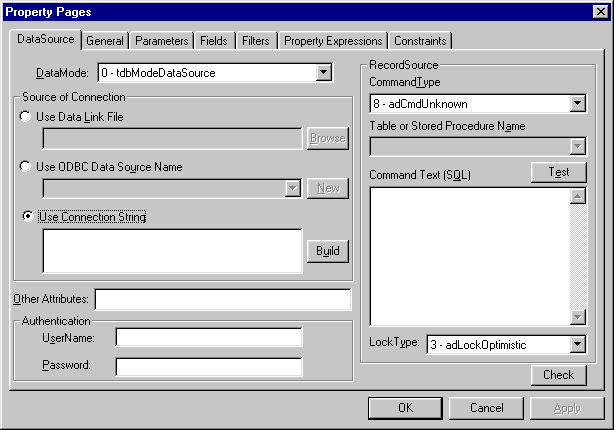
3. Select TData1, and click the right mouse button over it to open the control's context menu. Select the TData Properties option. This will open the True DataControl property pages dialog, where you can view and edit the properties of TData1. The dialog looks like this:
4. Establish a database connection for the TData1 control.
If you are familiar with the standard ADO data control (Microsoft ADODC) included with Visual Basic 6.0, you will find much commonality between them in specifying database connection. In True DataControl, this is done in the DataSource property page.
Press the Build button on the TData1 DataSource property page. This will bring up the Data Link Properties dialog, with four tabs in it. Select the Provider tab to display the list of all available OLE DB providers installed on your system. Select the Microsoft Jet 3.51 OLE DB Provider and click the Connection tab. Here you can Select or enter a database name: select the C:\Program Files\ComponentOne Studio\Common\TDDEMO.MDB database file using the ellipsis button on the right side of the edit box. Press the Test connection button to make sure the database connection is specified correctly. Now press the OK button to close the Data Link Properties dialog. The following text now appears in the text box:
Provider=Microsoft.Jet.OLEDB.3.51;Persist Security
Info=False;Data Source=C:\Program Files\ComponentOne Studio\Common\TDDEMO.MDB
The same text appears in the ConnectionString property of the TData1 control in the Visual Basic Properties window. You have specified the ConnectionString property, which defines the database connection for a TData control.
5. Once you have selected a database, you also need to specify the exact source of your data within the database. This is called the RecordSource in True DataControl, and consists of two properties: CommandType and RecordSource. Select 2 – adCmdTable in the CommandType combo box, then select Composer in the Table or Stored Procedure Name combo box. The page now looks like this:

You can see that the RecordSource property in the Visual Basic Properties window is now set to Composer. Press the Test button on the DataSource property page to make sure your database connection and RecordSource are correct. You should see the following message: Test RecordSource succeeded.
6. Repeat Steps 3 - 5 for TData2, selecting Opus in the Table or Stored Procedure Name combo box. Go to the Fields property page of TData2, click on the Last field and clear its visible property. The TData2 control will still have full access to the field Last, but no control bound to it will be able to access it. In the DataSource Property Tab for TData2, the Table or Stored Procedure Name should be set to Opus. Two additional steps are also required: DataGrid1 DataSource property must be set to TData1 and DataGrid2 DataSource property must be set to TData2.
7. Delete the DataGrid1_RowColChange event from the project.
Private Sub DataGrid1_RowColChange(LastRow As Variant, _
ByVal LastCol As Integer)
We will replace this with event with a Range Condition that we will set from the TData2 Fields property page.
8. Open the True DataControl property page for TData2 and select the General page. On the General page select TData1 in the Master combo box. This step will enable us to create the original master-detail relationship that we had previously created through code using the ADO data controls.
9. On the TData2 Fields property page, select the Last field. Click the right mouse button over the Last field and select New Range Condition from the menu. An empty range condition for the Last field will now appear with controls for entering the condition now visible in the right part of the page. Go to the Value Expression text box and type the following expression:
TData1.Last
This will create a Last = TData1.Last range condition for the TData2 field Last. Click the OK button, and then close the Property Pages dialog.
10. We will now replace the last references to ADO objects in our project with references to True DataControl objects. In the Option Explicit statement, replace: Dim Flds As ADODB.Fields with Dim Flds As TrueData60Ctl.Fields. In the Form_Load event, replace Set Flds = Adodc1.Recordset.Fields with Set Flds = TData1.Fields.
11. In the TData2_WillOpenData event, add the following code to synchronize the caption of the detail grid with the current record in the master grid.
DataGrid2.Caption = "The compositions of " & _
Flds("First").Value & " " & Flds("Last").Value.
Note: We could have achieved the same effect without any code for this by using the Property Expressions page of TData2 to set the caption of DataGrid2 without code. Tutorial 9 addresses this in detail.
Run the Program and Observe the Following:
· Moving between records on the Composers grid by clicking with the mouse button or navigating with the arrow keys will cause the corresponding detail records to display in the Compositions grid. The caption of the grid also changes to reflect the current record in the master grid.
· Please note that establishing the master-detail relationship between the grids was done without requiring a single line of code!
Close the program. You have successfully completed Tutorial 1.