This tutorial demonstrates the main features of the C1DbNavigator control. It is primarily used to navigate through data source rows, but it can also be used to perform common actions on data such as adding rows, confirming changes, updating the data source, refreshing from the data source (canceling changes), and others.
- Create a new Windows Application project.
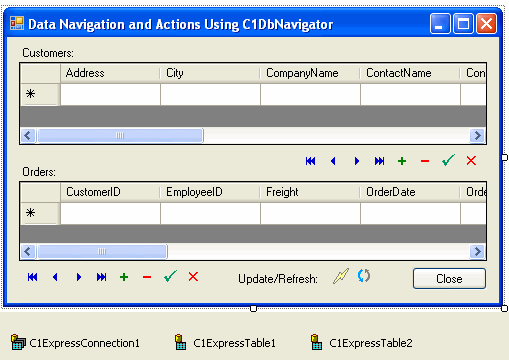
- Place the following components on the form as shown in the figure:
- C1ExpressConnection (C1.Data.Express.C1ExpressConnection)
- C1ExpressTable1-2 (C1.Data.Express.C1ExpressTable)
- C1Label1-3 (C1.Win.C1Input.C1Label)
- DataGridView1-2 (System.Windows.Forms.DataGridView)
- C1DbNavigator1-3 (C1.Win.C1Input.C1DbNavigator)
- Button1 (System.Windows.Forms.Button)
- From the Properties window, set the following properties for the C1Label and Button controls:
Control Property Value C1Label1 TextDetached True Text Customers: C1Label2 TextDetached True Text Orders: C1Label3 TextDetached True Text Update/Refresh: Button1 Name btnClose Text Close - Select the C1ExpressConnection1 component, go to the Properties window, open the ConnectionString property. Add the following to the ConnectionString property: Provider=Microsoft.Jet.OLEDB.4.0;Data Source="Documents\ComponentOne Samples\Common\C1NWind.mdb".
- Set the properties of C1ExpressTable1-2 as follows:
Control Property Value C1ExpressTable1 ConnectionComponent C1ExpressConnection1 DbTableName Customers C1ExpressTable2 ConnectionComponent C1ExpressConnection1 DbTableName Orders - Also, you need to set the AutoIncrement property of the OrderID field in C1ExpressTable2, otherwise you will not be able to update data in the database: Select C1ExpressTable2, press the ellipsis button in the Properties window for the Fields property to open the Fields dialog box, select the OrderID field and set its AutoIncrement property to ClientAndServer. This is necessary because OrderID is an autoincrement field in the database, so it must be treated accordingly by C1DataExpress.
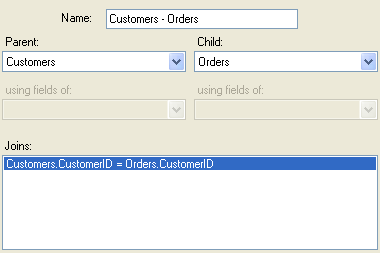
Create a master-detail relation between C1ExpressTable1 (master) and C1ExpressTable2 (detail):
- Press the ellipsis button in the Relations property of the C1ExpressionConnection1 control to open the Relations dialog box.
- In the dialog box, select Customers for Parent, Orders for Child, add a join with CustomerID for both Parent field and Child field, press OK to close the Relations dialog box.
- To bind controls to the data source, set the following properties:
Control Property Value DataGridView1 DataSource C1ExpressConnection1 DataMember _Customers C1DbNavigator1 DataSource C1ExpressConnection1 DataMember _Customers DataGridView2 DataSource C1ExpressConnection1 DataMember _Customers.Customers – Orders C1DbNavigator2 DataSource C1ExpressConnection1 DataMember _Customers.Customers – Orders - Now C1DbNavigator1 allows us to navigate the master table Customers, and the detail table Orders. However, we want some more functionality for our navigator control. We want the user to be able to perform common data action pressing navigator buttons. Using the VisibleButtons property, show the following buttons for C1DbNavigator1-2: Add, Delete, Apply, Cancel. By default, a navigator control also shows the current row number and row count. To save space, hide this information be setting the PositionVisible property to False.
- The third navigator control, C1DbNavigator3 is used to perform update and refresh for the whole data set (both tables Customers and Orders). To hide redundant navigator fields and buttons, set PositionVisible to False and select only two buttons, Update and Refresh in the VisibleButtons property. Update and Refresh buttons do not have built-in functionality, since their function may be different with different data sources. To make them work, you need to write code in event handlers. Create the following event handlers:
To write code in Visual Basic
Visual Basic Copy CodePrivate Sub C1DbNavigator3_UpdateData(ByVal sender As System.Object, ByVal e As System.EventArgs) Handles C1DbNavigator3.UpdateData Me.C1ExpressConnection1.Update() End Sub Private Sub C1DbNavigator3_RefreshData(ByVal sender As System.Object, ByVal e As System.EventArgs) Handles C1DbNavigator3.RefreshData Me.C1ExpressConnection1.Fill() End SubTo write code in C#
C# Copy Codeprivate void c1DbNavigator3_UpdateData(object sender, System.EventArgs e) { this.c1ExpressConnection1.Update(); } private void c1DbNavigator3_RefreshData(object sender, System.EventArgs e) { this.c1ExpressConnection1.Fill(); } - Navigator buttons can be monochrome, color (ColorButtons property set to True) or changing their color when hovered over (ColorWhenHover property set to True). They can also be three-dimensional (standard) or flat depending on the ButtonStyle property. Set the following properties:
Control Property Value C1DbNavigator1 ButtonStyle Standard C1DbNavigator1.ColorButtons True C1DbNavigator2 ButtonStyle Standard ColorButtons True C1DbNavigator3 ButtonStyle Standard ColorButtons True Using properties UIStrings and ButtonToolTips, it is also possible to change the text displayed in the navigator and to change button ToolTips. For instance, we could specify the first button ToolTip as “Select the first customer” instead of the default “First record”. These properties can also be used to localize your application.
Run the program and observe the following:
- By pressing the navigator buttons, you can move through the rows. If you press the Next button and hold it for a certain time (determined by the MoveDelayFirst property), the current position will change automatically with frequency determined by the MoveDelayNext property.
- You can jump to any row number by typing the number in the navigator position area in C1DbNavigator1. You can also use arrow keys and mouse wheel in that area to move to next or previous rows. HOME and END keys move to the first and last row. PAGE UP and PAGE DOWN keys or mouse wheel with CTRL key pressed to page through the rowset.
- If you change the value in a grid cell and press Cancel, the modified value will revert to the original value.
- You can add new rows with the Add button and delete rows with the Delete button.
- You can send changes to the database with Update button and re-fetch data from the database (discarding the changes you may have made) with the Refresh button.